Microsoft Entra ID API-driven provisioning
👋 Introduction
In today's fast-paced digital world, lots of organisations still rely on manual processes to create and manage user accounts. This not only takes up valuable time but also increases the risk of errors and inefficiencies. Fortunately, with the arrival of automatic provisioning through Microsoft Entra ID, businesses can make their user management processes more streamlined, enhancing productivity and security. This article delves into the use and benefits of Microsoft Entra's API-driven user provisioning.
❓ What is API-driven provisioning?
API-driven provisioning in Entra ID allows organisations to automate the synchronisation of users and groups from different sources (e.g. HR-Systems) to Active Directory or to Entra ID itself. This method supports integration with any source that can send the appropriate requests, enabling organisations to bridge the gap between their HR-Systems and their identity management systems in a cloud or hybrid environment. It improves control over data processing and transformation, ensuring accurate and timely updates.
📎 How does it work?
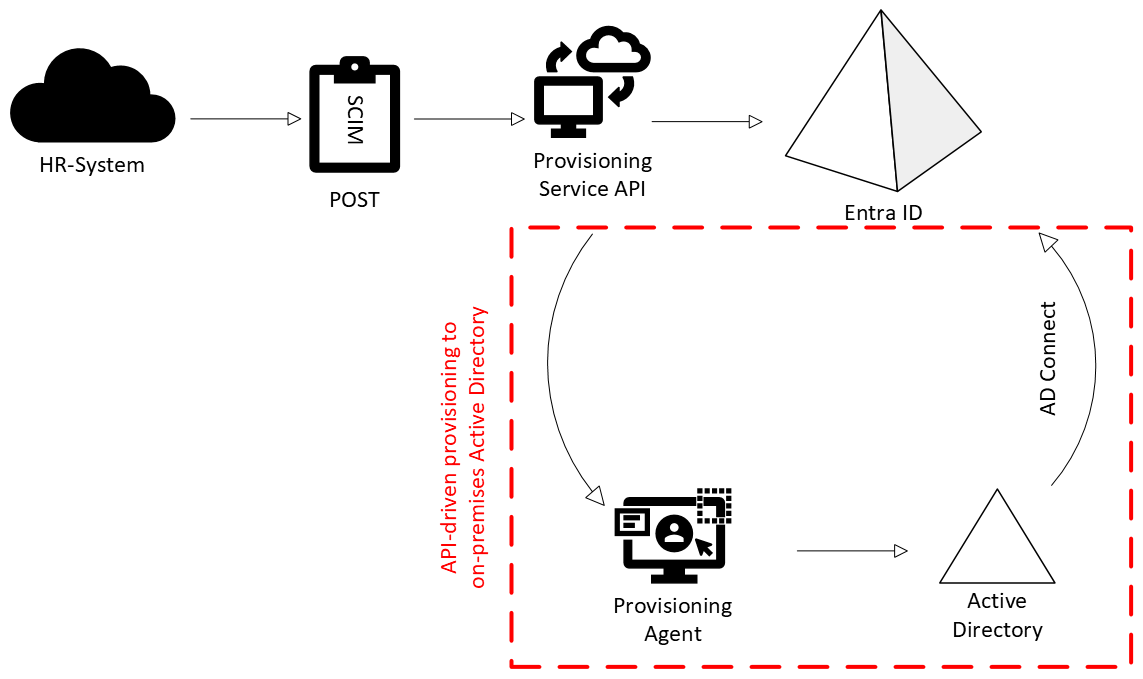
The process involves the HR-System (or any other source) sending the data that needs to be provisioned in SCIM format to the provisioning service via an API. The provisioning service then uses configured mappings to map the data to Entra ID. If you are using hybrid identities, the same thing happens, except that instead of going directly to Entra, the data goes from the provisioning API to the provisioning agent, which in turn maps it to the local Active Directory.
INFO
What is SCIM (System for Cross-domain Identity Management)?
SCIM is a protocol that standardizes how identity information is exchanged between one entity and another. It’s an open standard and is widely used to simplify the process of granting people or groups access to cloud-based applications.
Learn more here.
🔨 Implementation
In the following example, I will show how to implement API-driven provisioning in Entra ID.
Prerequisites
- Application Administrator (if you're configuring inbound user provisioning to Microsoft Entra ID) OR
- Application Administrator + Hybrid Identity Administrator (if you're configuring inbound user provisioning to on-premises Active Directory)
INFO
If you're configuring inbound user provisioning to on-premises Active Directory, you need access to a Windows Server where you can install the provisioning agent for connecting to your Active Directory domain controller.
Prepare the source
First we need a source for our data. For this you would normally use a HR-System.
INFO
If you use a big one like Workday or SuccessFactors you can provision an Enterprise app direcctly from the App Gallery in Entra ID and skip the API-driven provisioning part.
As an example you can find the following apps in the App Gallery:- Workday to Microsoft Entra ID User Provisioning
- Workday to Active Directory User Provisioning
- SuccessFactors to Microsoft Entra ID User Provisioning
- SuccessFactors to Active Directory User Provisioning
For our porpuse we use a 3rd Party HR-System which we have registered as an application in Entra ID. (Identity -> Applications -> App registrations -> New registration.)
Next we need to give the necessary permissions to our HR source, so it can authenticate savely when posting the SCIM Packages.
To do that go to the Microsoft Entra admin center and open Identity -> Applications -> App registrations -> [Your App].Now select 'API permissions' and 'Add a permission'.
- Microsoft APIs -> Microsoft Graph -> Application permissions -> SynchronizationData-User.Upload
- Microsoft APIs -> Microsoft Graph -> Application permissions -> AuditLog.Read.All
And then 'Grant admin consent for [your tenant name]'.
With that the Application`s Service Principal has the necessary permissions to POST the SCIM packages to the API.
If you want to use a Managed Identity instead, you can use this Link to see how.
Creating the inbound API-driven provisioning App
- Go to the Microsoft Entra admin center and sign in with your account.
- Select Identity -> Applications -> Enterprise applications -> New application.
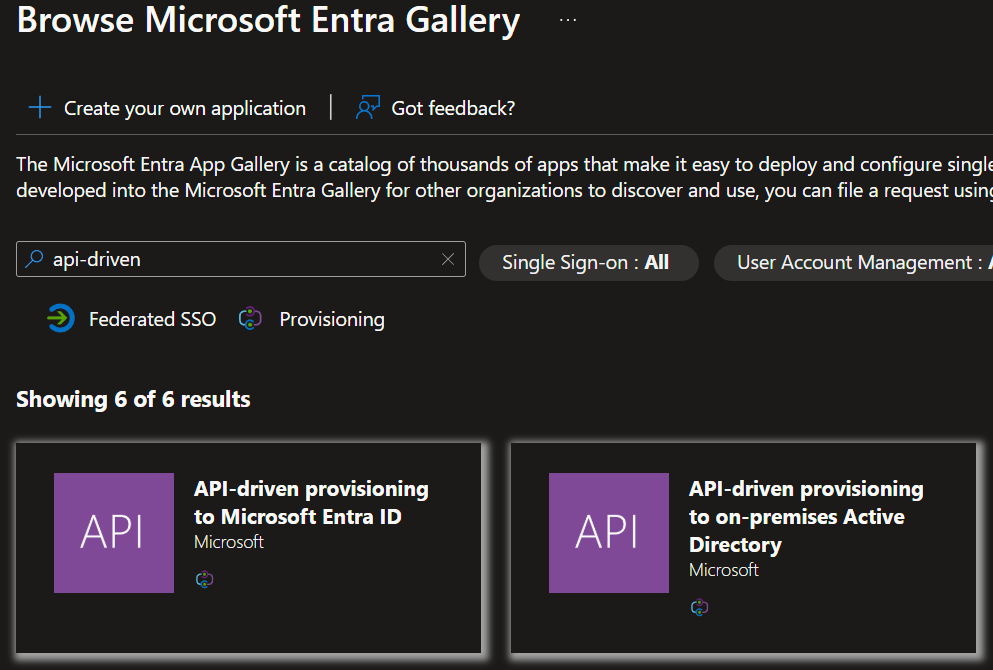
- Enter 'api-driven' in the search field, then select the application for your setup.
- API-driven provisioning to on-premises Active Directory: Select this app if you're provisioning hybrid identities from your HR-System.
- API-driven provisioning to Microsoft Entra ID: Select this app if you're provisioning cloud-only identities from your HR-System.
- Open the application and select 'Provisioning' -> 'Get started'.
- Now select 'Automatic' under Provisioning mode and click 'Save'.
INFO
If you provision to an on-premises Active Directory, you need to provide the Domain Name and default OU you want to use for the provisioning.
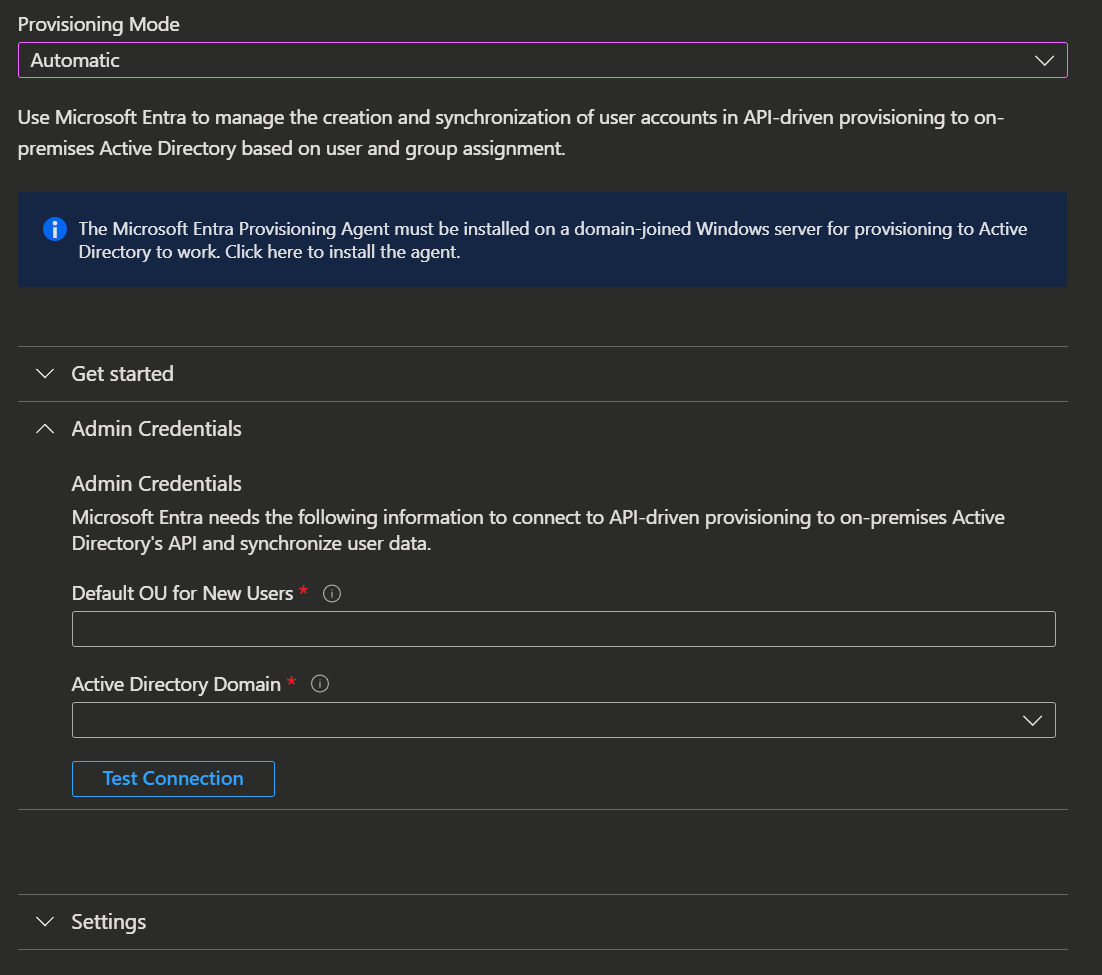
In addition you need to install the Microsoft Entra provisioning agent on a Windows Server that can connect to your domain controller, so it can provision accounts to your local domain. Learn how to install the provisioning agent here.
- After saving a new section appears called 'Mappings', where we can configure the attributes that are sent from your source to Microsoft Entra ID.
- Now open the 'Mappings' section and click on the Mapping Configuration.
(Provision API urn:ietf:params:scim:schemas:extension:enterprise:2.0:Users)
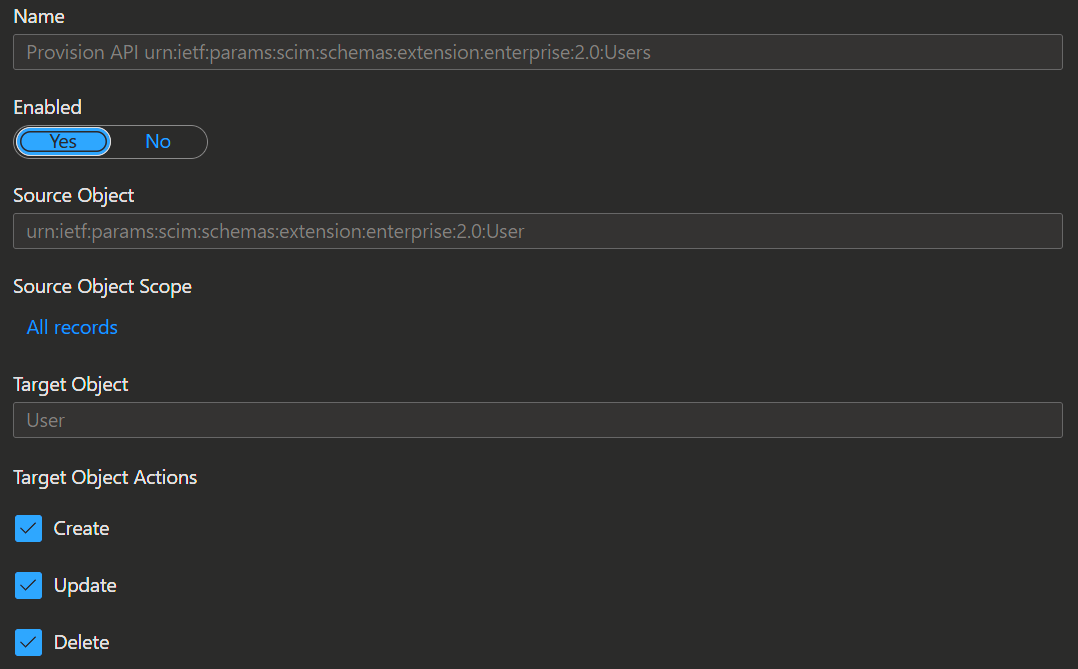
- In the top section of the 'Attribute Mapping' you find the following options:
- Enabling button
- Source Object Scope
- Target Object Actions
Details
- Enabling button:
Enables the Attribute Mapping. - Source Object Scope:
In the source object scope, you can filter which inbound Data is in scope for provisioning. - Target Object Actions:
Here you can select which actions are allowed to be performed by this provisioning App.- Create
- Update
- Delete
- The bottom section is where the mapping is done. Here you can find the Microsoft standards for user provisioning. You can edit these and add new custom mappings.
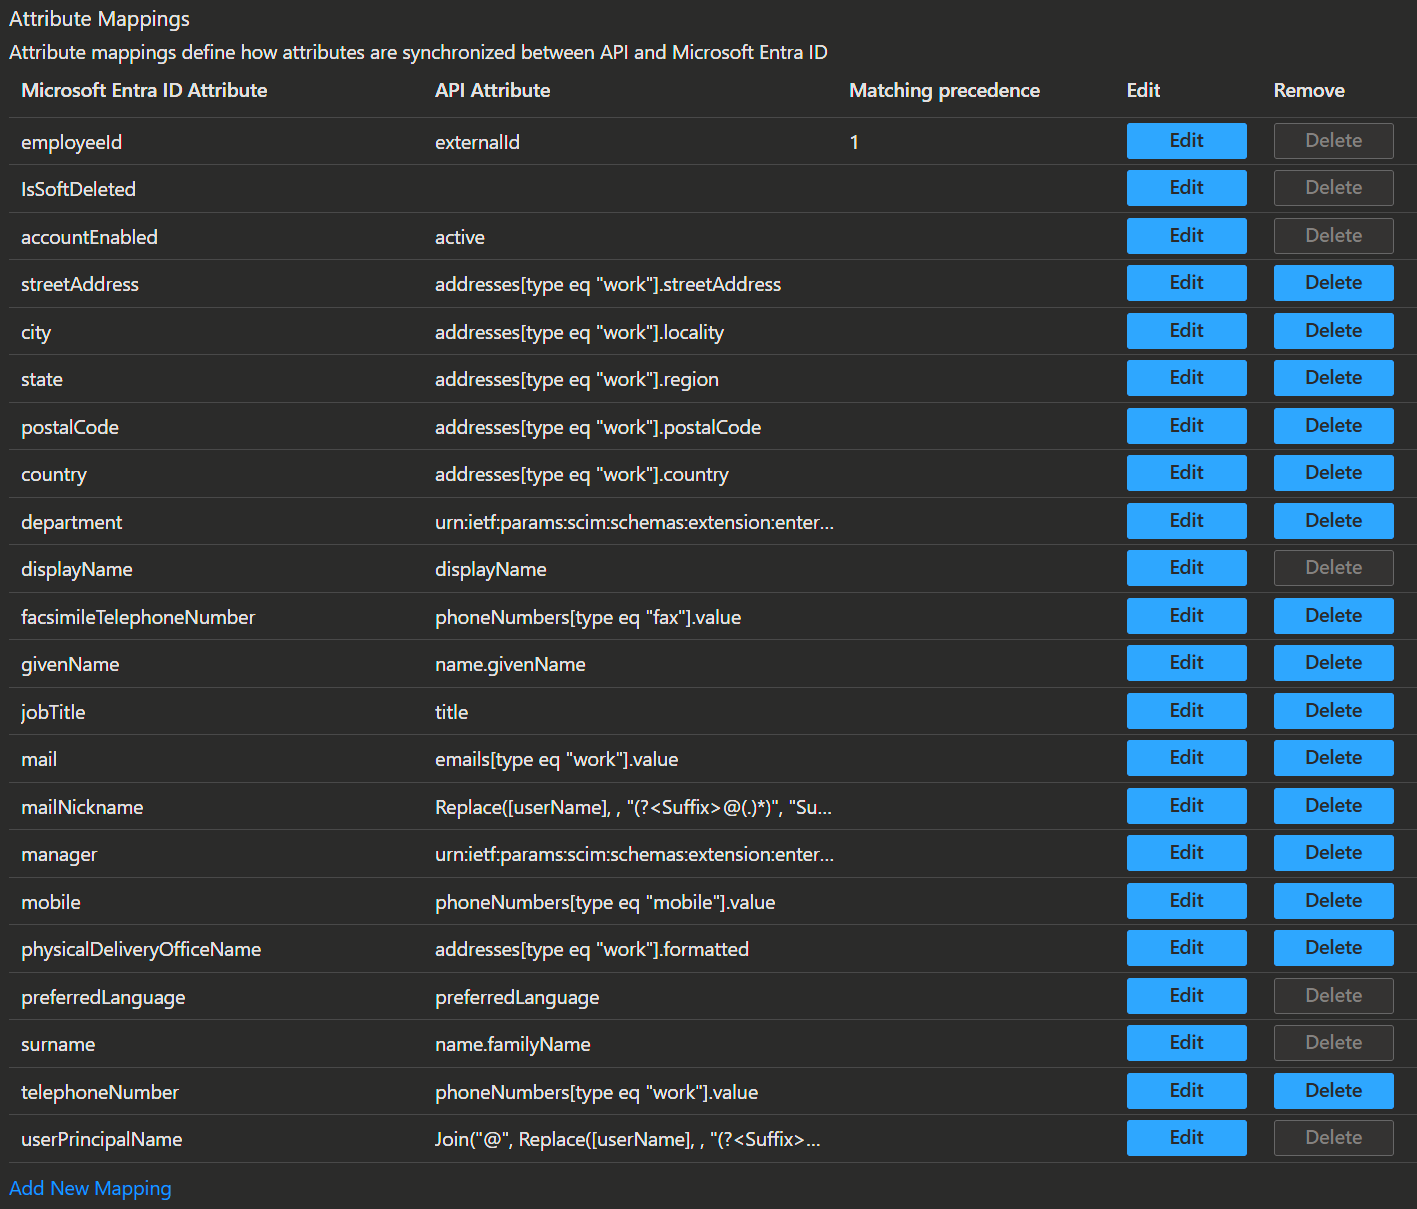
- To add a new mapping, click on the 'Add New Mapping' button in the bottom.
Details
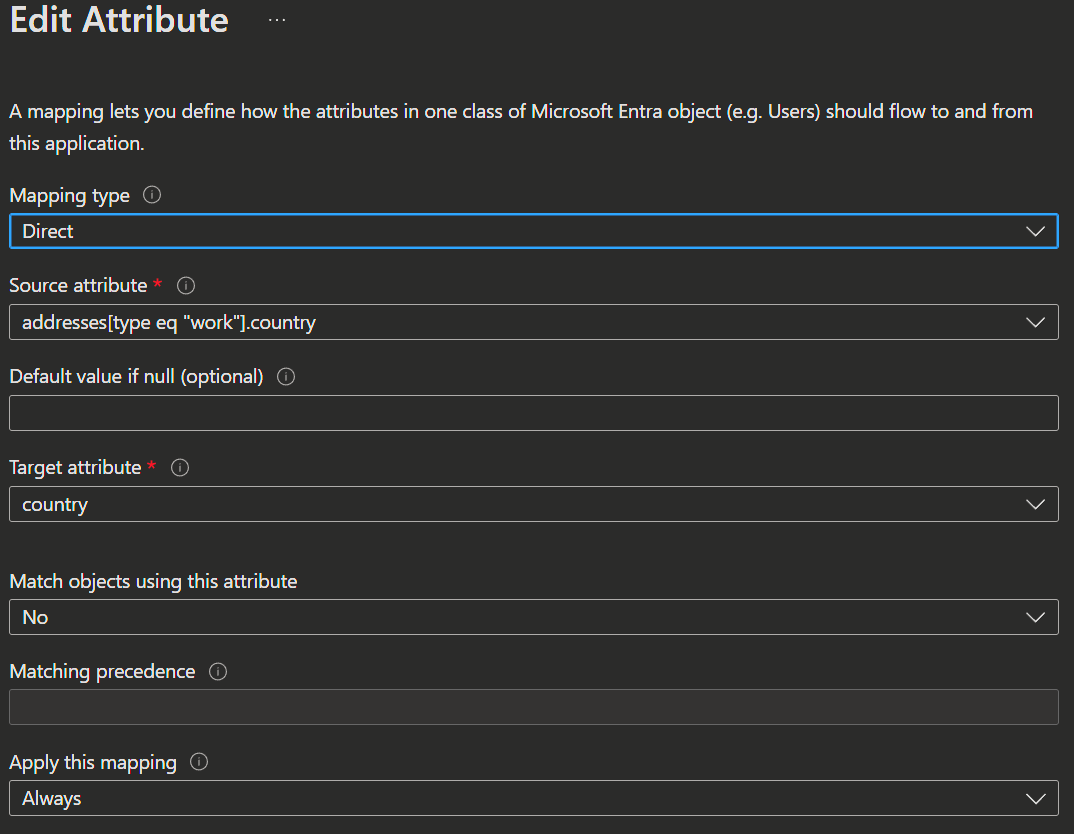
Mapping Types:
- Direct: The target attribute is populated with the attribute value of the linked object in the source system.
- Constant: The target attribute is populated with a specific constant string.
- Expression: The target attribute is populated based on the result of a script-like expression (see Information about the 'expression builder' below).
- None: The target attribute is left unmodified (if empty, its populates with the default value).
Source attribute:
The user attribute from the source system (HR-System).Default value if null (optional):
The value that is passed to the target system if the source attribute is null.Target attribute:
The user attribute in the target system (Entra ID).Match objects using this attribute:
Whether this mapping should be used to uniquely identify users between the source and target systems.Matching precedence:
Matching precedence define in which order source objects are matched with target objects. The system will try to find the object in the target using the rule with priority 1, if not found it will use the rule with priority 2, and so on. As soon as a match is found, no further matching attributes are evaluated. While you can set as many matching attributes as you would like, consider whether the attributes you're using as matching attributes are truly unique and need to be matching attributes.Apply the mapping:
- Always: Apply this mapping on both user creation and updates.
- Only if attribute contains multiple values: Apply this mapping only if the attribute contains multiple values.
- Only during object creation: Apply this mapping only on user creation.
IMPORTANT
Attribute Matching
- Matching attributes should be unique: Attributes such as userPrincipalName, mail, or object ID are good fits as matching attributes.
- Multiple attributes can be used as matching attributes: Defining multiple attributes to be evaluated when matching users, and the order in which they're evaluated, can be advantageous if you're using a matching attribute that could be empty, such as an email address.
- The value in the source and the target don't have to match exactly: The value in the target can be a function of the value in the source. So, one could have an emailAddress attribute in the source and the userPrincipalName in the target for example (Or use the expression builder like in the example below).
- Matching based on a combination of attributes isn't supported: Most applications don't support querying based on two properties, therefore this solution doesn't either.
- All users must have a value for at least one matching attribute: If you only define one matching attribute, this attribute can never be empty in the source system.
In Addition you got the checkbox 'Show advanced options' at the bottom. When you check this, you get the additional options to:
- edit attribute list for API: With this you can edit your list of attributes that appear in the source and target attribute lists.
- use the expression builder: With this you can create script-like attributes, that transform attributes from the source with a 'mini script expression'.
Details
Expression:
Append([userPrincipalName], ".test")
INPUT: (userPrincipalName): "John.Doe@contoso.com"
OUTPUT: "John.Doe@contoso.com.test"- review your schema: With this you can review, download, and edit your schema in JSON format.
Don`t forget to save when you are done with the Attribute Mapping.
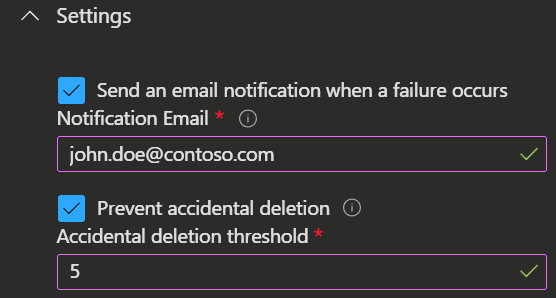
In the Provisioning Screen right below the Mappings, you can find additional settings where you can configure:
- Email notification when a failure occurs
- Accidental deletion threshold
Now, please ensure that the Provisioning Status is set to 'On' at the bottom of the page and then click 'Save'.
And finally you can go back to the 'Overview' in the Provisioning screen and click 'Start Provisioning'. This starts the provisioning engine and the API endpoint waits to be called by your source.
💡 Conclusion
Great job! You have successfully prepared a source system to send new users to your Entra environment and created an API endpoint that is ready to receive and process these requests.
Before you go all in, it's a good idea to start with a few test users. This way, you can make sure everything is working smoothly and catch any issues early. Keep an eye on the logs and notifications to spot any problems.
Remember, a successful provisioning system needs regular monitoring and tweaking.
With API-driven provisioning, you can simplify user management, cut down on manual work, and keep your data consistent across all your apps. This not only makes things more efficient but also improves the user experience.
Happy provisioning!