Configure Windows Server security baselines with OSConfig

👋 Introduction
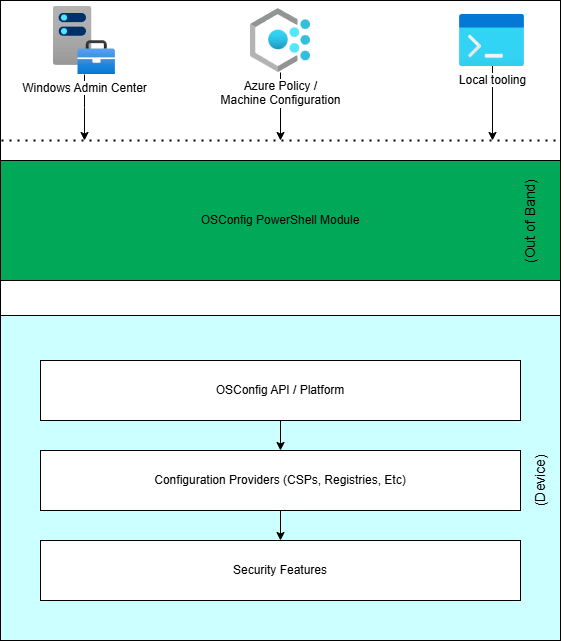
OSConfig is a handy tool that simplifies security configuration by using scenarios to quickly set up and manage your devices, whether they're on-premises or connected through Azure Arc. At its core, OSConfig combines PowerShell cmdlets, built-in APIs, and scenario definitions to help you define and maintain the desired state of your systems. Think of OSConfig as a built-in feature of Windows Server that makes configuring your devices easier.
Here are some of the key highlights of the security baselines:
- Secured-Core: UEFI MAT, Secure Boot, Signed Boot Chain
- Protocols: TLS Enforced 1.2+, SMB 3.0+, Kerberos AES
- Credential protection: LSASS/PPL
- Account and password policies
- Security policies and security options
One of the coolest things about OSConfig is its drift control feature. It keeps your system locked into a secure, known good state. Once you enable it, OSConfig takes care of any unexpected changes by automatically fixing them. It does this through a refresh task that runs in the background, so you don’t have to worry about your system drifting away from its desired configuration.
IMPORTANT
Currently OSConfig securits baselines only support Windows Server 2025.
💾 Installation
Open a PowerShell session as an Administrator and use the following command to install the needed Module
Install-Module -Name Microsoft.OSConfig -Scope AllUsers -Repository PSGallery -Force🧑🔧 Configuration
Configure the security baselines
- To set up the security baseline using Desired State Configuration (DSC), just run the commands below.
- Make sure to open PowerShell as an Administrator to get the necessary permissions.
# To apply the baseline for a domain-joined device, run the following command:
Set-OSConfigDesiredConfiguration -Scenario SecurityBaseline/WS2025/MemberServer -Default

# To apply the baseline for a device that's in a workgroup, run the following command:
Set-OSConfigDesiredConfiguration -Scenario SecurityBaseline/WS2025/WorkgroupMember -Default

# To apply the baseline for a device that's configured as the DC, run the following command:
Set-OSConfigDesiredConfiguration -Scenario SecurityBaseline/WS2025/DomainController -Default

# To apply the secured-core baseline for a device, run the following command:
Set-OSConfigDesiredConfiguration -Scenario SecuredCore -Default

# To apply the Microsoft Defender Antivirus baseline for a device, run the following command:
Set-OSConfigDesiredConfiguration -Scenario Defender/Antivirus -Default# To verify that the baseline for a domain-joined device is properly applied, run the following command:
Get-OSConfigDesiredConfiguration -Scenario SecurityBaseline/WS2025/MemberServer
# To verify that the baseline for a device that's in a workgroup is properly applied, run the following command:
Get-OSConfigDesiredConfiguration -Scenario SecurityBaseline/WS2025/WorkgroupMember
# To verify that the baseline for a device that's configured as the DC is properly applied, run the following command:
Get-OSConfigDesiredConfiguration -Scenario SecurityBaseline/WS2025/DomainController
# To verify that the secured-core baseline for a device is properly applied, run the following command:
Get-OSConfigDesiredConfiguration -Scenario SecuredCore
# To verify that the Microsoft Defender Antivirus baseline for a device is properly applied, run the following command:
Get-OSConfigDesiredConfiguration -Scenario Defender/Antivirus# To remove the baseline for a domain-joined device, run the following command:
Remove-OSConfigDesiredConfiguration -Scenario SecurityBaseline/WS2025/MemberServer
# To remove the baseline for a device that's in a workgroup, run the following command:
Remove-OSConfigDesiredConfiguration -Scenario SecurityBaseline/WS2025/WorkgroupMember
# To remove the baseline for a device that's configured as the DC, run the following command:
Remove-OSConfigDesiredConfiguration -Scenario SecurityBaseline/WS2025/DomainController
# To remove the secured-core baseline for a device, run the following command:
Remove-OSConfigDesiredConfiguration -Scenario SecuredCore
# To remove the Microsoft Defender Antivirus baseline for a device, run the following command:
Remove-OSConfigDesiredConfiguration -Scenario Defender/Antivirus# To obtain the desired configuration details for the specified scenario, use the following commands.
# The output appears in a table format that includes the name of the configuration item, its compliance status, and the reason for noncompliance.
# To check the compliance details for a domain-joined device, run the following command:
Get-OSConfigDesiredConfiguration -Scenario SecurityBaseline/WS2025/MemberServer | ft Name, @{ Name = "Status"; Expression={$_.Compliance.Status} }, @{ Name = "Reason"; Expression={$_.Compliance.Reason} } -AutoSize -Wrap
# To check the compliance details for a workgroup device, run the following command:
Get-OSConfigDesiredConfiguration -Scenario SecurityBaseline/WS2025/WorkgroupMember | ft Name, @{ Name = "Status"; Expression={$_.Compliance.Status} }, @{ Name = "Reason"; Expression={$_.Compliance.Reason} } -AutoSize -Wrap
# To check the compliance details for the DC baseline, run the following command:
Get-OSConfigDesiredConfiguration -Scenario SecurityBaseline/WS2025/DomainController | ft Name, @{ Name = "Status"; Expression={$_.Compliance.Status} }, @{ Name = "Reason"; Expression={$_.Compliance.Reason} } -AutoSize -Wrap
# To check the compliance details for the secured-core baseline, run the following command:
Get-OSConfigDesiredConfiguration -Scenario SecuredCore | ft Name, @{ Name = "Status"; Expression={$_.Compliance.Status} }, @{ Name = "Reason"; Expression={$_.Compliance.Reason} } -AutoSize -Wrap
# To check the compliance details for the Microsoft Defender Antivirus baseline, run the following command:
Get-OSConfigDesiredConfiguration -Scenario Defender/Antivirus | ft Name, @{ Name = "Status"; Expression={$_.Compliance.Status} }, <span>@{ Name = "Reason"; Expression={$_.Compliance.Reason} } -AutoSize -WrapIMPORTANT
- When you apply or remove a security baseline, a restart is required for changes to take effect.
- When you customize a security baseline, a restart is required for changes to take effect, depending on which security features you modified.
- During the removal process, when security settings are reverted, changing these settings back to their premanaged configuration isn't guaranteed. It depends on the specific settings within the security baseline. This behavior aligns with the capabilities that the Microsoft Intune policies provide. To learn more, see details below.
Remove a security baseline assignment
When a security baseline setting no longer applies to a device, or settings in a baseline are set to Not configured, those settings on a device might not revert to a premanaged configuration depending on the settings in the security baseline. The settings are based on CSPs, and each CSP can handle the change removal differently.
Other processes that might later change settings on the device include a different or new security baseline, device configuration profile, Group Policy configurations, or manual edit of the setting on the device.
Customize security baselines
After you complete the security baseline configuration, you can modify the security settings while maintaining control.
Customizing the security values allows for more control of your organization's security policies, depending on your environment's specific needs.
EXAMPLE
The ability to copy and paste files from RDP sessions is disabled.
If you need to use this function on a member server, run the following command and then reboot your device:
Set-OSConfigDesiredConfiguration -Scenario SecurityBaseline/WS2025/MemberServer -Name RemoteDesktopServicesDoNotAllowDriveRedirection -Value 0Below you find the Desired State Configuration (DSC) scenarios u can use in the configuration of your machines.
You can drill down into the scenarios below, to find a list (CSV) of settings to customize.
| Scenario | Description |
|---|---|
| AppControl | Application Control for Business allows organizations to control which drivers and applications are allowed to run on their Windows clients |
| AppControl\WS2025\AppBlockList\Audit | A default (block list) Application Control for Business policy (audit mode) for Windows Server 2025. |
| AppControl\WS2025\AppBlockList\Enforce | A default (block list) Application Control for Business policy (enforce mode) for Windows Server 2025. |
| AppControl\WS2025\DefaultPolicy\Audit | A default Application Control for Business policy (audit mode) for Windows Server 2025. |
| AppControl\WS2025\DefaultPolicy\Enforce | A default Application Control for Business policy (enforce mode) for Windows Server 2025. |
| Defender\Antivirus | Recommendations by Microsoft to secure configurations for Microsoft Defender Antivirus. |
| SecuredCore | Secured-core is a collection of capabilities that offers built-in hardware, firmware, driver and operating system security features. |
| SecuredCoreState | Secured-core state is a read-only collection of capabilities to display built-in hardware, firmware, driver and operating system security features. |
| SecurityBaseline\Server\2022\DomainController | Recommendations by Microsoft to secure configurations for Windows Server 2022 machines in the Domain Controller role. |
| SecurityBaseline\Server\2022\MemberServer | Recommendations by Microsoft to secure configurations for Windows Server 2022 machines in the Member Server role. |
| SecurityBaseline\Server\2022\WorkgroupMember | Recommendations by Microsoft to secure configurations for Windows Server 2022 machines in the Workgroup Member role. |
| SecurityBaseline\WS2025\DomainController | Recommendations by Microsoft to secure configurations for Windows Server 2025 machines in the Domain Controller role. |
| SecurityBaseline\WS2025\MemberServer | Recommendations by Microsoft to secure configurations for Windows Server 2025 machines in the Member Server role. |
| SecurityBaseline\WS2025\WorkgroupMember | Recommendations by Microsoft to secure configurations for Windows Server 2025 machines in the Workgroup Member role. |
| SSH | Recommendations by Microsoft to secure OpenSSH server configurations for Windows Server machines |
NOTE
Microsoft also provides a part of the individual settings here.
Drift control
Drift control is one of OSConfig's standout features. It keeps your system in a secure, known good state by automatically fixing any changes that stray from the desired configuration. This happens through a background refresh task that runs quietly in the system.
# Gets the drift control enable status and refresh period
get-osconfigdriftcontrol

# Sets the drift control refresh period on the system to 45 Minutes
set-osconfigdriftcontrol 45
If multiple "authorities" are used to manage the same settings (like Group Policy and OSConfig), you must remove one of the sources if the parameters are different. Otherwise conflicts are expected, because the settings will keep constantly changing between sources.
For cloud or Azure Arc-enabled resources, OSConfig uses an orchestrator to ensure everything works smoothly.
Each authority gets a precedence order, which determines who has the final say.
This order applies not just to configurations but also to whether drift control is enabled for each authority or even for specific scenarios.
- Cloud authority (Azure Policy)
- Local authority (Windows Admin Center and Windows PowerShell)
- Any other deployment tool
Configure App Control
App Control for Business is a software-based security layer that reduces the risk of attack by enforcing an explicit list of software that's allowed to run.
- Audit mode: Allows untrusted code to run while events are logged.
- Enforcement mode: Disallows untrusted code from running while events are logged.
CAUTION
Flight-signed (pre-release or test) binaries are not permitted. If you don't do this, you won't be able to start your device.
# To configure the default App Control policies in audit mode, open PowerShell as admin and run the following command:
Set-OSConfigDesiredConfiguration -Scenario AppControl\WS2025\DefaultPolicy\Audit -Default
Set-OSConfigDesiredConfiguration -Scenario AppControl\WS2025\AppBlockList\Audit -Default

# To configure the default App Control policies in enforcement mode, open PowerShell as admin and run the following command:
Set-OSConfigDesiredConfiguration -Scenario AppControl\WS2025\DefaultPolicy\Enforce -Default
Set-OSConfigDesiredConfiguration -Scenario AppControl\WS2025\AppBlockList\Enforce -Default# To verify that the App Control policy was applied, run the following command and select the Enter key twice:
citool -lp | findstr /I "WS2025"
# If you configured policies in audit mode, you should expect the following output:
- Friendly Name: BlockUMCI_Microsoft_WS2025_Audit
- Friendly Name: AllowMicrosoft_WS2025_Audit
# If you configured policies in enforcement mode, you should expect the following output:
- Friendly Name: BlockUMCI_Microsoft_WS2025_Enforce
- Friendly Name: AllowMicrosoft_WS2025_Enforce# To remove the default App Control policies from audit mode, open PowerShell as admin and run the following command:
Remove-OSConfigDesiredConfiguration -Scenario AppControl\WS2025\DefaultPolicy\Audit
Remove-OSConfigDesiredConfiguration -Scenario AppControl\WS2025\AppBlockList\Audit
# To remove the default App Control policies from enforcement mode, open PowerShell as admin and run the following command:
Remove-OSConfigDesiredConfiguration -Scenario AppControl\WS2025\DefaultPolicy\Enforce
Remove-OSConfigDesiredConfiguration -Scenario AppControl\WS2025\AppBlockList\Enforce
# After you remove a policy, there should be no output when you run citool -lp | findstr /I "WS2025" for verification.
[CAUTION]
Removing App Control policies manually or through citool.exe causes the drift control protection of OSConfig to reestablish the policies after a refresh period of four hours by default.
We recommend that you use OSConfig to remove any App Control policies that you set by using OSConfig.INFO
The same feature is available for Windows devices. You can learn more here: App Control for Business | Intune.
Monitor App Control logs
To check the logs after applying the App Control policy, pick any third-party app you want to run on your device.
- If you set the policy to audit mode, look for event ID 3076 in the logs to see if the app triggered any events.
- If you set the policy to enforcement mode, check for event ID 3077 to see if the app was blocked.
This will help you confirm how the policy is working with your apps.
If a third-party app tries to access something it shouldn't, the system steps in and blocks it.
To view and export these event logs, follow these steps:
View
- Open the Event Viewer.
- Open
Applications and Service Logs\Microsoft\Windows\CodeIntegrity\Operational. - Look for event ID 3076 for audit mode or 3077 for enforcement mode.
Export
- Open Event Viewer and navigate to
Applications and Service Logs\Microsoft\Windows\CodeIntegrity. - Right-click on the Operational log and choose Filter Current Log.
- In the filter dialog, clear any existing filters, type 3076 in the
All Event IDsbox, and hit OK. - Right-click the Operational log again and select Save Filtered Log File As.
- Pick a name and location for the
.evtxfile in the Save As dialog, then click OK. - If prompted by the Display Information dialog, choose whether you need the log details in another language, and confirm with OK.
If you're exporting logs for enforcement mode instead, just filter for event ID 3077 in step 3.
INFO
The same feature is available for Windows devices. You can learn more here: Monitor App Control for Busines Audit Logs | Intune
Create supplemental App Control policies
Here's how you can create supplemental App Control policies:
- First, open the App Control Wizard.
- On the Home screen, click Policy Editor.
- In the Policy Editor, choose Convert Event Logs to a Policy. Then, under Parse Event Log evtx Files to Policy, click Parse Log File(s).
- In the dialog that pops up, find your
.evtxfile, select it, and click Open. Confirm the prompt by clicking OK, then hit Next. - On the File Rules screen, look under Filename and pick the file you want to add to the policy.
- Under Rule Type, select Path, then click + Add Allow.
- Repeat step 7 for all the files you want to include, and when you're done, click Next.
NOTE
By default, supplemental policies are saved as XML files in C:\Users\Username\Documents.
Once your supplemental policy is ready run the script below:
$policyPath = "[Your supplemental policy]"

# Reset GUID (best practice)
Set-CIPolicyIdInfo -FilePath $policyPath -ResetPolicyID

# Set policy version (VersionEx in the XML file)
$policyVersion = "1.0.0.1"
Set-CIPolicyVersion -FilePath $policyPath -Version $policyVersion

# Set policy info (PolicyName and PolicyID in the XML file)
Set-CIPolicyIdInfo -FilePath $policyPath -PolicyID "[MyApp]-Policy_$policyVersion" -PolicyName "[MyApp]-Policy" # [MyApp] = The App your are making the supplemental policy for.
$base = "{9214D8EE-9B0F-4972-9073-A04E917D7989}"
Set-CIPolicyIdInfo -FilePath $policyPath -SupplementsBasePolicyID $base

#Set the new policy into the system
Set-OSConfigDesiredConfiguration -Scenario AppControl -Name Policies -Value $policyPath
To check if the supplemental policies were applied, keep an eye on event IDs 3076 and 3077. You can find the steps for this in the Monitor event logs section. Make sure there aren’t any new events popping up that the system didn’t expect.
Query policies
If you want to check which policies are active in your setup, just run this command:
(Get-OSConfigDesiredConfiguration -Scenario AppControl).Value.PolicyInfo | Where-Object { $_.IsEffective -eq $true }And if you're curious about the policies that aren't currently active, use this one:
(Get-OSConfigDesiredConfiguration -Scenario AppControl).Value.PolicyInfo | Where-Object { $_.IsEffective -eq $false }💡 Conclusion
By leveraging OSConfig, you can save time, reduce complexity, and ensure your systems are always aligned with your organization's security policies.
So, go ahead and explore the possibilities with OSConfig, your servers will thank you for it!
All in all, OSConfig is a super handy tool when it comes to managing and automating operating system configurations, especially in large-scale environments. It helps take a lot of the manual hassle out of keeping systems consistent. It's definitely one of those behind-the-scenes tools that makes IT teams' lives way easier.
References: