
App Control for Business
👋 Introduction
App Control for Business is a security feature in Microsoft Intune that helps organizations control which apps can run on Windows devices. It ensures only approved applications are allowed while blocking anything that doesn’t meet your company’s rules. These policies are part of Intune’s endpoint security and use the Windows ApplicationControl CSP to enforce restrictions.
Intune’s managed installer policy also tags apps (not retroactively) you deploy through Intune as trusted, so software deployed through your MDM does not need to be approved, saving time when you also use Intune for your app deployment. Here Microsoft made huge steps in simplifying approving apps, with their latest update, which lets you create multiple Managed Installer rules and assign them to different groups. This seems to suggest that it is only a matter of time until other managed installers are able to be used similarly.
Why use it?
App Control for Business prevents risky or unnecessary software from running.
- Reduce risks: block untrusted apps, tampered with apps or simply unwanted apps.
- White-/Blacklisting: only approved apps are allowed.
- Shadow IT: prevent unauthorized third party apps from being installed.
- Licensing: help your compliance team keep unlicensed software installations in check.
App Control for Business vs. AppLocker
You may have recognized that it sounds an awful lot like AppLocker. Here is the difference:
| Feature / Capability | App Control for Business | AppLocker |
|---|---|---|
| Control which apps can run | ✅ | ✅ |
| Integrates with Intune | ✅ | ❌ |
| For cloud-managed environments | ✅ | ❌ |
| Automatic trust for Intune-deployed apps | ✅ | ❌ |
| Uses Windows ApplicationControl CSP | ✅ | ❌ |
| Rule types (path, publisher, hash) | ✅ | ✅ |
| Strong enforcement / blocks bypass attempts | ✅ | ⚠️ |
| Easy to manage at scale | ✅ | ⚠️ |
| Managed via Group Policy | ❌ | ✅ |
| Getting new features | ✅ | ❌ |
| Windows 7 and earlier | ❌ | ✅ |
| User based policies (for shared devices) | ❌ | ✅ |
✅ = Fully supported
⚠️ = With limitations
❌ = Not supported
In short, if you can use App Control for Business, you should.
But there are a few scenarios where AppLocker might still be needed.
💾 Managed installer
A managed installer marks apps and all the files it installs as trusted. As soon as a policy is created, all deployed apps will get tagged as coming from a managed installer. App Control can be set to allow these apps to run, unless a specific deny rule blocks them.
DANGER
When you enable this feature, any app deployed via Intune is automatically trusted. If an Intune-distributed app becomes compromised, App Control will not block it.
- Open the Microsoft Intune admin center -> App Control for Business and click on the Managed Installer tab.
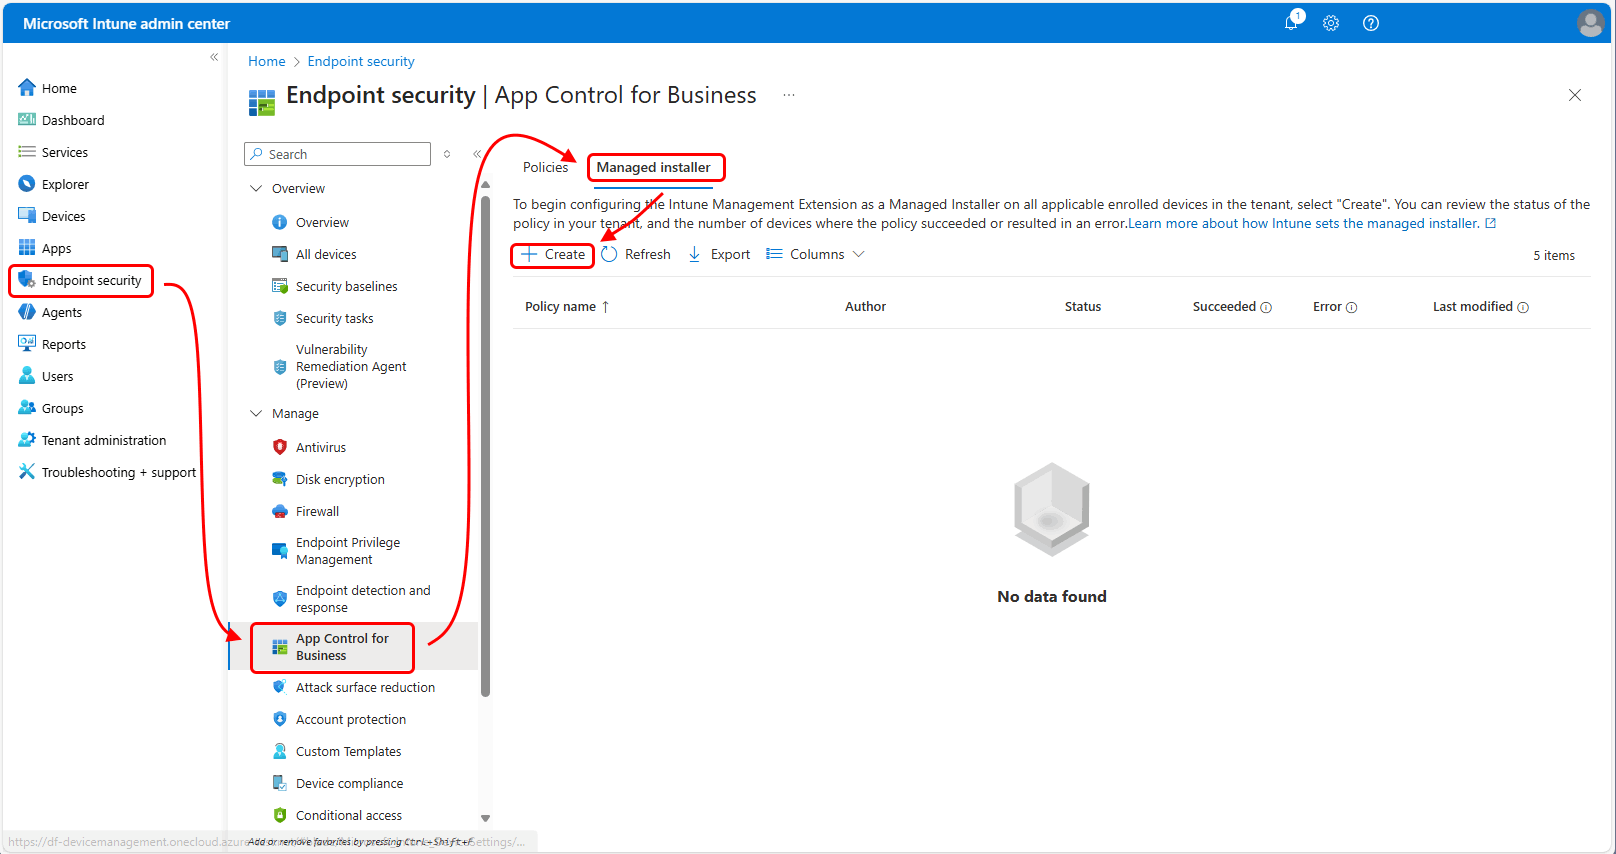
- With
+ Createyou can now create a managed installer policy, adding Intune as a trusted Installer.

INFO
You can find known limitations to the managed installer feature here.
🔏 App Control policy
With Intune’s App Control for Business policies, you control which apps can run on your managed Windows devices. By default, apps not approved by the policy are blocked. If you enable Audit mode, all apps are allowed to run, but their activity is logged locally for review.
There are two types of policies: base policies and supplemental policies. A base policy is the starting point that defines the core rules for which apps can run on your managed Windows devices. Once you’ve set up a base policy, using either XML data or the built-in controls, you can expand it with supplemental policies. Supplemental policies let you add more rules in XML format to build on the original base policy. You can also apply multiple supplemental policies to the same base policy, giving you flexibility and fine-grained control over your app management.
Microsoft also is hard at work expanding the controls in Intune and making it easier to create policies in the future without the need for XML knowledge.
IMPORTANT
You should always start with auditing your policy, so to not block all your apps.
- Open the Microsoft Intune admin center -> App Control for Business and click on
+ Create Policy.
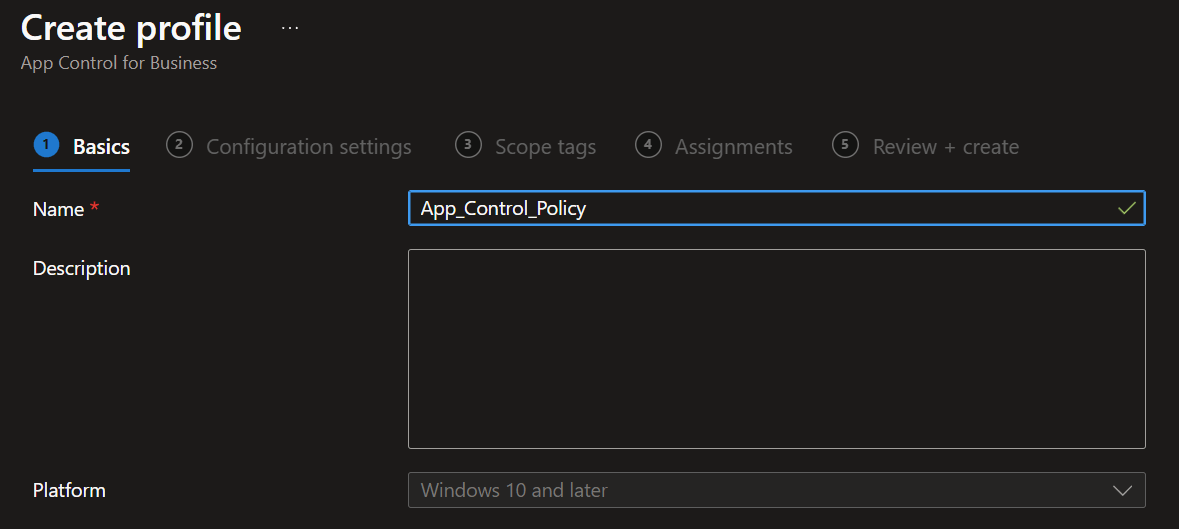
- Now add the policy name and description.
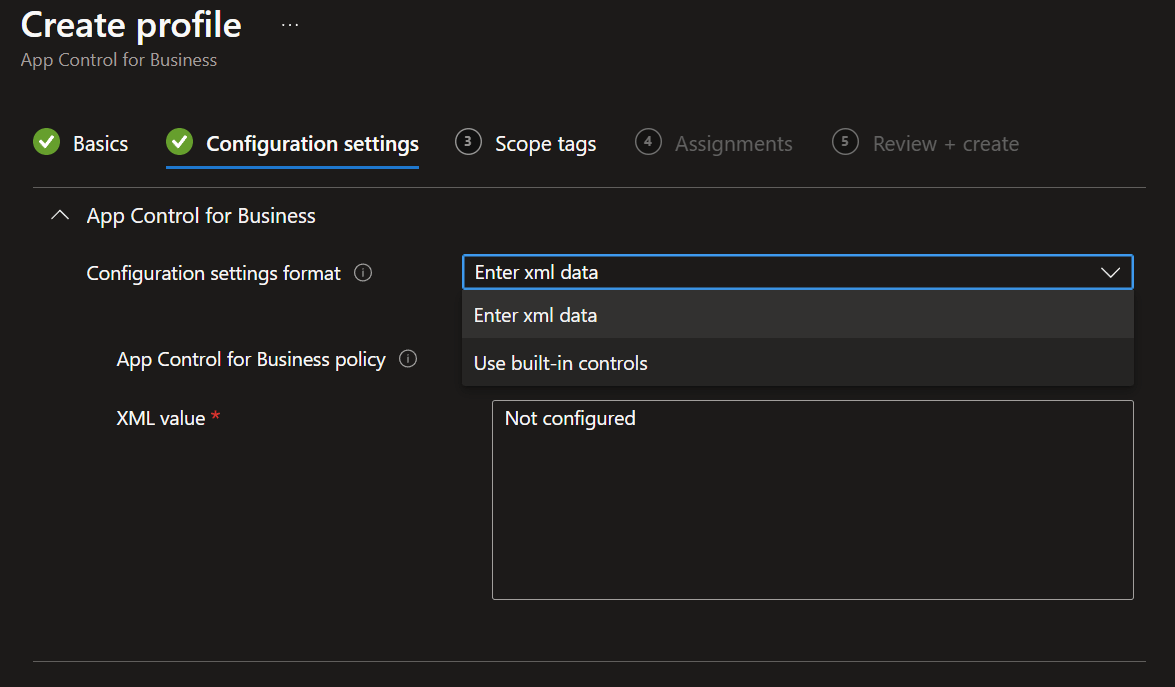
- In the Configuration settings tab, you have two possibilities for the Configuration settings format.
- Use built-in controls
- Enter xml data
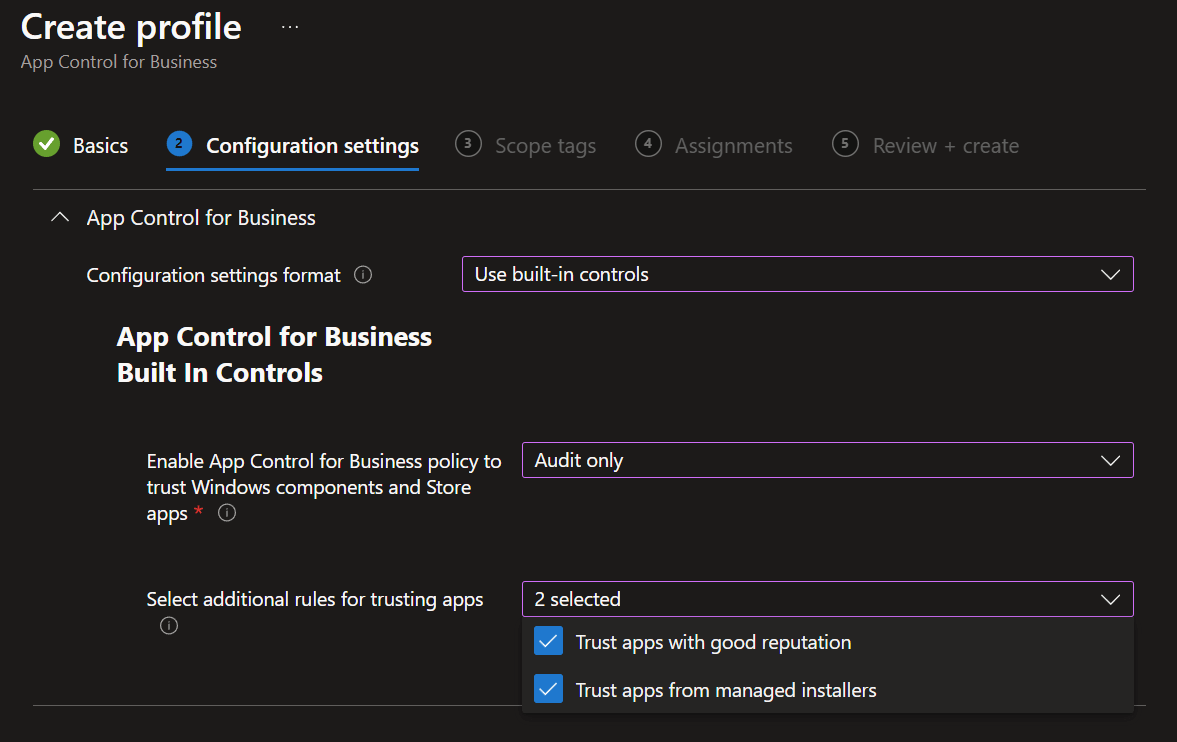
- The built-in controls provide Microsoft template options, allowing you to trust Windows components and Store apps. You can also choose to trust files with good reputation and trust apps from managed installers. Additionally, select whether to apply an Audit policy (logs activity without blocking apps) or to enforce the rules (blocks unapproved apps).
INFO
To generate XML data for custom app control policies, use the official Microsoft tool WDAC Wizard.
See the step-by-step instructions in the WDAC Wizard section below.
- Next up you can insert your tags and add your assignments
- Then click
Createand you're done
If you use the built-in controls as base policy, in the following table you will find the standard policy IDs for reference in your supplemental policies. These IDs do not change.
| Base policy ID | Explanation |
|---|---|
| {A8012CFC-D8AE-493C-B2EA-510F035F1250} | Enable app control policy to trust Windows components and Store apps. |
| {D6D6C2D6-E8B6-4D8F-8223-14BE1DE562FF} | Enable app control policy to trust Windows components and Store apps and Trust apps with good reputation. |
| {63D1178A-816A-4AB6-8ECD-127F2DF0CE47} | Enable app control policy to trust Windows components and Store apps and Trust apps from managed installers. |
| {2DA0F72D-1688-4097-847D-C42C39E631BC} | Enable app control policy to trust Windows components and Store apps and Trust apps with good reputation and Trust apps from managed installers. |
🪄 WDAC Wizard
(App Control for Business Wizard)
App Control for Business Wizard is an open-source tool from Microsoft that helps IT administrators quickly set up App Control for Business policies. The wizard provides a user-friendly interface for creating, editing and merging App Control policies.
Download and install it from the Microsoft website.
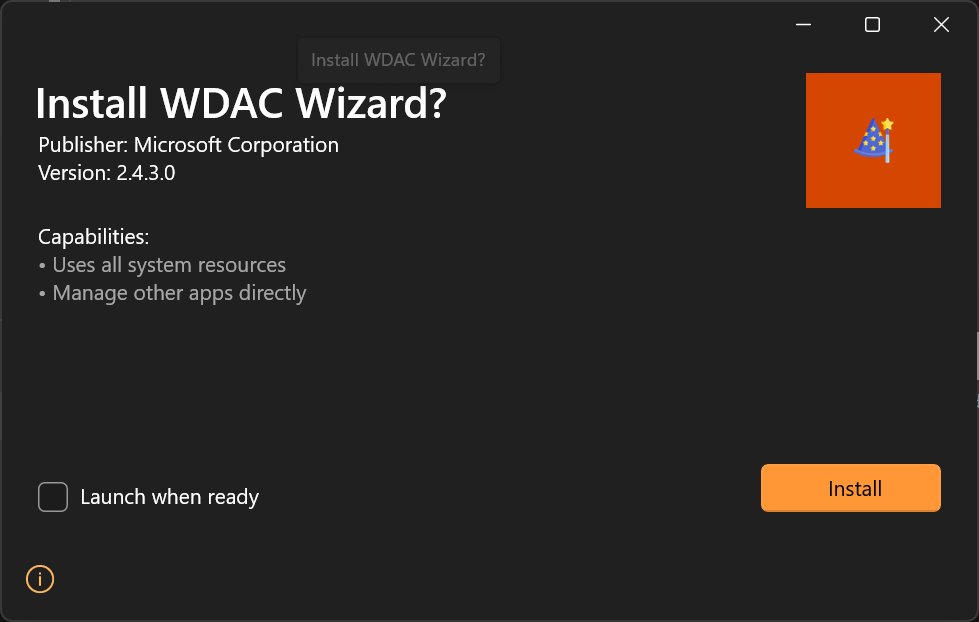
Base Policy
- When you start the app, we first need to create a new policy with
Policy Creator.
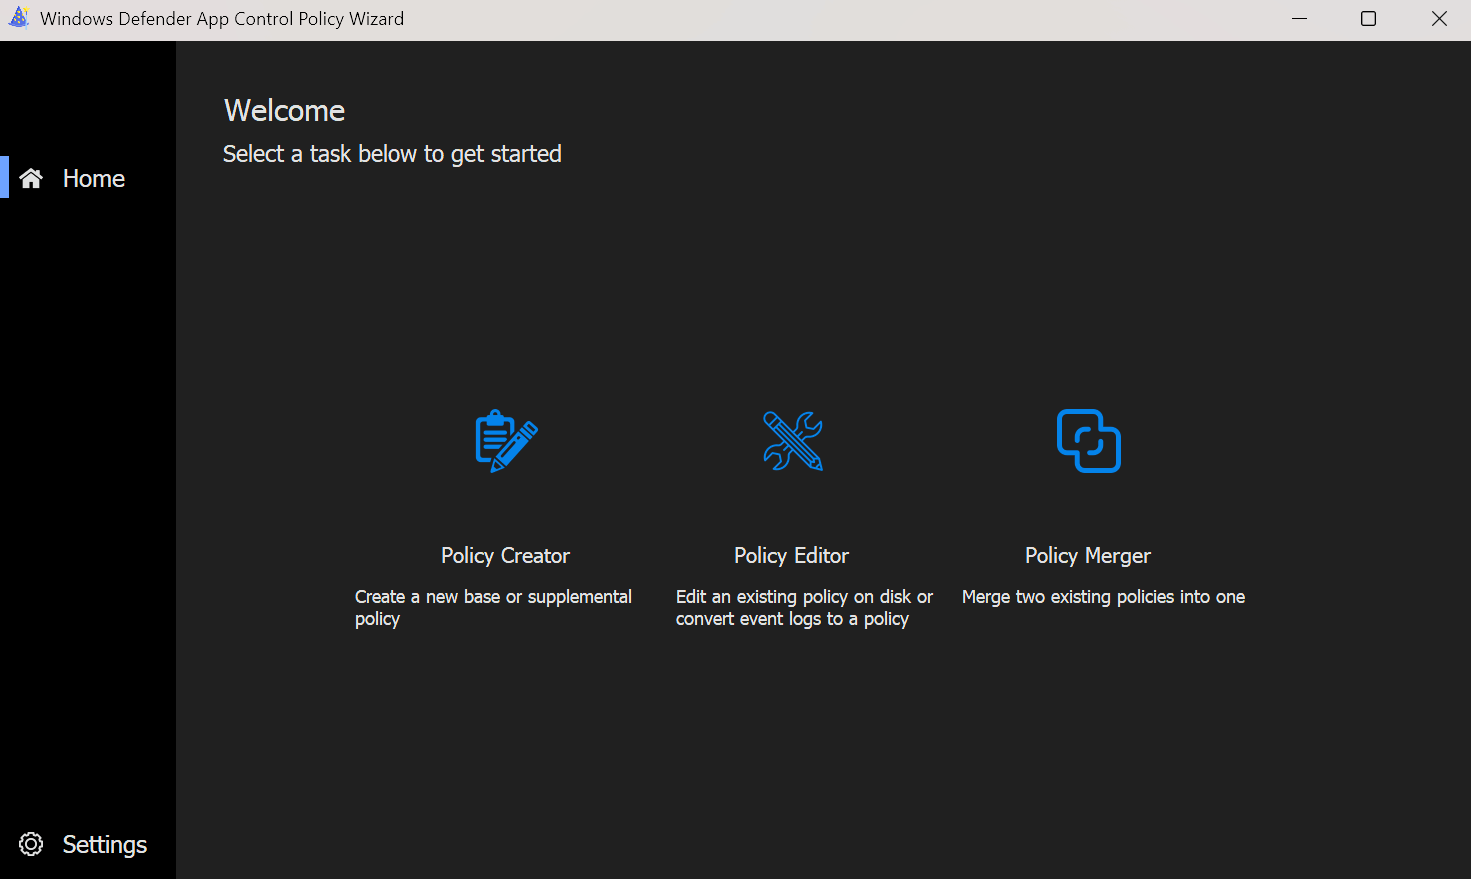
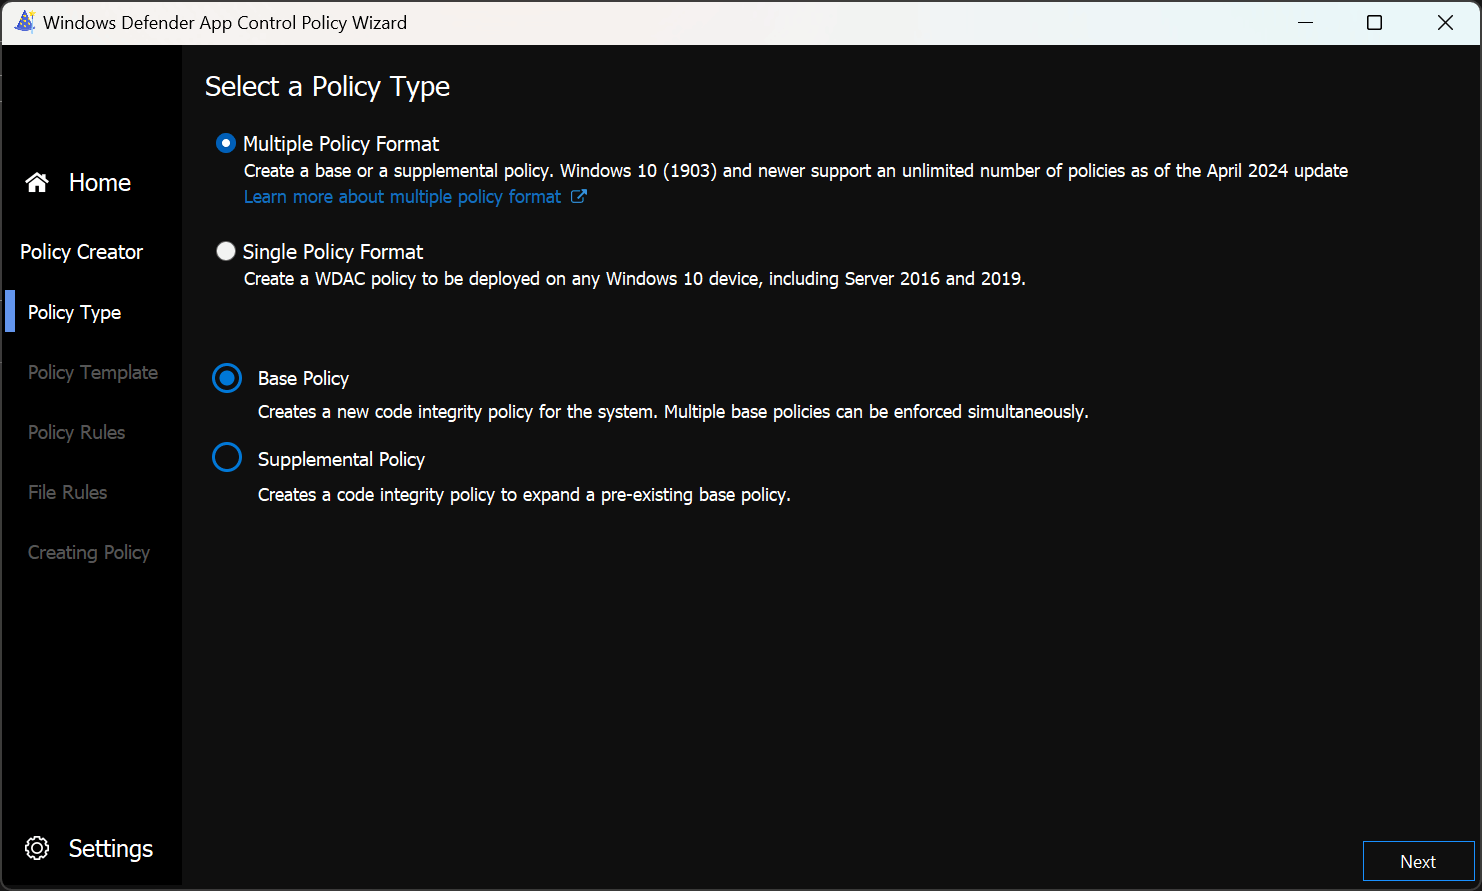
- Then we select the type of policy we want to create, in this case a Base Policy with Multiple Policy Format.
INFO
Multiple Policy Format means that the policy can be used as a base policy and expanded with supplemental policies.
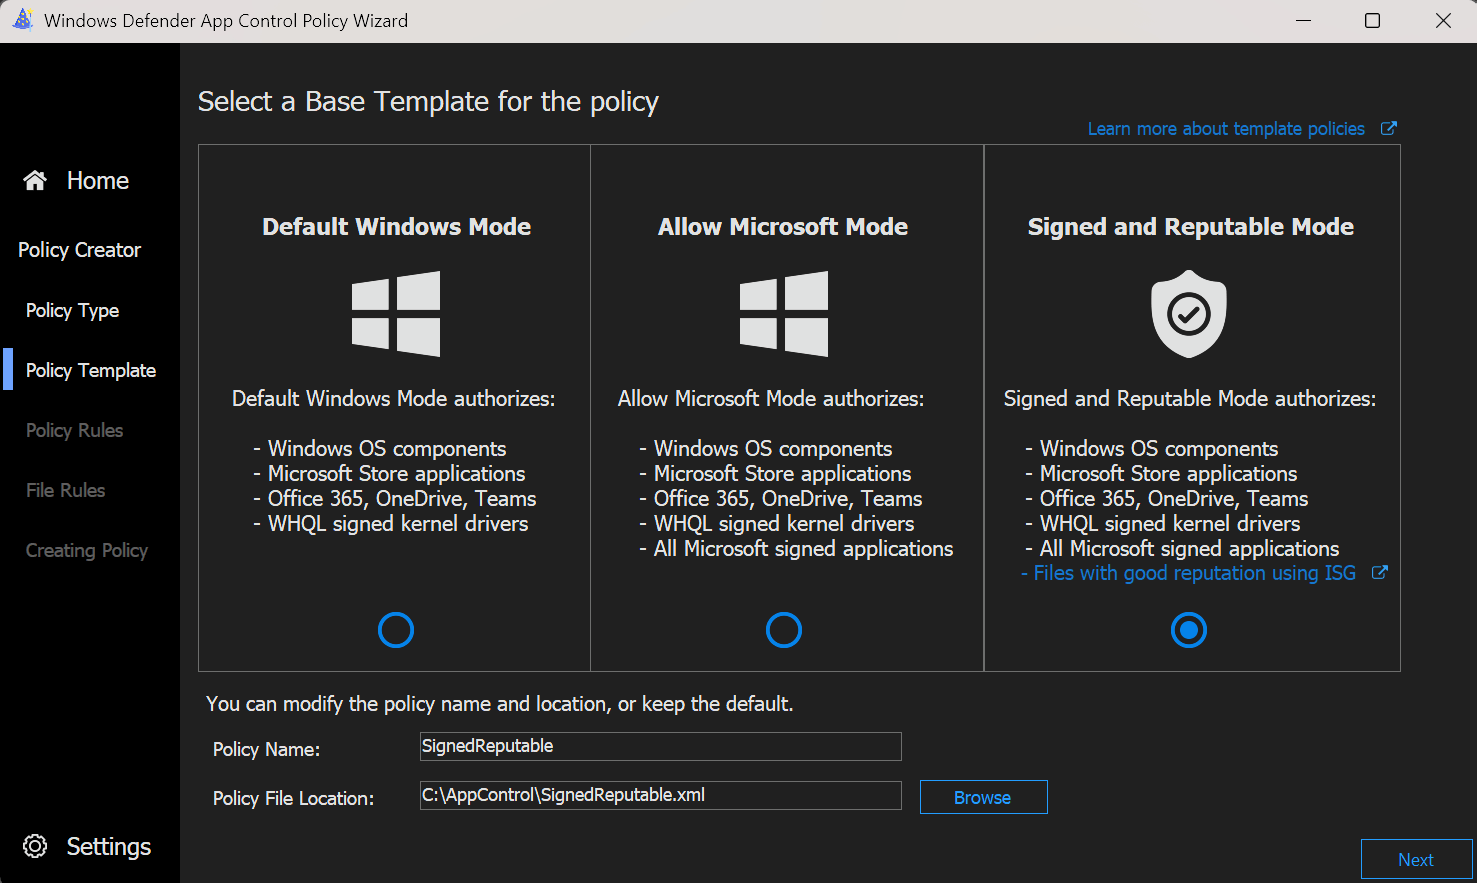
- Next we select a configuration templates, in this example the Signed and Reputable Mode. Generally you can think of the policies as being from most restrictive on the left, to least restrictive on the right. That does not mean that the Signed and Reputable Mode is not restrictive or an open policy.
INFO
These templates essentially reflect the built-in controls Intune has offered, but with one key difference: Intune includes the Managed Installer as a main option and has overall more unchangeable settings, whereas in the older WDAC Wizard the Managed Installer was optional in all templates.
Base Policy Template explanation
| Template Base Policy | Mode authorized components |
|---|---|
| Default Windows Mode |
|
| Allow Microsoft Mode |
|
| Signed and Reputable Mode |
|
- Now we are coming to the main policy rule configuration, where depending on our template, some rules are already preselected. The template rules can generally be used as they are, with the exception of the Managed Installer rule, which we want to enable to trust Intune as a managed installer.
Policy Rule explanation
| Rule option | Description |
|---|---|
| Advanced Boot Options Menu | The F8 preboot menu is disabled by default for all App Control for Business policies. Setting this rule option allows the F8 menu to appear to physically present users. |
| Allow Supplemental Policies | Use this option on a base policy to allow supplemental policies to expand it. |
| Disable Script Enforcement | This option disables script enforcement options. Unsigned PowerShell scripts and interactive PowerShell are no longer restricted to Constrained Language Mode. NOTE: This option is required to run HTA files, and is only supported with the Windows 10 May 2019 Update (1903) and higher. Using it on earlier versions of Windows 10 isn't supported and may have unintended results. |
| Hypervisor-protected code integrity (HVCI) | When enabled, policy enforcement uses virtualization-based security to run the code integrity service inside a secure environment. HVCI provides stronger protections against kernel malware. |
| Intelligent Security Graph Authorization | Use this option to automatically allow applications with "known good" reputation as defined by the Microsoft Intelligent Security Graph (ISG). |
| Managed Installer | Use this option to automatically allow applications installed by a software distribution solution, such as Microsoft Configuration Manager, that has been defined as a managed installer. |
| Require WHQL | By default, legacy drivers that aren't Windows Hardware Quality Labs (WHQL) signed are allowed to execute. Enabling this rule requires that every executed driver is WHQL signed and removes legacy driver support. Henceforth, every new Windows-compatible driver must be WHQL certified. |
| Update Policy without Rebooting | Use this option to allow future App Control for Business policy updates to apply without requiring a system reboot. |
| Unsigned System Integrity Policy | Allows the policy to remain unsigned. When this option is removed, the policy must be signed and have UpdatePolicySigners added to the policy to enable future policy modifications. |
| User Mode Code Integrity | App Control for Business policies restrict both kernel-mode and user-mode binaries. By default, only kernel-mode binaries are restricted. Enabling this rule option validates user mode executables and scripts. |
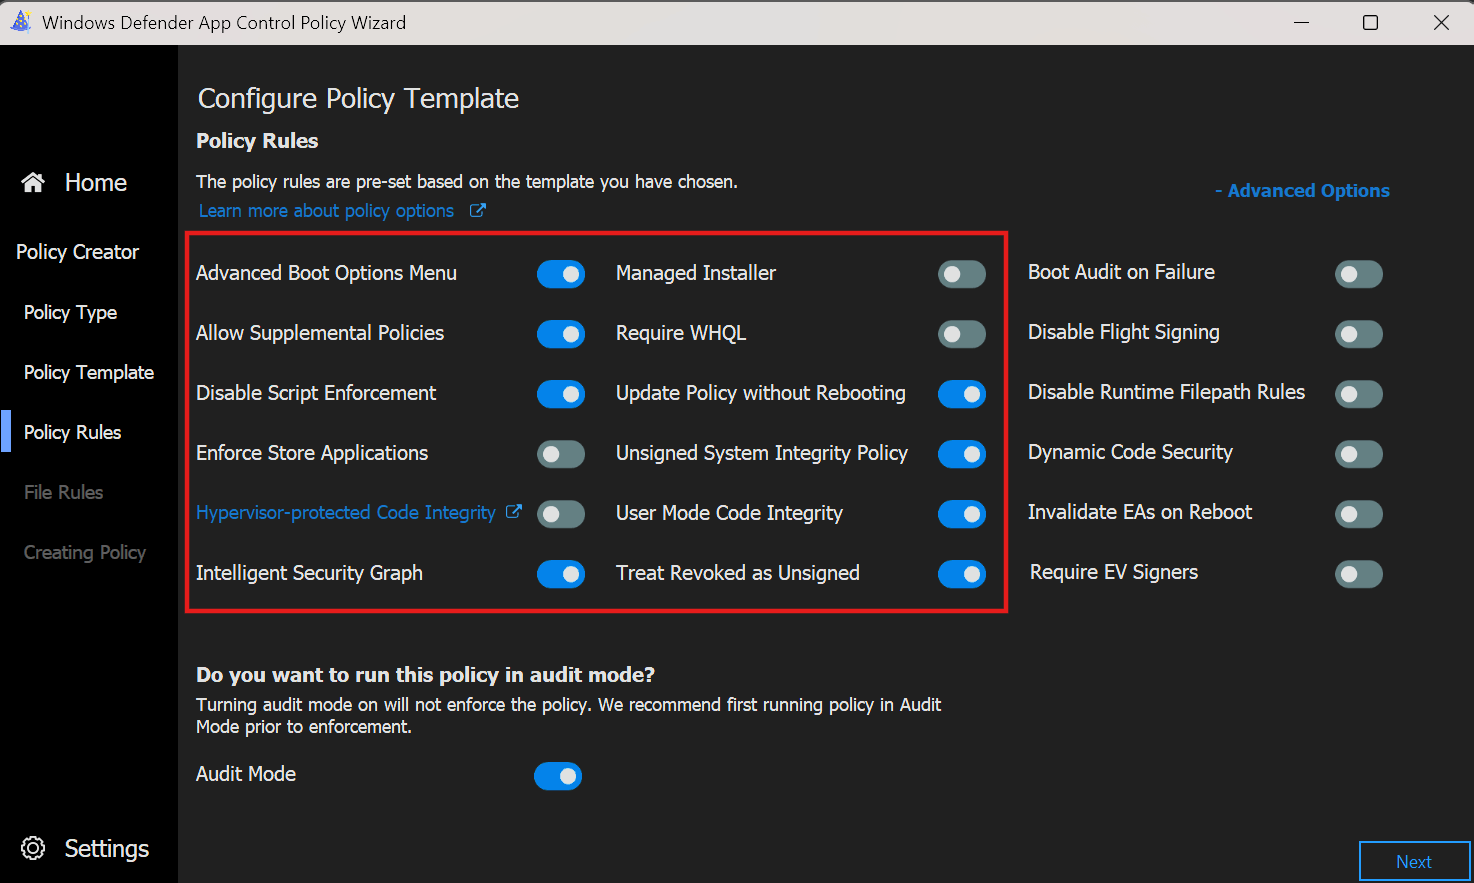
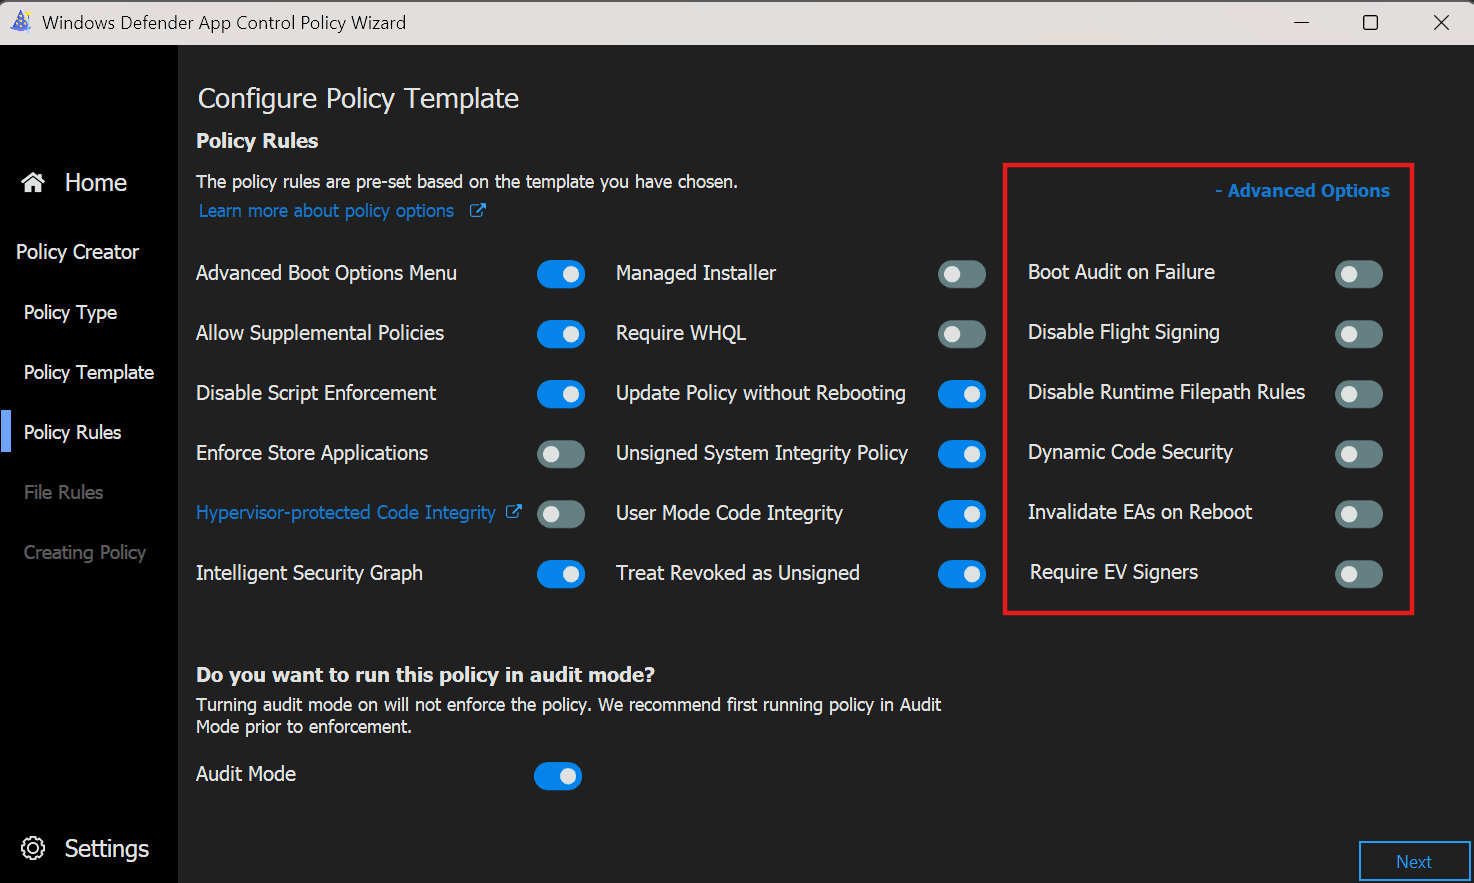
- We can extend the policy rules further by expanding the Advanced Policy Rules. In our example we keep that as is.
Advanced Policy Rule explanation
| Rule option | Description |
|---|---|
| Boot Audit on Failure | Used when the App Control for Business policy is in enforcement mode. When a driver fails during startup, the App Control policy is placed in audit mode so that Windows loads. Administrators can validate the reason for the failure in the CodeIntegrity event log. |
| Disable Flight Signing | If enabled, App Control policies block flightroot-signed binaries. This option would be used in the scenario in which organizations only want to run released binaries, not flight/preview-signed builds. |
| Disable Runtime FilePath Rule Protection | This option disables the default runtime check that only allows FilePath rules for paths that are only writable by an administrator. |
| Dynamic Code Security | Enables policy enforcement for .NET applications and dynamically loaded libraries (DLLs). |
| Invalidate EAs on Reboot | When the Intelligent Security Graph option (14) is used, App Control sets an extended file attribute that indicates that the file was authorized to run. This option causes App Control to periodically revalidate the reputation for files authorized by the ISG. |
| Require EV Signers | This option isn't currently supported. |
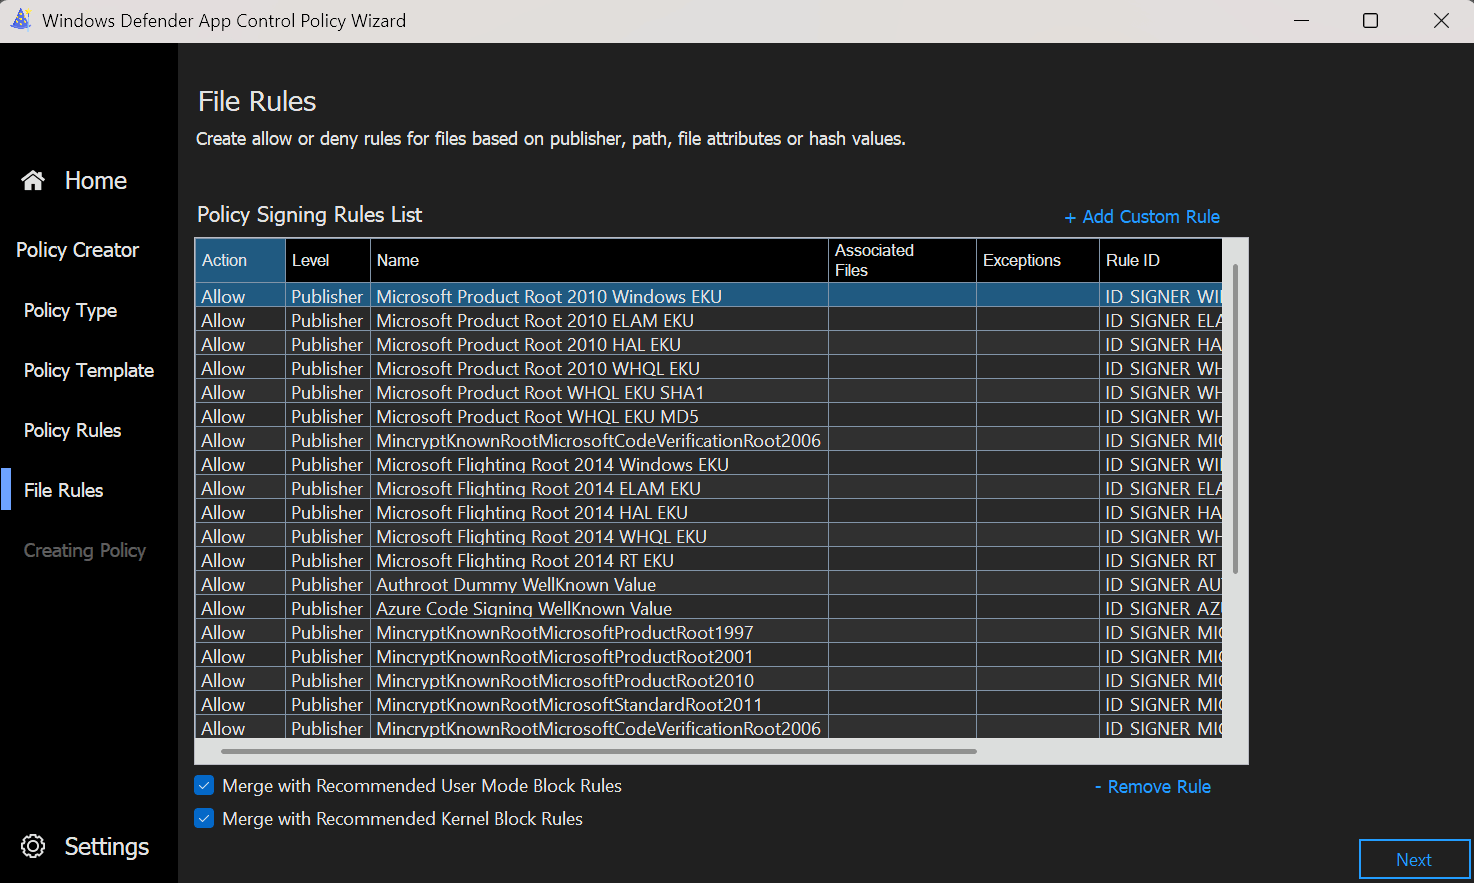
- Next up we see the file rule list which we adopt as is for the base policy.
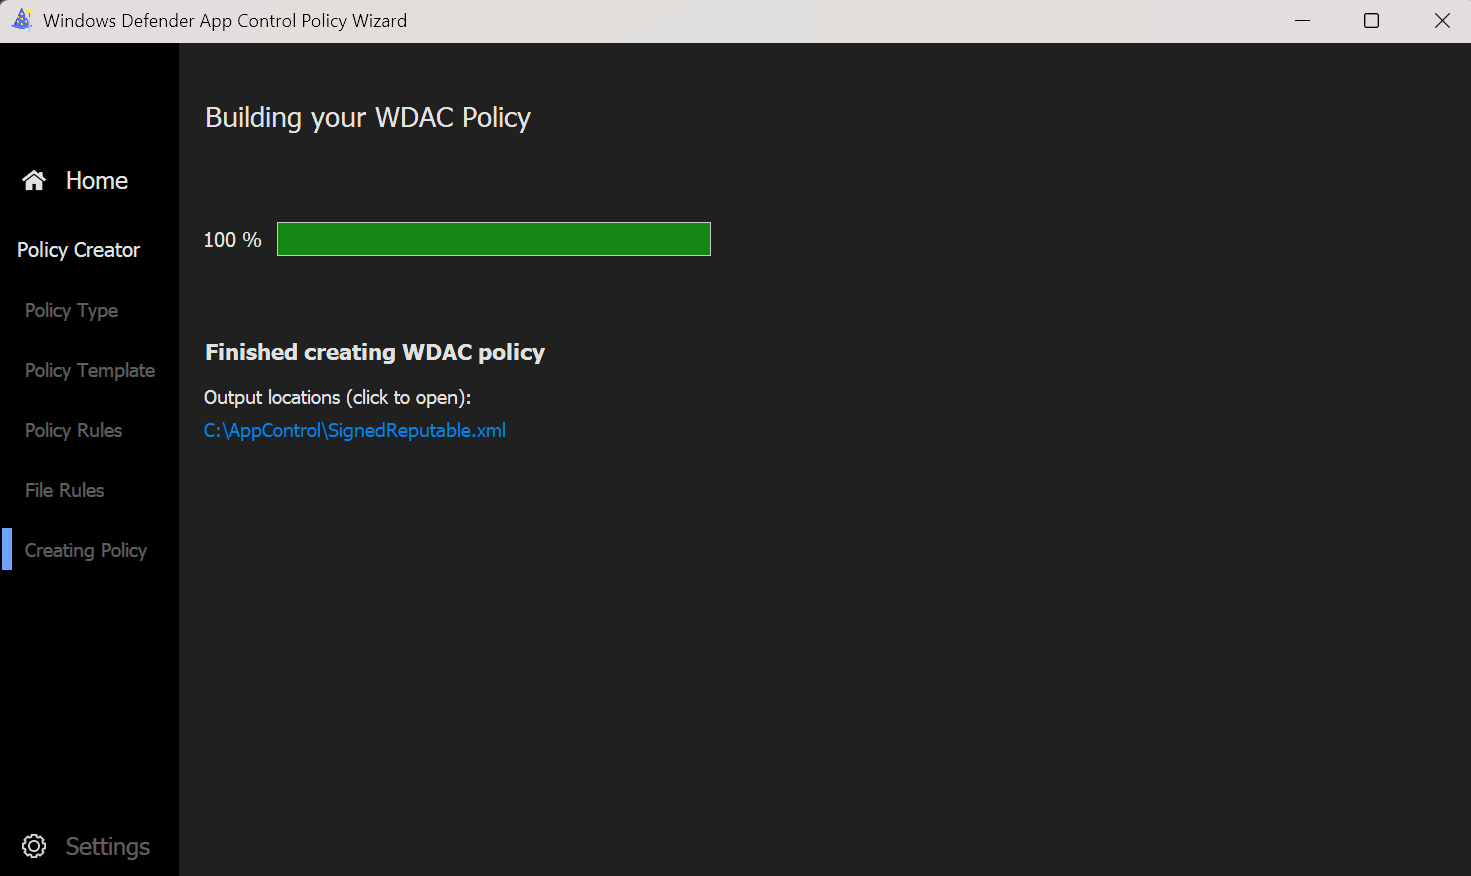
- Now we can click
Nextto build the policy, which we can then use to upload to Intune's App Control for Business.
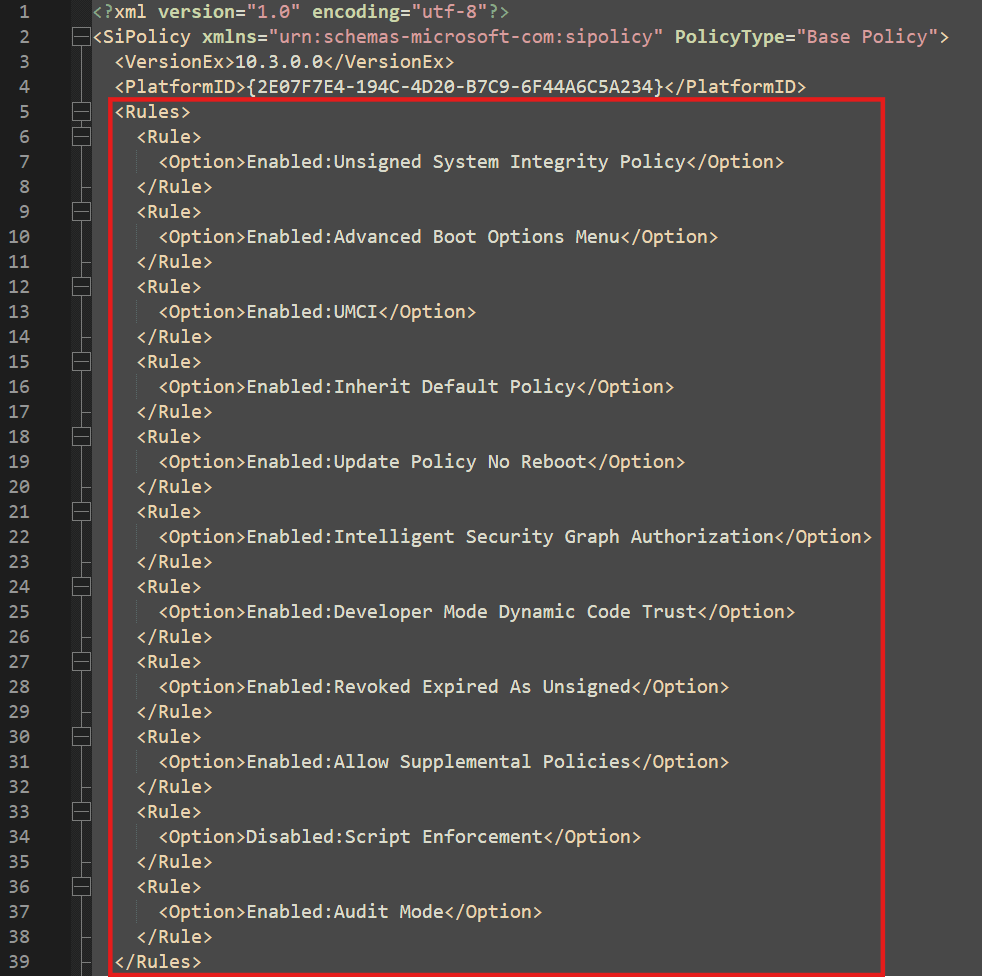
- When we proceed to look at the newly built XML file, we can see the main rules we selected in the wizard right at the top.
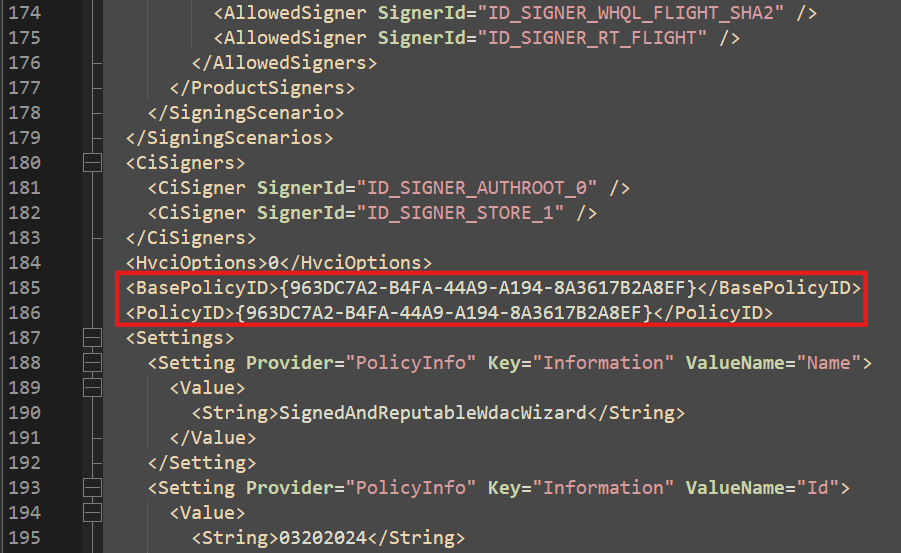
And at the bottom we find the Policy ID which we will need when we create a supplemental policy.
Suplemental Policy
Now that we have created our base policy, we can create a supplemental policy to add custom exceptions for the software we want to specifically allow.
INFO
If the software gets deployed via Intune, the managed installer rule will already trust it, so you only need a supplemental policy if you want to allow software that is not deployed via Intune or uses an auto updater (see the known limitations of the managed installer rule mentioned before).
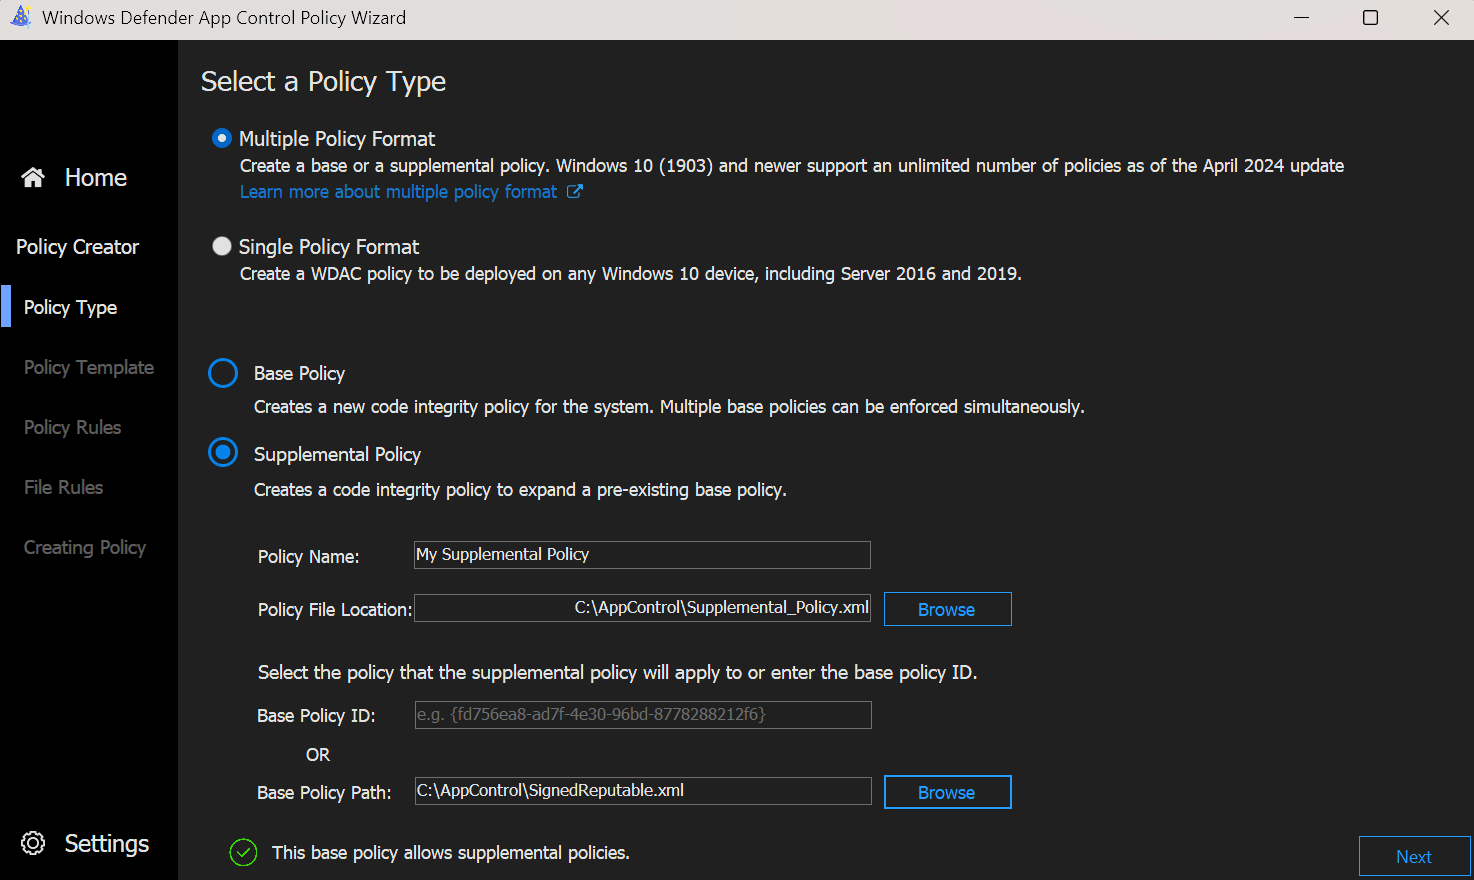
- We start the wizard again, but this time we select Supplemental Policy as the policy type. Now a few fields pop up in which, after the policy name, we either need to enter the Base Policy ID we looked at before or browse directly for the base policy xml and let the system get the ID for us.
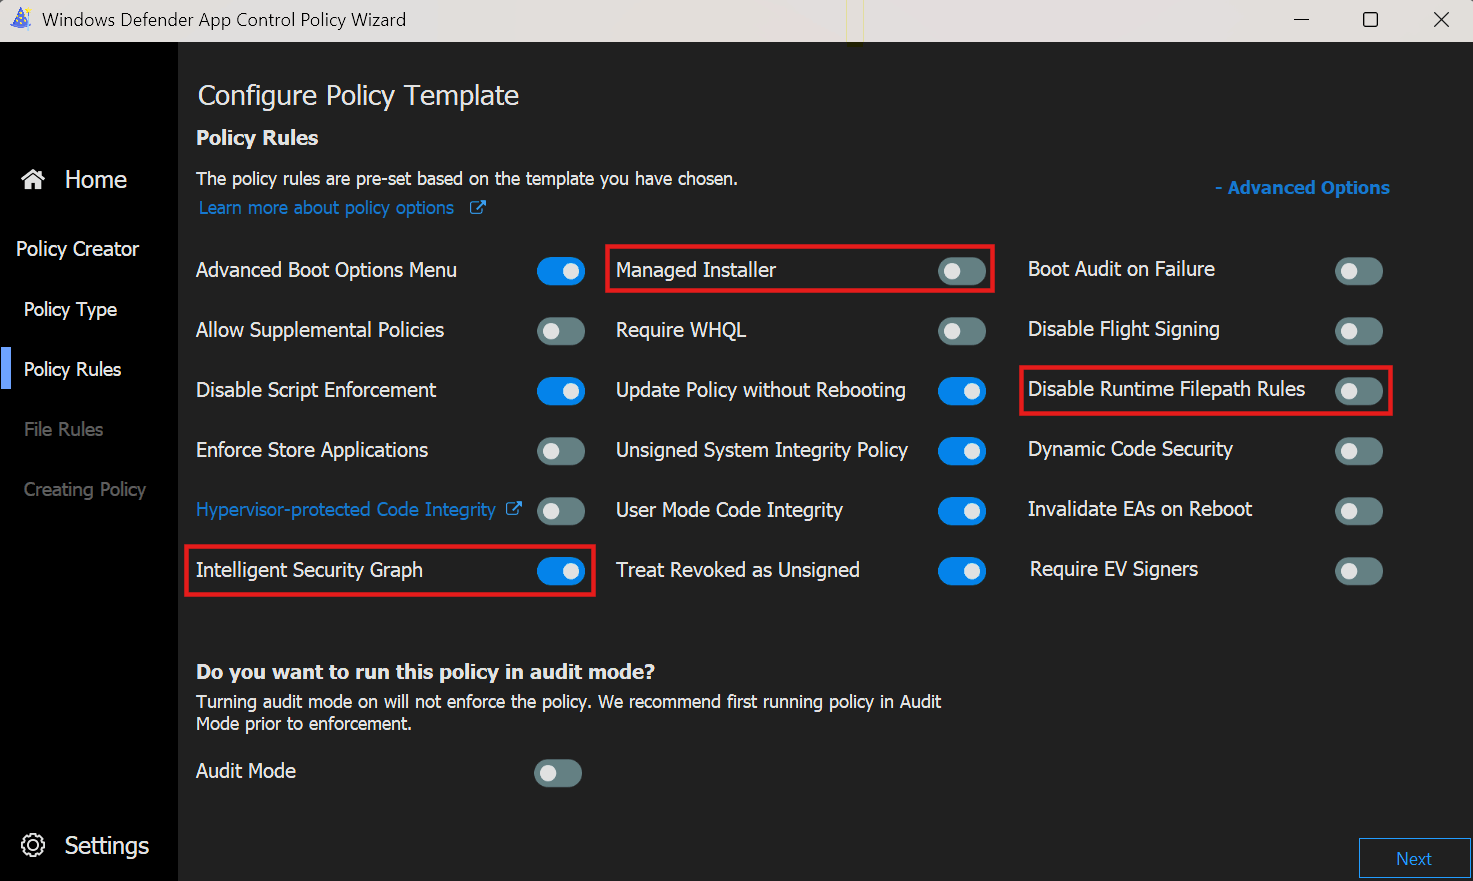
- After that we jump directly to the policy rules, where the rules from the base policy are already preselected and can not be changed. Except the 3 rules shown below, which we can change after the fact.
- What we created this policy for we find in the next screen, where we can add custom file rules. For that we click
+ Add Custom Ruleat the top right.
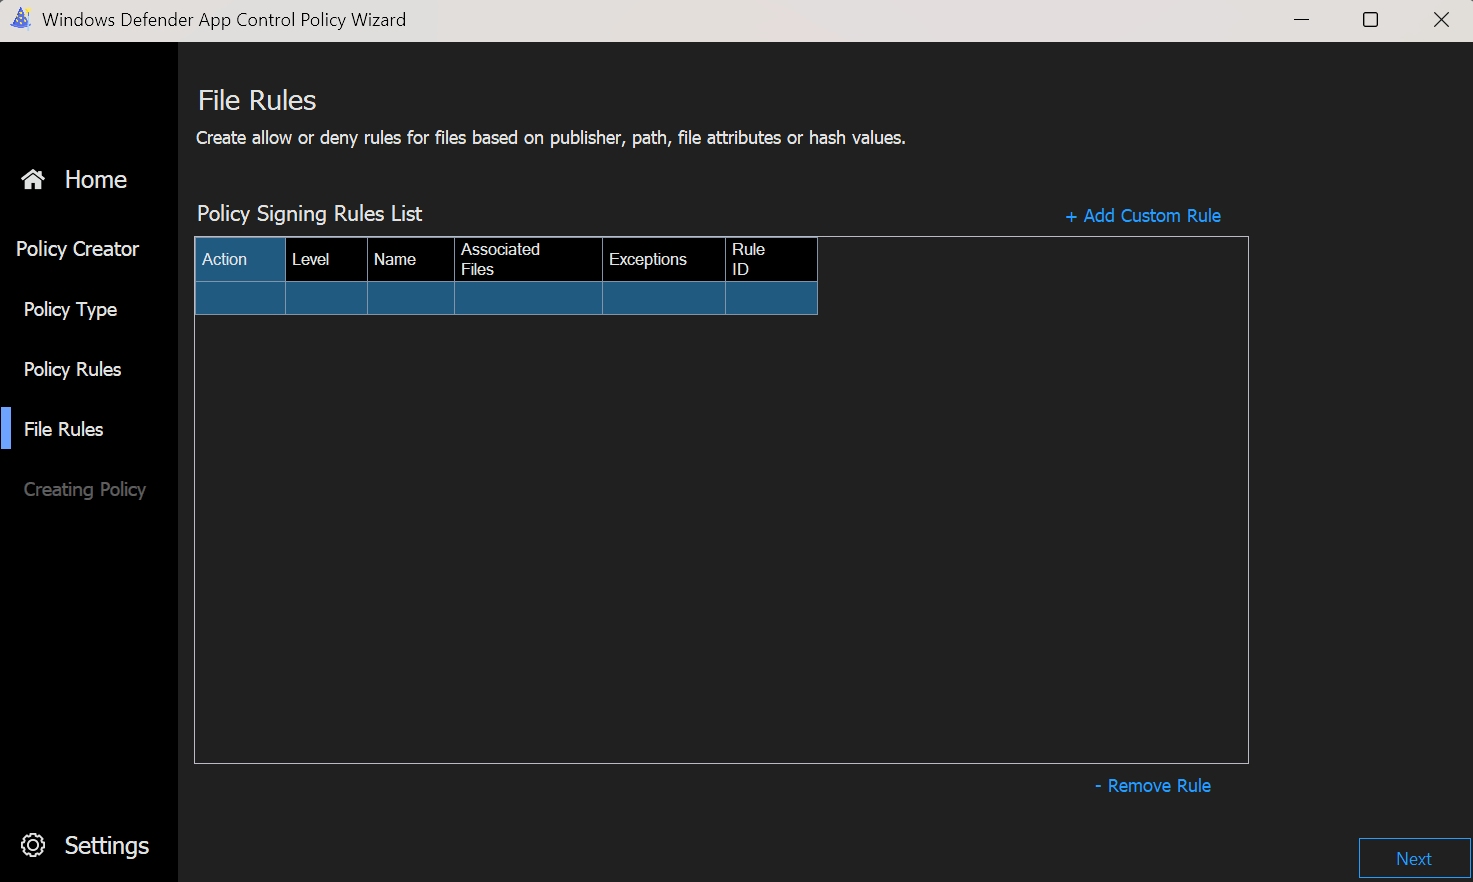
- Now a different window pops up, where we can select the rule conditions.
- Rule Scope: Usermode Rule / Kernel Rule
- Rule Action: Allow / Deny
- Rule Type: Publisher / Path / File Attributes / Packaged App / File Hash / COM Object / Folder Scan
- Reference File
Rule Scope explanation
Usermode: Applies to processes and applications that run in user space (ring 3). This covers typical executables, scripts, DLLs and applications that users or admins start.
Kernel mode: Applies to code that runs in kernel space (ring 0). This covers drivers, kernel modules and any low-level components that interact with the operating system core.
You can learn more about Protection Rings here.
Rule Type explanation
- Publisher: Publisher rules base file rules on properties in the code signing certificate chain.
- Path: File path rules are less secure than signer rules since they rely on changeable access permissions.
- File Attributes: The Wizard can create file name rules from authenticated attributes, useful when apps and their dependencies (e.g., DLLs) share the same product name
- Packaged App: MSIX app files share a common catalog signature. You can create a signer rule from the installer (.msix/.msixbundle) or the AppxSignature.p7x in the installation folder.
- File Hash: The Wizard can create file rules by file hash, but maintaining hash values for current product versions can add administrative overhead.
- COM Object: App Control for Business enforces a built-in allowlist for COM object registration. You can add more COM objects if needed to support your organization’s apps.
- Folder Scan: Scan a folder to create file rules for all contained files. Useful for shared network folders or folders with portable apps.
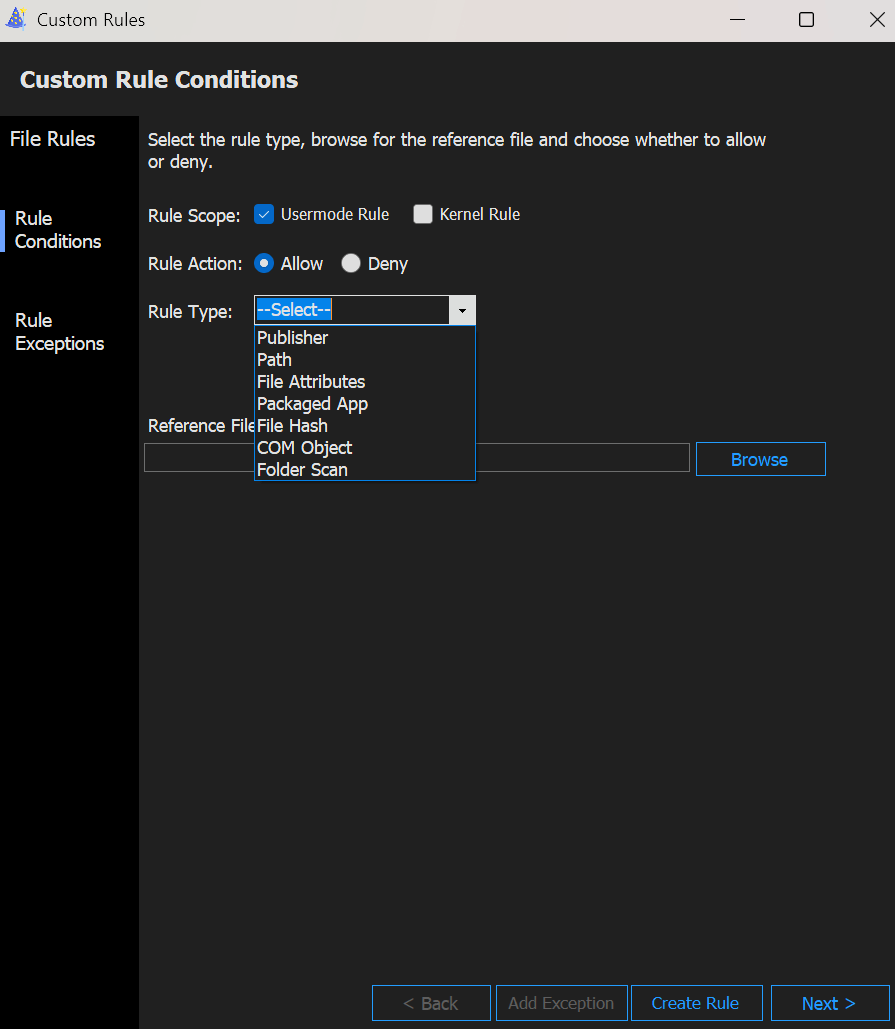
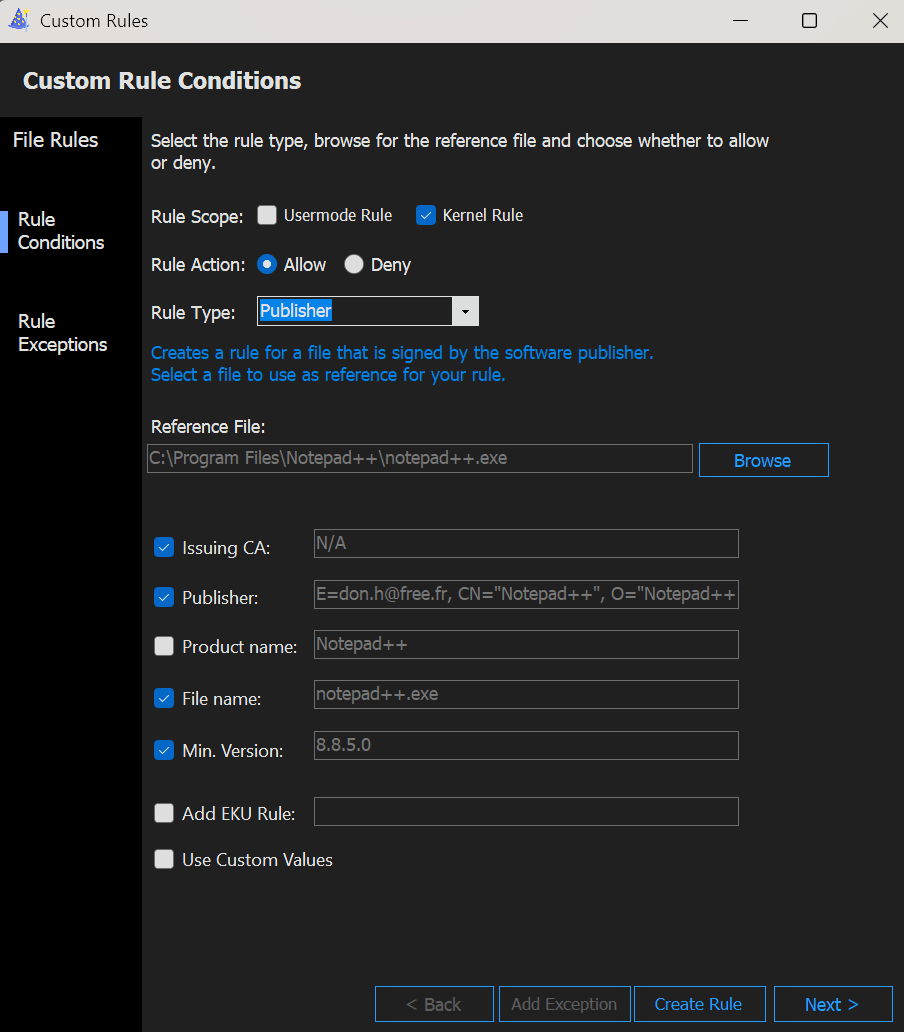
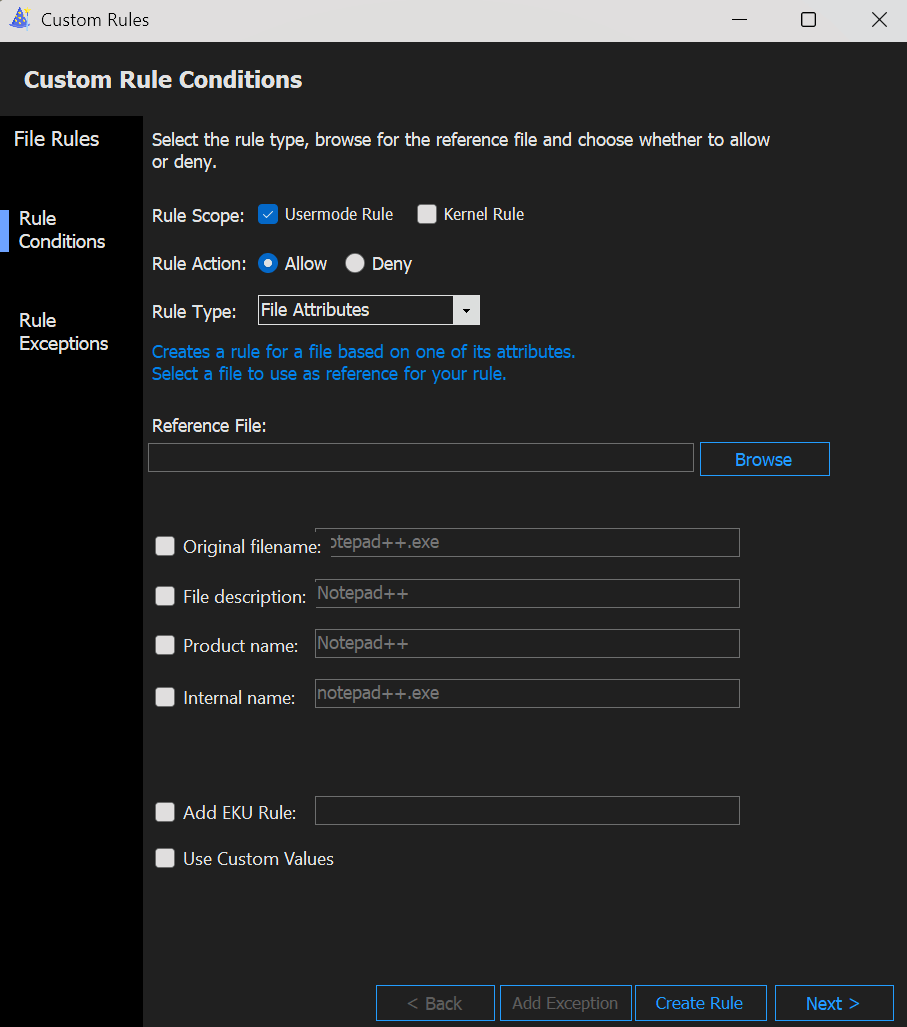
When we select the Rule Type Publisher or File Attributes, we get additional options to further specify the rule.
Publisher explanation
| Rule Condition | App Control Rule Level | Description |
|---|---|---|
| Issuing CA | PCACertificate | Highest available certificate is added to the signers. This certificate is typically the PCA certificate, one level below the root certificate. Any file signed by this certificate is affected. |
| Publisher | Publisher | This rule is a combination of the PCACertificate rule and the common name (CN) of the leaf certificate. Any file signed by a major CA but with a leaf from a specific company, for example, a device driver corp, is affected. |
| File version | SignedVersion | This rule is a combination of PCACertificate, publisher, and a version number. Anything from the specified publisher with a version at or above the one specified is affected. |
| File name | FilePublisher | Most specific. Combination of the file name, publisher, and PCA certificate and a minimum version number. Files from the publisher with the specified name and greater or equal to the specified version are affected. |
File Attributes explanation
| Rule level | Description |
|---|---|
| Original Filename | Specifies the original file name, or the name with which the file was first created, of the binary. |
| File description | Specifies the file description provided by the developer of the binary. |
| Product name | Specifies the name of the product with which the binary ships. |
| Internal name | Specifies the internal name of the binary. |
- When we are done configuring the rule, we just click
Create Ruleand after thatNextto build the policy.
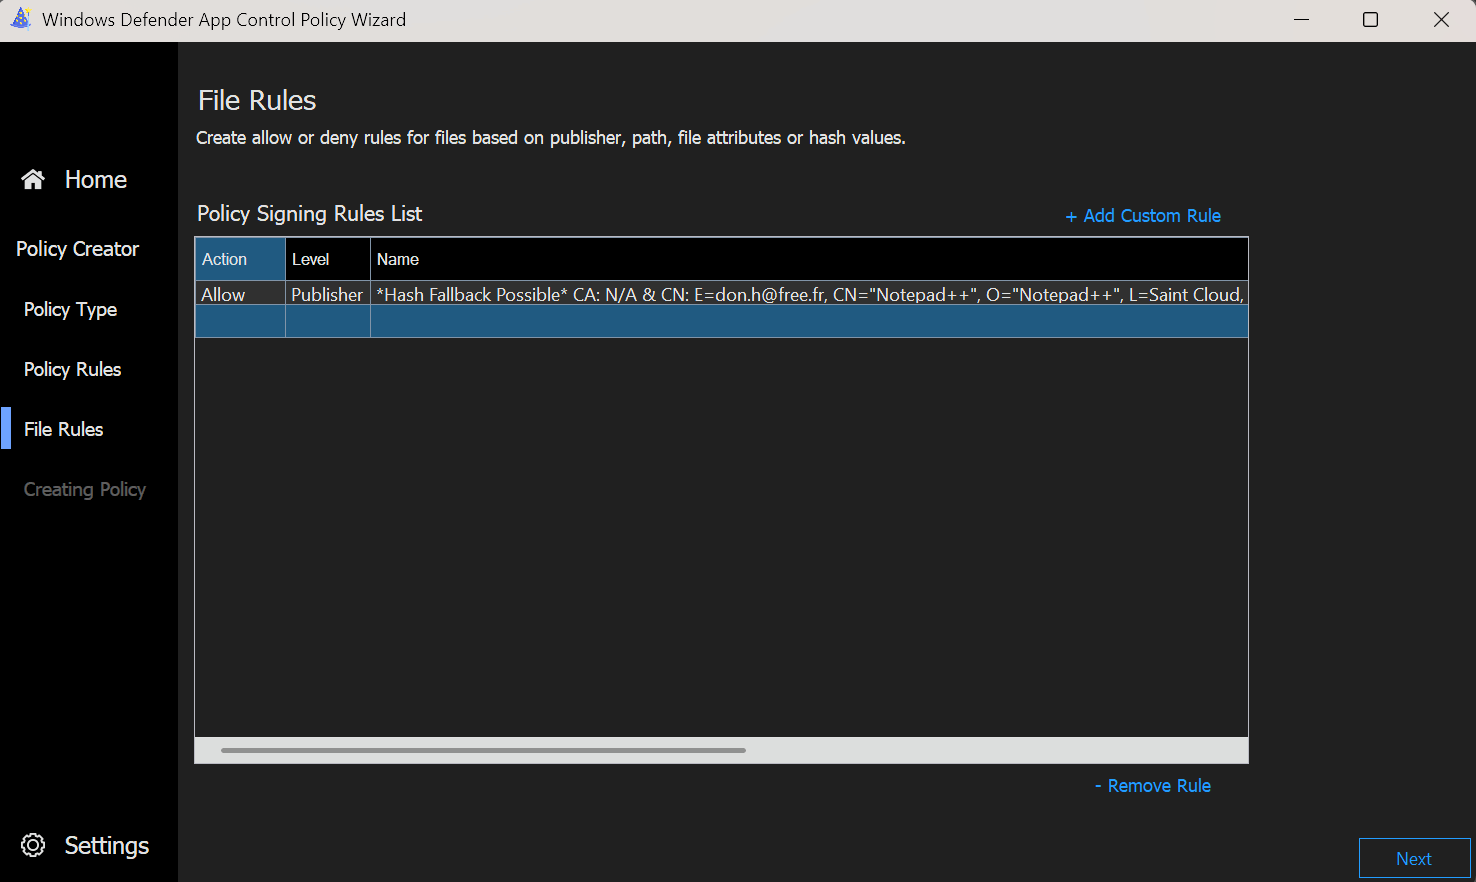
- We now proceed to look at the XML file, the Policy ID of the supplemental Policy and the Base Policy ID we created before are right at the top. Beneath that we can see the custom rule we created.

Edit Policy
If we now want to edit an existing policy or use a more convenient possibility to add a lot of policies at once, we can go back to the main screen and click on Policy Editor.
Here we can now simply load an existing policy and edit it like we did at time of creation or we can select Convert Event Log to a WDAC Policyand use logs to create rules for us. We can either let the Wizard search our device for the event logs needed, use a saved event log file (.evtx) or we can use a KQL query to get the data from Microsoft Defender or Log Analytics. This way we can gather a lot of information about what apps are running in our environment and create rules for them.
WARNING
Be aware that if you don't restrict your KQL query, the results can be overwhelming at first, especially when you did not restrict any apps in the past.
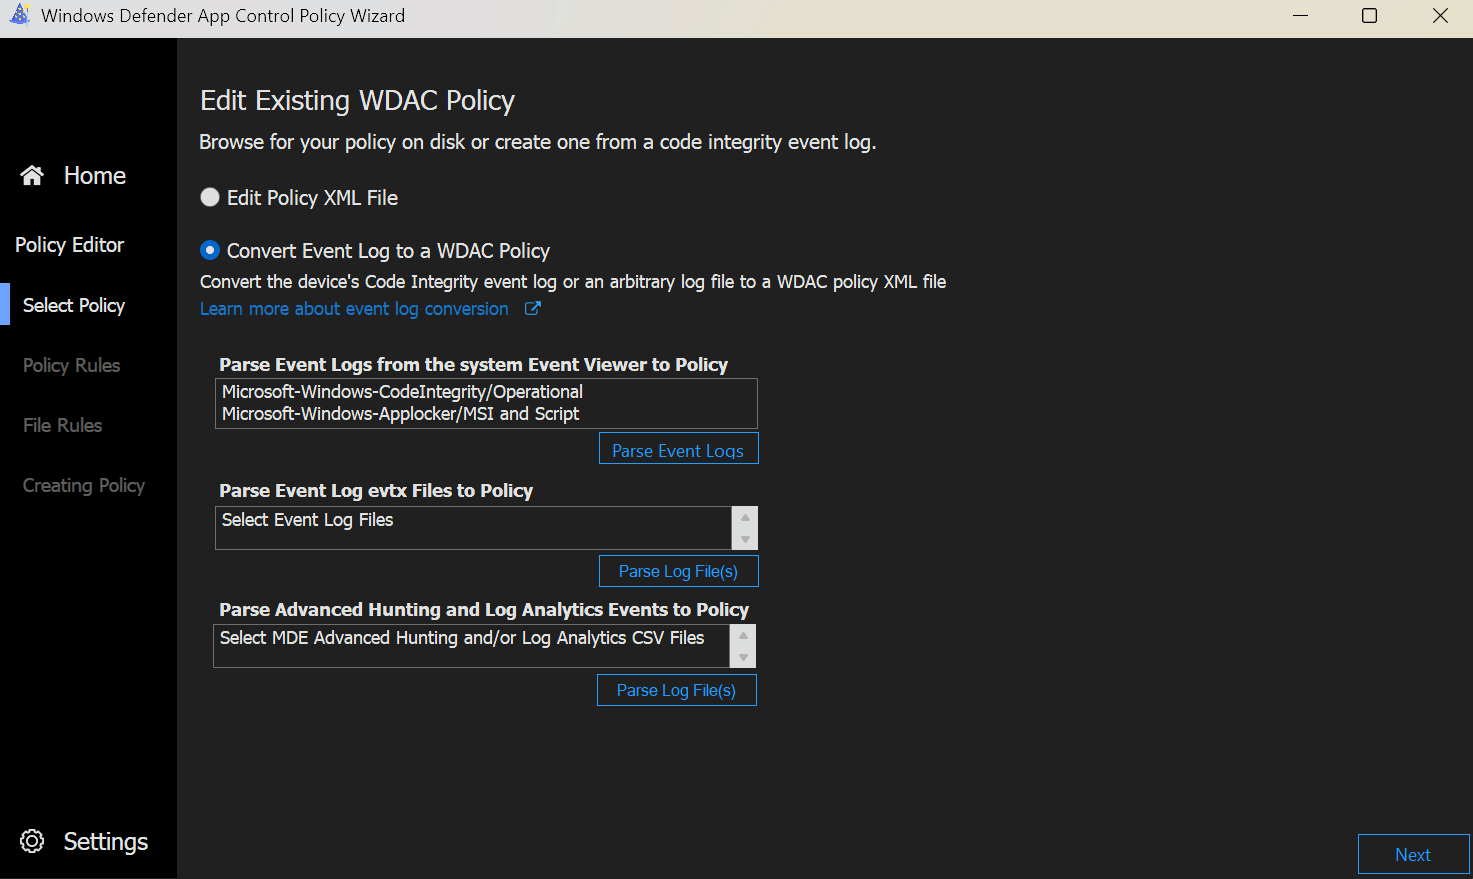
As soon as you parsed the data, you click Next and the wizard will show you all the apps it found, which you can then select to create Allow rules for by clicking + Add Allow. Then click Next again and the wizard will edit the policy for you.
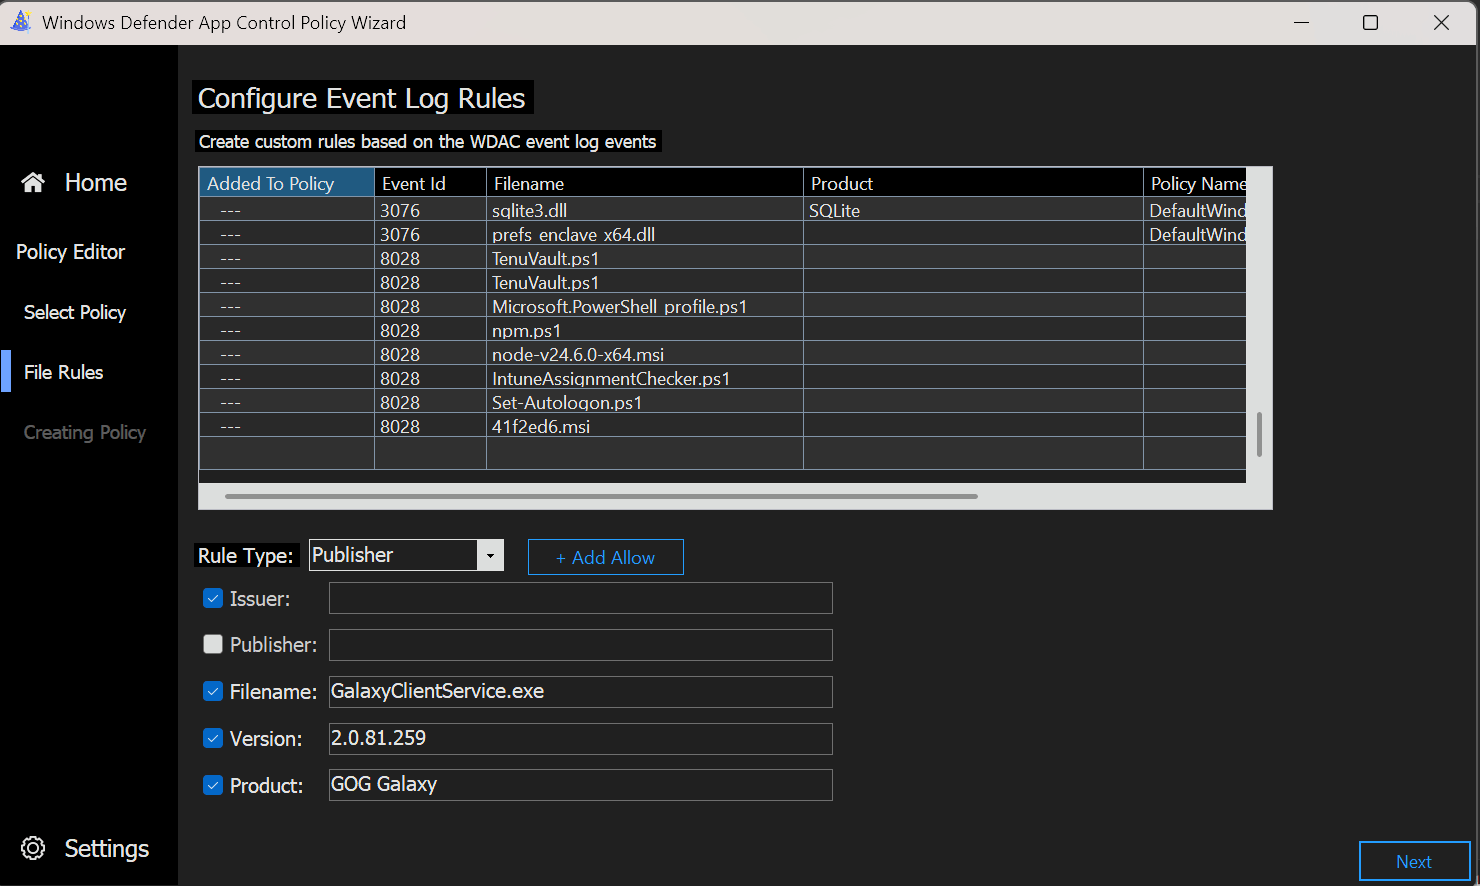
Below you find the recommended KQL query to get all the necessary information and the fields the Wizard needs.
DeviceEvents
// Take only App Control events
| where ActionType startswith 'AppControlCodeIntegrity'
// SigningInfo Fields
| extend IssuerName = parsejson(AdditionalFields).IssuerName
| extend IssuerTBSHash = parsejson(AdditionalFields).IssuerTBSHash
| extend PublisherName = parsejson(AdditionalFields).PublisherName
| extend PublisherTBSHash = parsejson(AdditionalFields).PublisherTBSHash
// Audit/Block Fields
| extend AuthenticodeHash = parsejson(AdditionalFields).AuthenticodeHash
| extend PolicyId = parsejson(AdditionalFields).PolicyID
| extend PolicyName = parsejson(AdditionalFields).PolicyName
// Keep only required fields for the App Control Wizard
| project-keep Timestamp,DeviceId,DeviceName,ActionType,FileName,FolderPath,SHA1,SHA256,IssuerName,IssuerTBSHash,PublisherName,PublisherTBSHash,AuthenticodeHash,PolicyId,PolicyName
AppIDTagging Policy
The App Control Policy Wizard has a new feature since June 2025 to create AppIdTagging Policies. This Policy is built on App Control for Business but does not determine whether applications are allowed to run. Instead, these policies assign a custom tag to the processes of running applications. Any application that meets the AppId policy criteria receives the tag. Those that do not simply remain untagged.
Opinion
This capability lays the groundwork for expanding the Managed Installer feature. By tagging processes with custom identifiers, you will likely be able to create Managed Installer rules for them in the future. This approach will let you authorize tagged processes to run without relying on specific executables, deployment methods, or tags that may disappear after updates.
- On the Policy Type screen of the App Control Policy Wizard, select
AppIdTagging Policy.
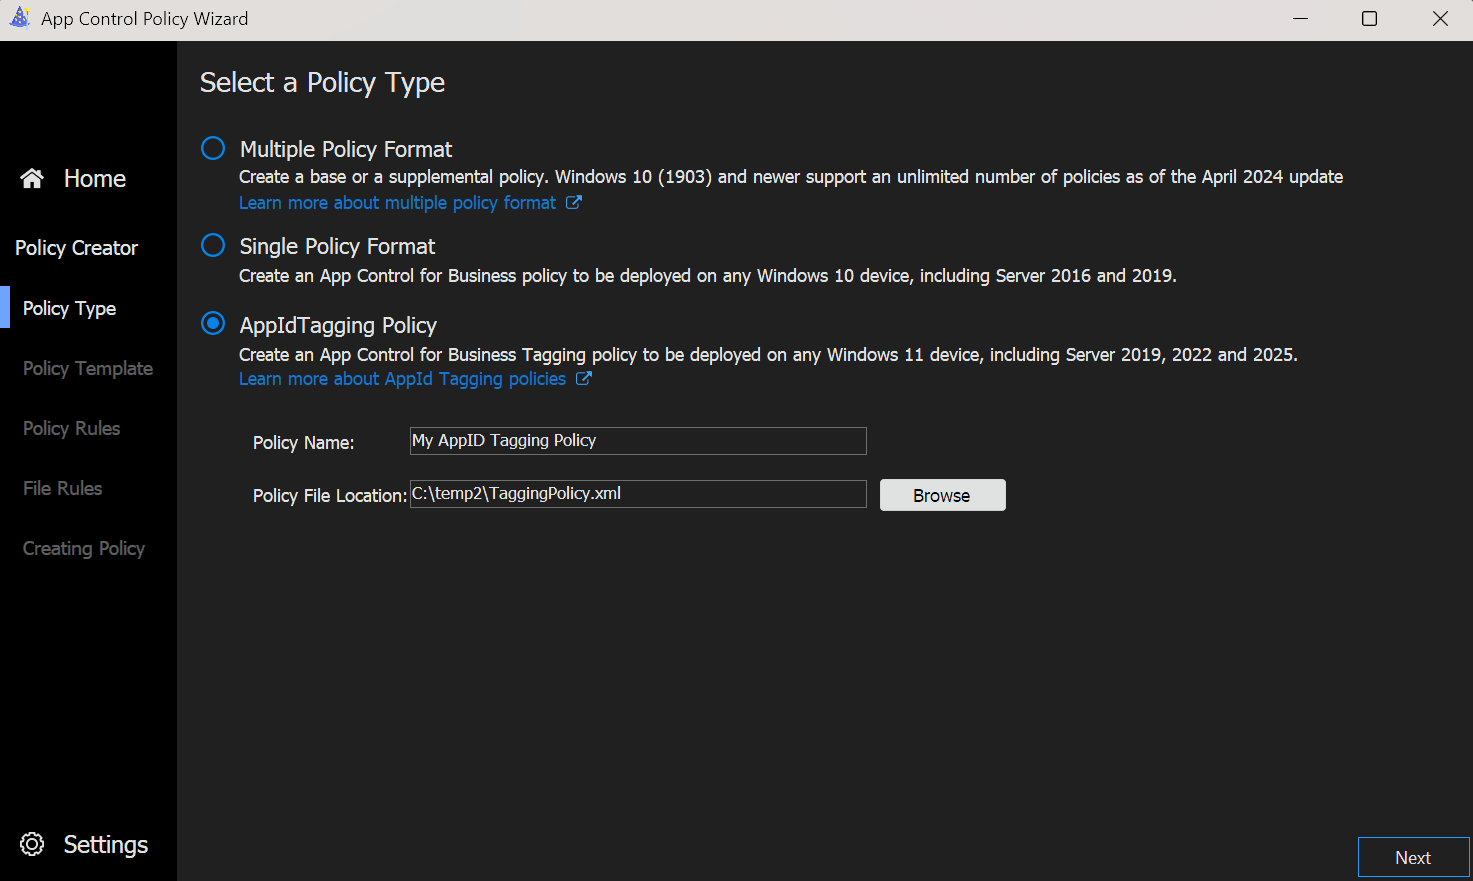
- On the Policy Template screen you can only change two settings.
- Update Policy without Rebooting
- Disable Runtime Filepath Rules
- When you proceed to the Policy Rules screen, you see the pre-defined AppID Tag and can now add additional tags.
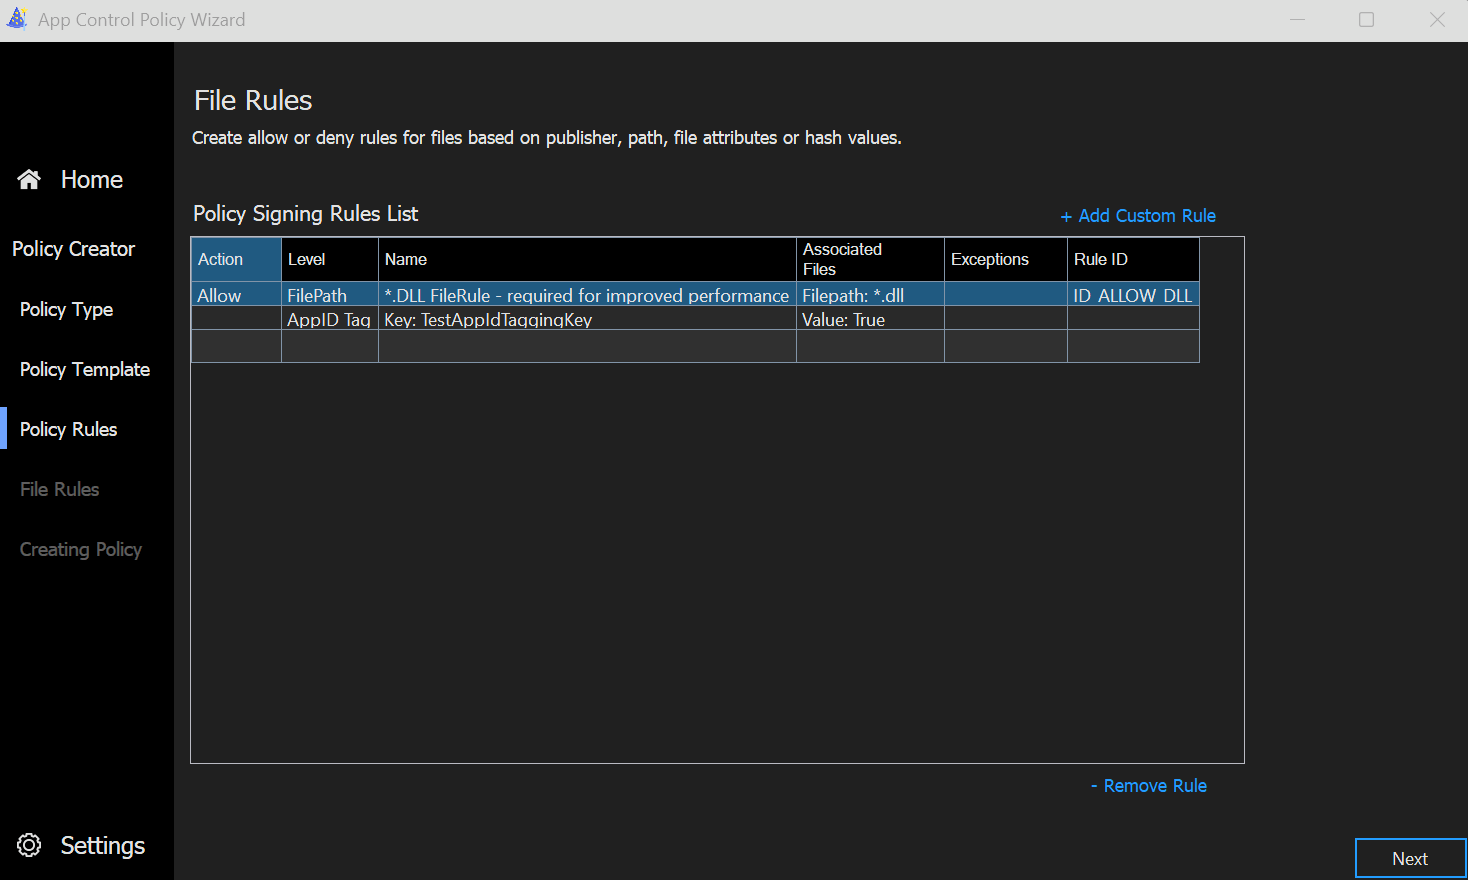
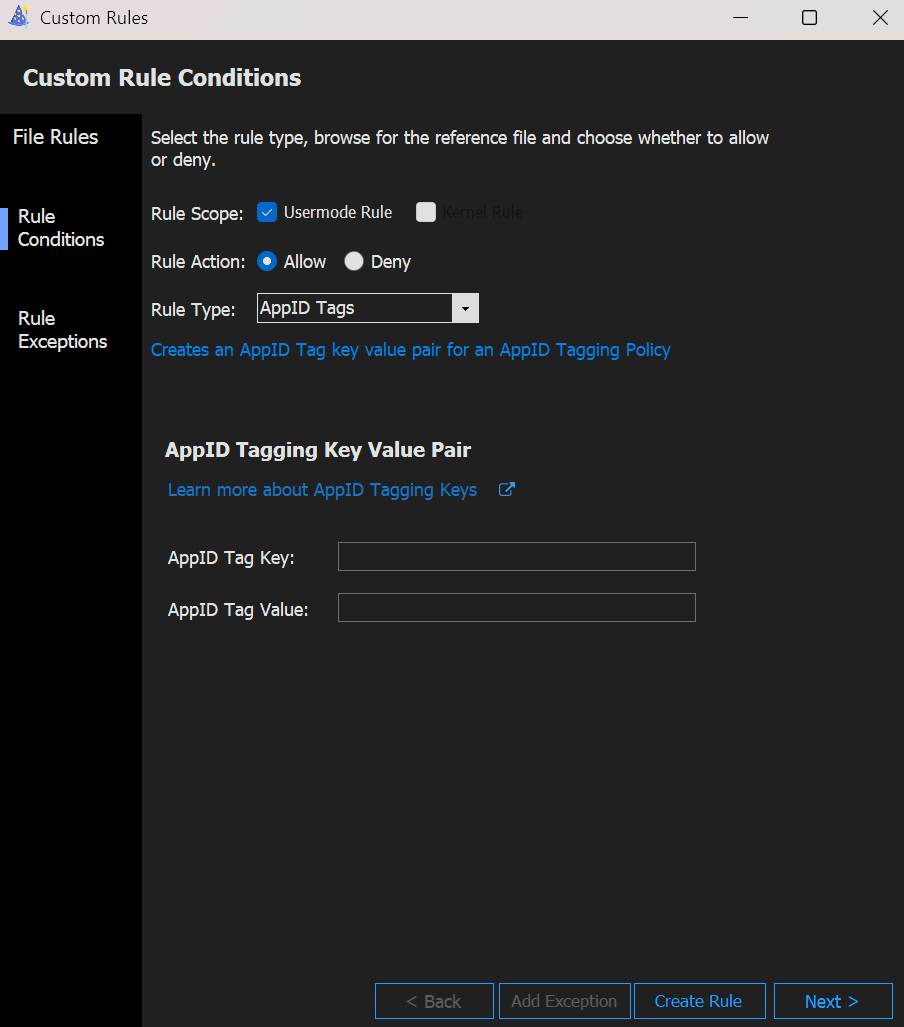
If you click + Add Custom Rule to create an additional tag, you will see the standard custom rule window you are familiar with. Here you can define the Key (e.g. 'TestTag') and 'True' as Value.
Verifying Tags on Running Processes
To verify that the application processes have been tagged correctly, you can use the WinDbg application from Microsoft.
INFO
Keep in mind that any processes already running before the policy was applied must be restarted, as App Control for Business only tags processes started after deployment.
Download and Install the Microsoft's WinDbg application
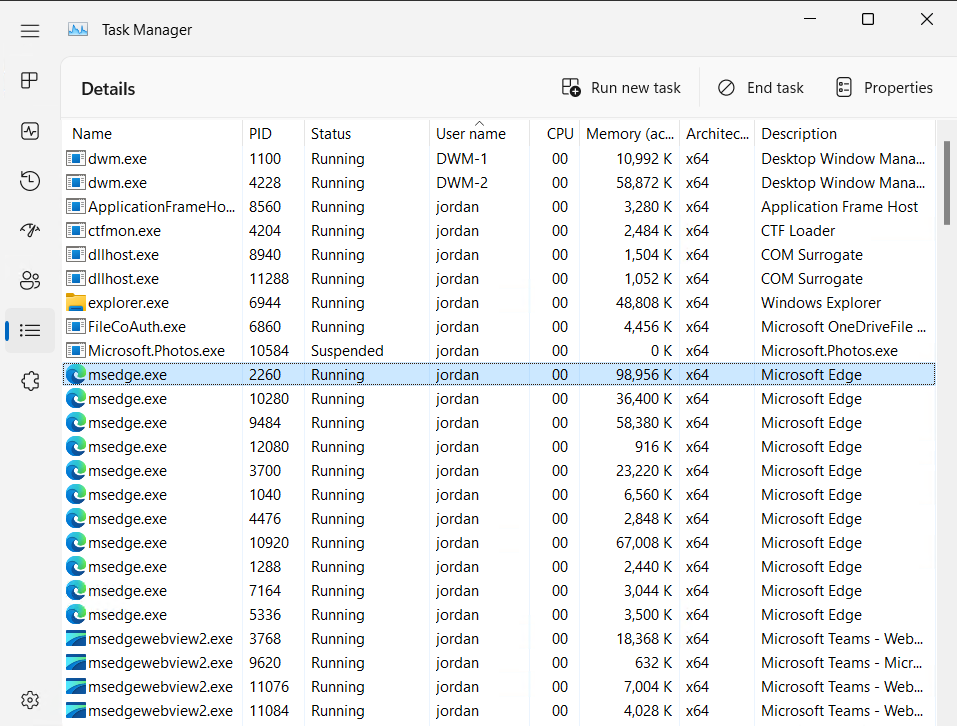
Get the Process ID (PID) of the process you want to check from Task Manager
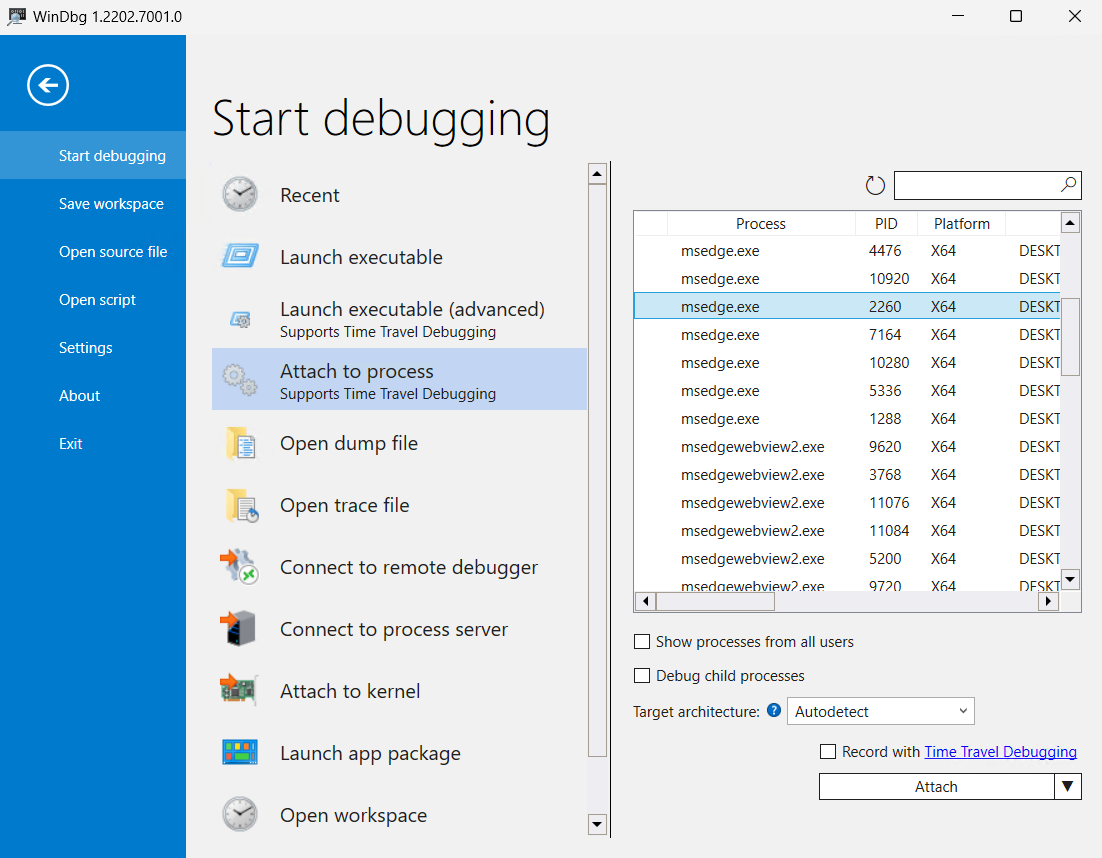
- Now open WinDbg to inspect the process
- Select File -> Attach to Process and search for the PID identified before
- Click
Attachto connect to the process.
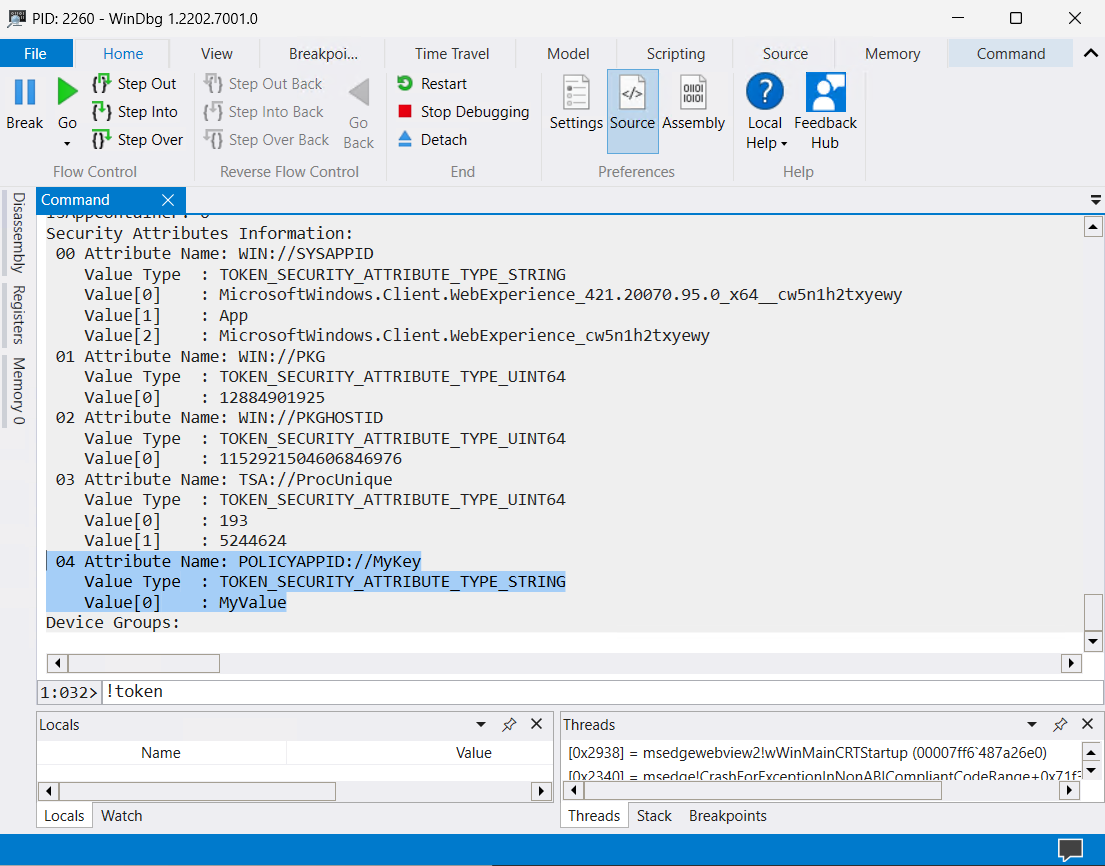
- Next type
!tokenin the textbar below the Command window and press Enter to see the security attributes off the process
Under POLICYAPPID:// you find the key you set in the policy and its corresponding value in the Value[0] field.
TIP
You can find more information about Appid Tagging in the AppId Tagging guide - Microsoft Learn
🛡️ AppControl Manager
AppControl Manager is a brilliant community tool by HotCakeX (Violet Hansen - MVP) that provides a nice graphical user interface to manage App Control and Code Integrity policies. It is escpecially useful when you want better UI then the WDAC Wizard provides or when you want to manage App Control policies in Bulk.
You can install it directly through the Microsoft Store:
or use Winget:
winget install --id 9PNG1JDDTGP8 --exact --accept-package-agreements --accept-source-agreements --force --source msstoreWhen we start the app, we got quite a few options to choose from:
- Policies creation
- Certification handling
- Log Processing
- Policy editing
- Information gathering
- Policy Management
- Documentation
- Logs
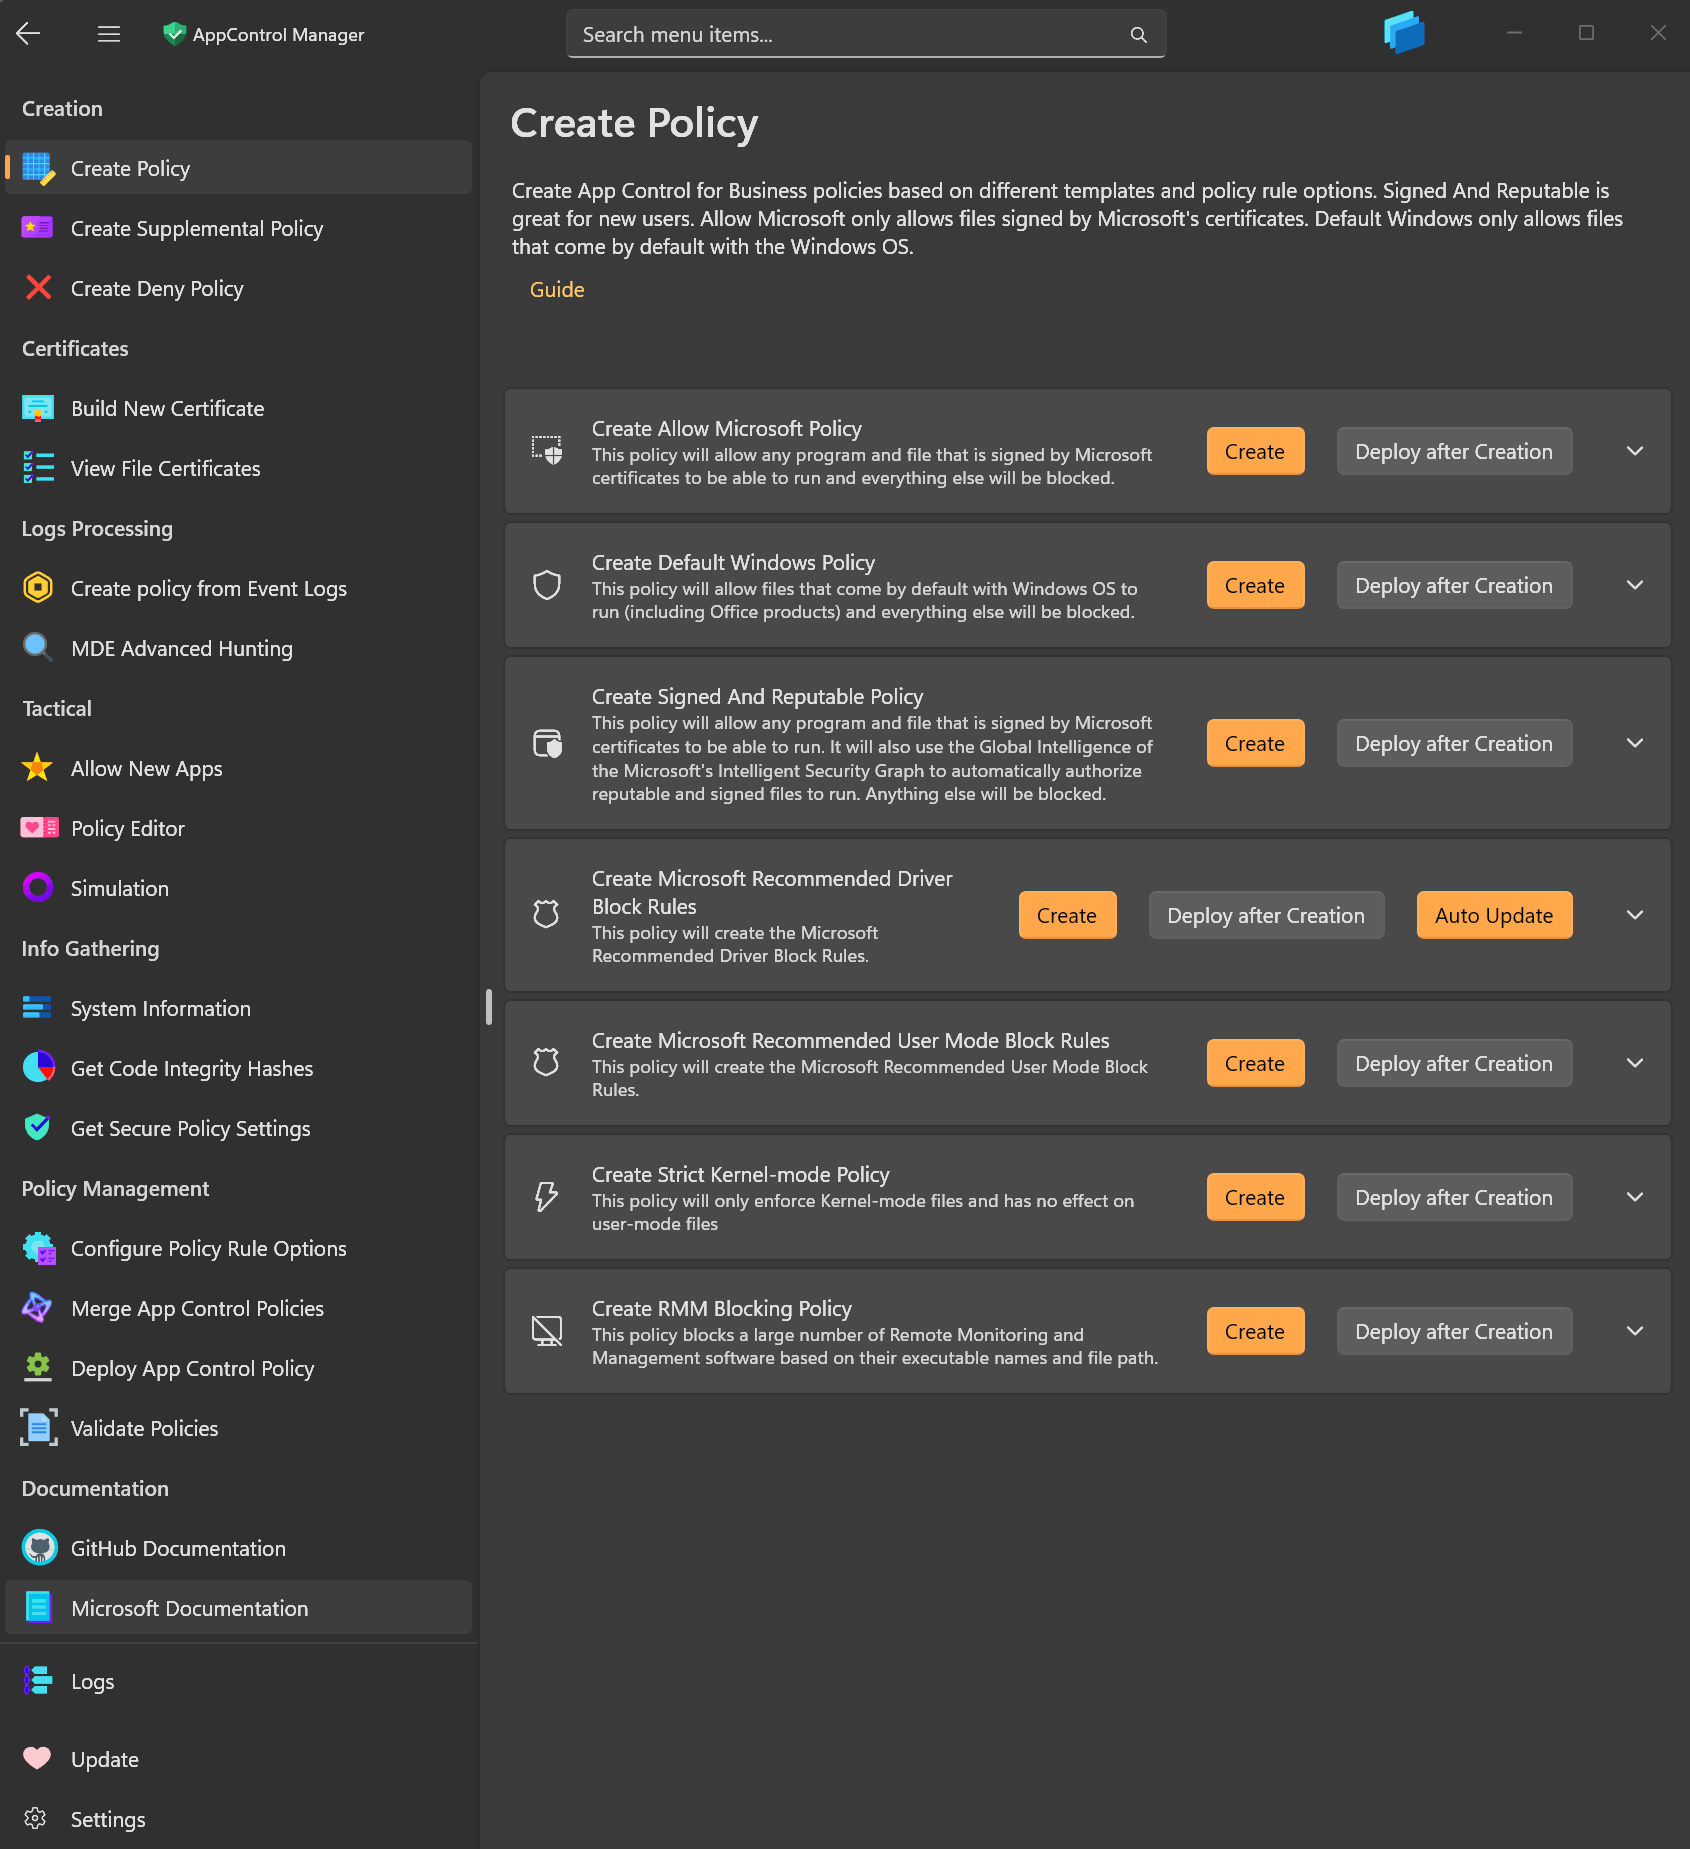
I won’t go over all the features here, since Violet has already done such a phenomenal job covering them in her own YouTube video. Instead, I’ll show how to easily edit and expand supplemental policies, because that is what I use the tool for the most.
INFO
If you want to learn even more about the tool, check out the complete Wiki on the AppControl Manager - Github Page.
In our scenario, we already created a base policy like shown before and created a suplemental policy with the WDAC Wizard. But now we want to add more rules to the suplemental policy and that conviniently in bulk.
- We start the AppControl Manager and select
MDE Advanced Hunting. - The AppControl Manager will now ask to relaunch it as admin to use this feature.
- Next we can use the built-in KQL query to get the necessary data from Defender for Endpoint.
- Use either the Cloud tab to let AppControl Manager ingest the data directly via Graph.
- Or use the Local tab to import a saved .csv file with the data. For that we can take the KQL query I provided before or one of the examples in the cloud tab and use that in the Defender admin Portal → Investigation & Response → Hunting → Advanced Hunting.
Advanced Hunting
Copy the code in the Query window and click on the Run Query button.
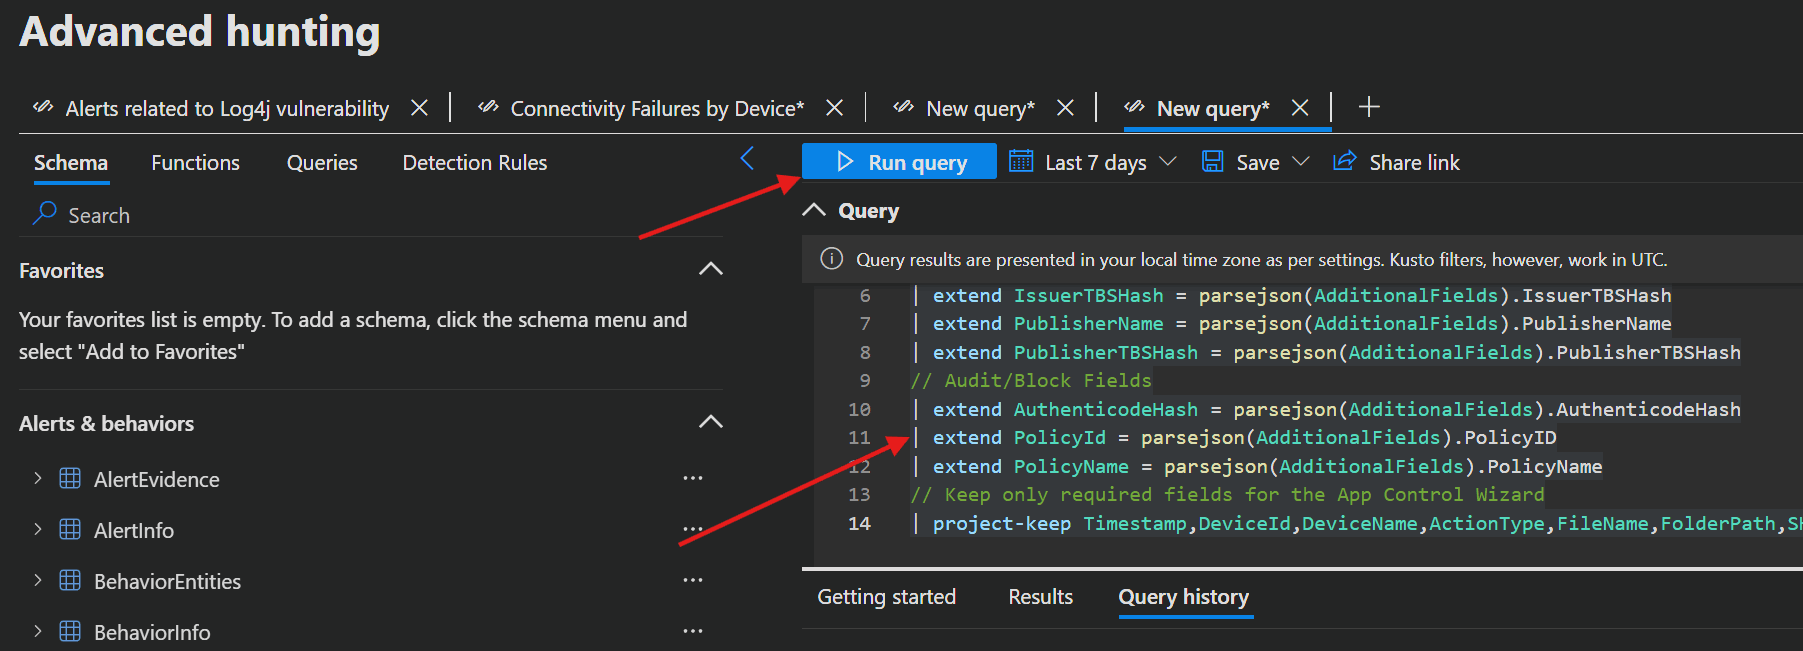
After that you can export the results as a .csv file by clicking Export → Download to CSV.
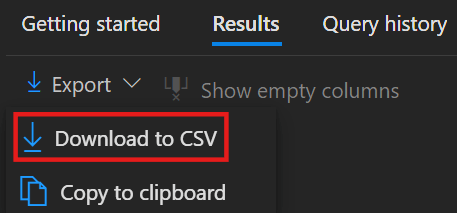


- Now when we exported a .csv file, we need to parse them in the Local tab. This is done by clicking
Browsing for MDE Advanced Hunting logs, selecting the .csv file and then clickingScan Logs.

- After the scan, independ of the method you used to get the data, we now need to look through the results to make sure we only make Allow rules for software we actually want to allow. The apps we don't want to allow, we can simply delete from the list.
- Then select the Create tab, click on the drop down next to
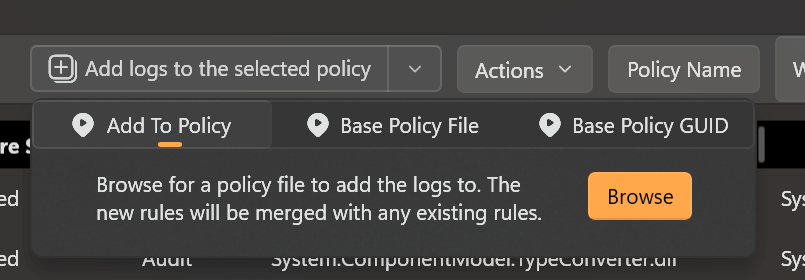
Add logs to the selected policy→Add to Policyand browse for the suplemental policy we created before.
- After selecting the policy, we can click
Add logs to the selected policyand the AppControl Manager will add all the rules for us to the suplemental policy. Following that we can click onAdditional Actionsif we want to take further actions like look at the changed policy.

💡 Conclusion
App Control for Business isn’t just a security feature, it’s a practical way to take control of the apps in your environment and protect your organization. With Intune, the WDAC Wizard and the AppControl Manager community tool, you have everything you need to start building and rolling out policies today. Begin small, test your configurations and grow your setup step by step. You’ll quickly see how these tools make it easy to strike the right balance between security and usability and your environment will be much safer for it.
So don’t wait: set up your first policy, give your organization safer ways to work and move your security forward.
My best practice
A practical way I approach app control is by combining the strengths of the different tools. I start by using the built-in Intune controls to create a solid base policy, that I can easily switch between Audit and enforce mode. Then, with the WDAC Wizard or AppControl Manager, I generate an empty supplemental policy. From there, I pull the last 30 days of logs from all devices through Defender for Endpoint using KQL and parse them with AppControl Manager to automatically build the necessary exceptions.
This method gives me a reliable baseline that I can first run in audit mode to observe the impact. Once I’m confident the policy works as intended, I gradually move into enforcement, step by step, without disrupting my users.
If you want to go deeper into the subjects or tools I talked about, like adding Certificates to your policies and so on, I recommend checking out the resources below.
Resources