👋 Introduction
Microsoft Defender for Identity (MDI) (formerly Azure Advanced Threat Protection / Azure ATP) is a cloud-based security solution that helps you protect and monitor identities across your organization. It brings together identity data within the Microsoft Defender portal from both on-premises and cloud identities. It helps you by bringing together your identity signals with all the other security signals you get and shows you a full picture of these threats. In addition it extends the automated attack disruption features of Microsoft Defender to your on-premises identities.
Licenses
Defender for Identity is already included in a lot of M365 plans, but also available as a standalone license.
- Enterprise Mobility + Security E5 (EMS E5/A5)
- Microsoft 365 E5 (Microsoft E5/A5/G5)
- Microsoft 365 E5/A5/G5/F5* Security
- Microsoft 365 F5 Security + Compliance*
- Standalone Defender for Identity license
How does it work?
Outside the Cloud, Defender for Identity works by utilizing a sensor on your AD DS (Domain Services / Domain Controller), AD FS (Federation Service) and AD CS (Certificate Service) Servers. The sensor monitors for threats, analyzes network traffic and collects event logs. It sends this data to the cloud service, which combines and displays the findings together with the other security signals in the Microsoft Defender portal.
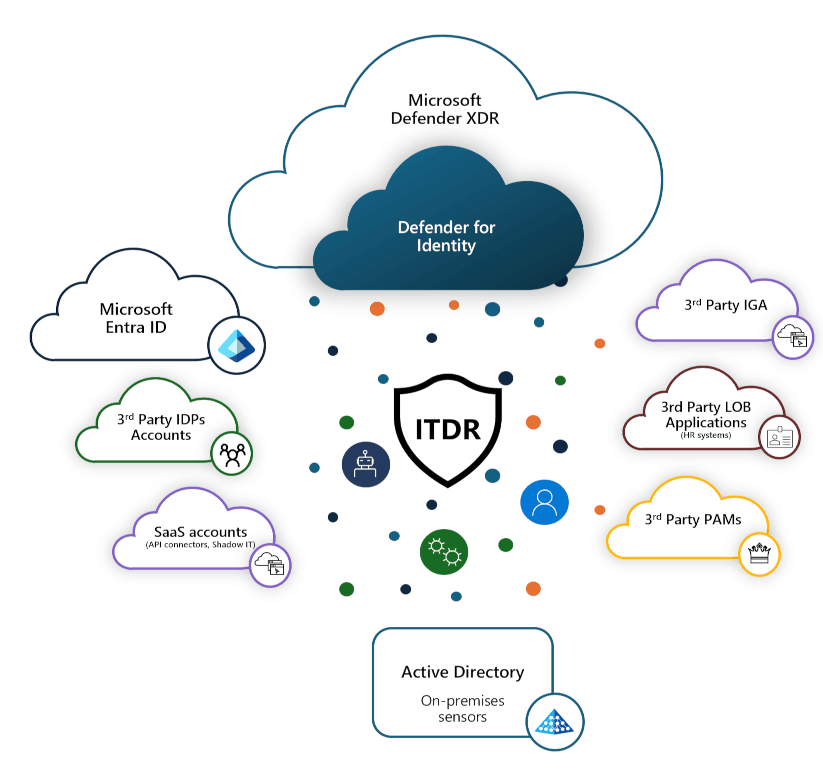
Over the past years, Microsoft has integrated Defender for Identity into the unified Microsoft Defender XDR portal. This provides a central location for viewing security alerts and incidents, making it easier to respond across different areas. This is because attackers do not operate within boundaries, whether these be identity-based, device-based or otherwise.
Also there are two versions of the Defender for Identity sensor (2.x & 3.x) at the moment because of the efforts from Microsoft to make the onboarding, offboarding and operation easier by integrating it into the Defender for Endpoint and Operating System from Windows Server 2019 onwards. That also means that the new sensor uses the same connectivity as Defender for Endpoint and you don't have to open additional ports on your firewalls. But the new sensor is still in Development at the moment (February 2026) and does not fully support all features of the previous version yet.
3rd Party Integrations
You can use a third-party identity or Privileged Access Management (PAM) provider with Microsoft Defender for Identity.
You have the option to integrate Okta using the built-in integration. Microsoft provides comprehensive documentation, including a step-by-step guide on how to configure the integration (see How Microsoft Defender for Identity protects your Okta accounts).
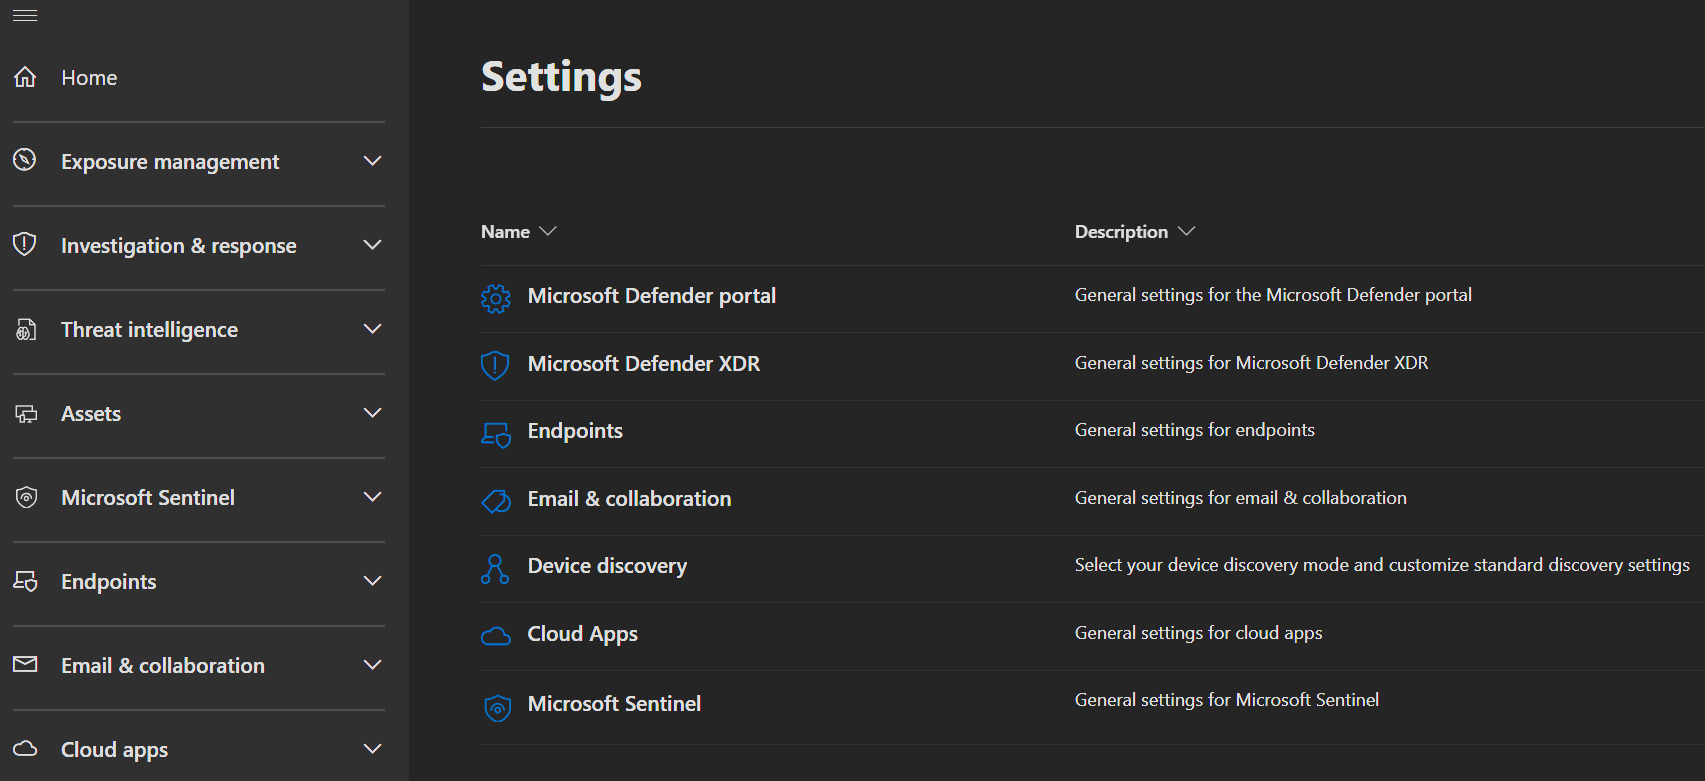
If you use a third-party PAM solution, Microsoft also offers built-in integrations with several providers like CyberArk, BeyondTrust and Delinea. Documentation on supported PAM providers is available directly in the Microsoft Defender portal -> Investigation & response -> Partner catalog -> Technology partners, where you can find detailed information and direct links. You can also access this information here: Integrate Defender for Identity with PAM services.
Sizing
MDI sensors require a minimum amount of resources to run properly. If the server doesn't have the required resources, domain controller performance shouldn't be affected, but the Defender for Identity sensor might not work as expected.
You can use the MDI sizing tool to check if you got the required resources. Download it here.
- Copy the tool to your domain controller and run it.
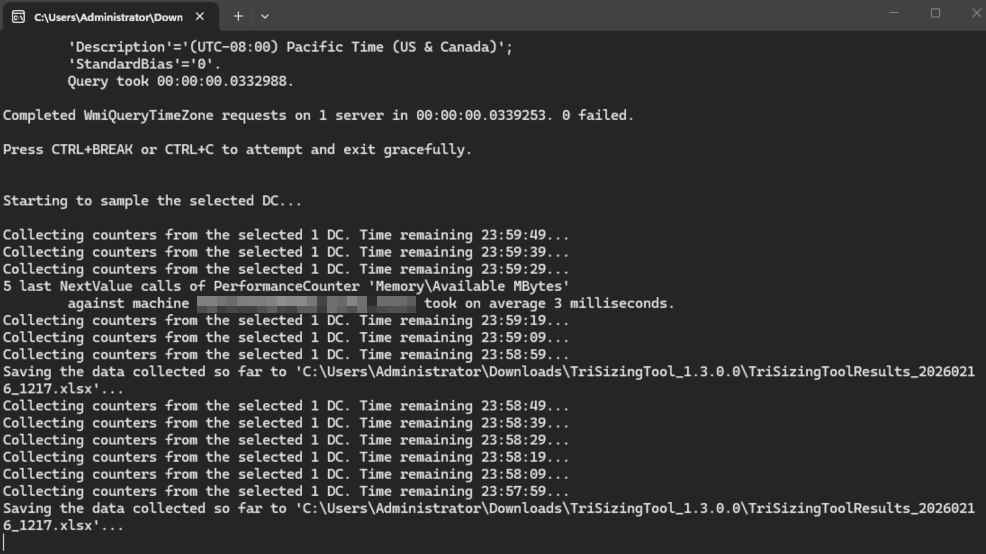
- The tool will run and check if your server is supported based on the Busy Packets/Second value. This is calculated based on the 15 busiest minutes over a 24-hour period. While the tool runs, it creates and updates an XMLS report. As soon as you are ready, stop the tool with
CTRL + Cand open the report to check the results.

A few common results are:
| Result | Description |
|---|---|
| Yes | The sensor is supported. |
| Yes, but additional resources required | Add missing resources. |
| Maybe | Current Busy Packets/sec may be higher than average. |
| Maybe, but additional resources required | Add specified resources or if Busy Packets/sec exceeds 60K. |
| No | Sensor not supported. |
| Missing OS Data | Unable to read OS data. |
| Missing Traffic Data | Unable to read traffic data. |
| Missing RAM data | Unable to read RAM data. |
| Missing core data | Unable to read core data. |
MDI sensor sizing estimation
| Busy packets / second | CPU (physical cores) | RAM |
|---|---|---|
| 0-1k | 0.25 | 2.50 |
| 1k-5k | 0.75 | 6.00 |
| 5k-10k | 1.00 | 6.50 |
| 10k-20k | 2.00 | 9.00 |
| 20k-50k | 3.50 | 9.50 |
| 50k-75k | 5.50 | 11.50 |
| 75k-100k | 7.50 | 13.50 |
The CPU and RAM capacity refers to the sensor's consumption, not the servers capacity.
Migrate ATA -> MDI
If your identity security still utilizes the local Advanced Threat Analytics (ATA) solution, moving from ATA to MDI modernizes your security with advanced analytics and automated remediations.
Unlike ATA, MDI uses Event Tracing for Windows (ETW) to provide more in-depth detection functionality, correlating threats with all the other security signals in the Defender security stack.
So it is highly recommended to switch to this modern, more secure and up to date security solution.
If you need guidance on how to Migrate, Microsoft provides migration information here.
💿 Installation
Getting started
To get started with Defender for Identity you first need to have a license activated in your tenant. Otherwise the Identity sections will not be visible in the Defender portal.
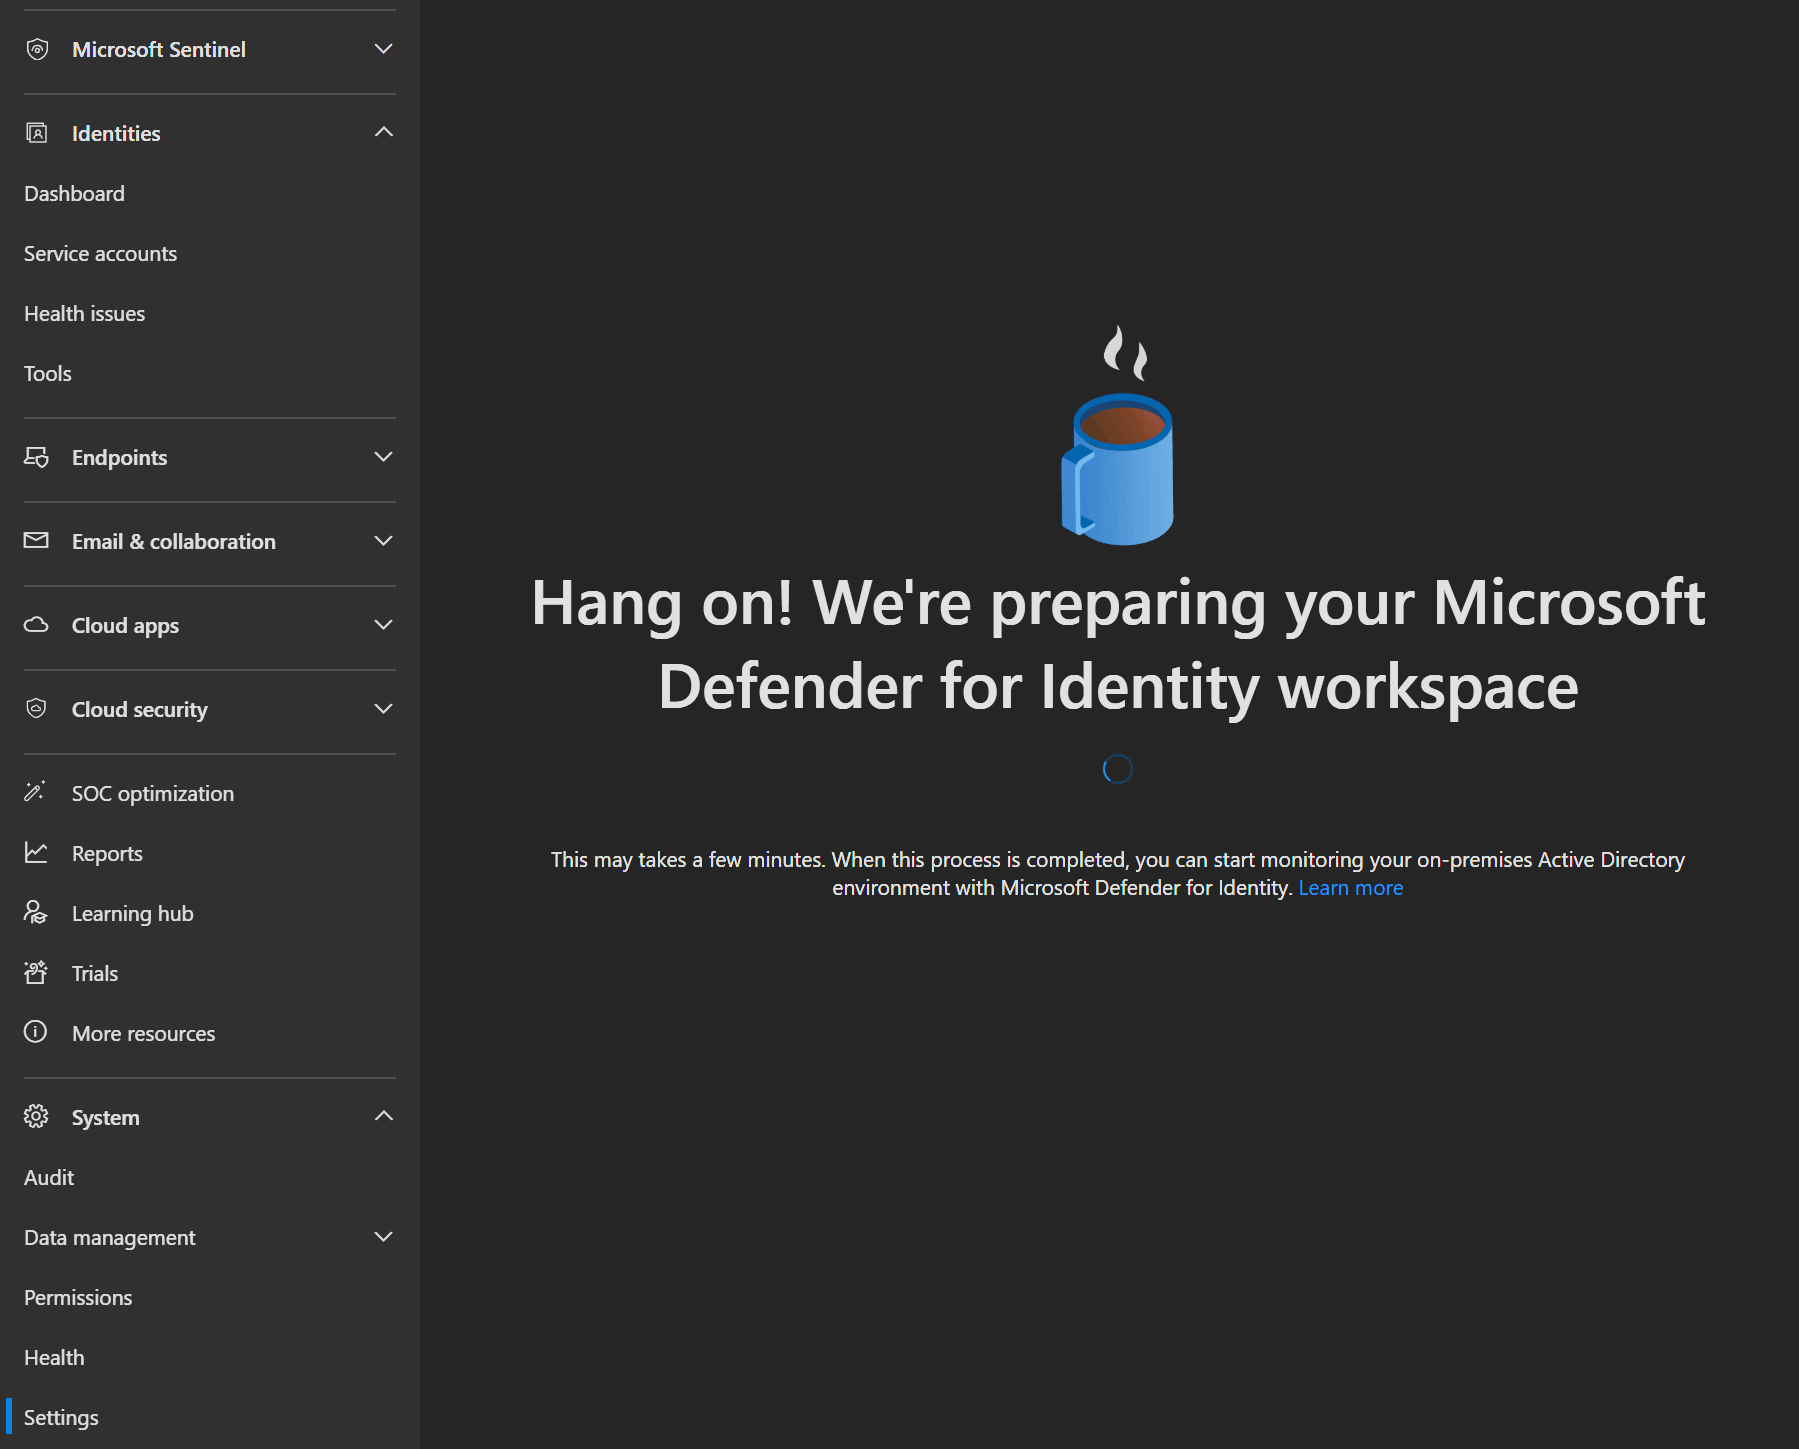
If you have a license and navigate to your Defender portal, the Identity section takes a moment to appear.
After the Identity section is visible and you navigate to Settings -> Identity, the Defender for Identity Workspace will get prepared.
Which Sensor version is right for me?
The new sensor (v3 / unified sensor) is integrated directly into Windows Server with Defender for Endpoint, eliminating separate installation steps, addtional port openings and a separate update channel, using the standard Windows update cycle. Version v3 is recommended when onboarding new domain controllers, but there is no need to update existing MDI environments.
Here you find a comparison table between the two sensor versions:
| Feature | Classic Sensor (v2) | New Sensor (v3) |
|---|---|---|
| Installation | Separate download & installation | Built-in to Windows Server |
| OS Support | Windows Server 2012 R2 and later (2012 R2 functionality is limited due to the OS.) | Windows Server 2019 and later |
| Network Ports | Requires additional ports to be opened for communication with the cloud service (look here) | Uses the same ports as Defender for Endpoint, no additional ports needed |
| Update Method | Separate update channel | Standard Windows Update cycle |
| Name Resolution | Local protocols (NetBIOS, WINS) | Cloud-based NNR via Defender data |
| Management | Standalone agent management | Unified with Defender for Endpoint (MDE) |
| AD permissions | Requires account with read acces to the whole directory to get full functionallity | Uses Local System identity |
Be aware that if you got the 2.x sensor alreaddy installed, you won`t be able to deploy the 3.x sensor on the same server, without removing the old one first.
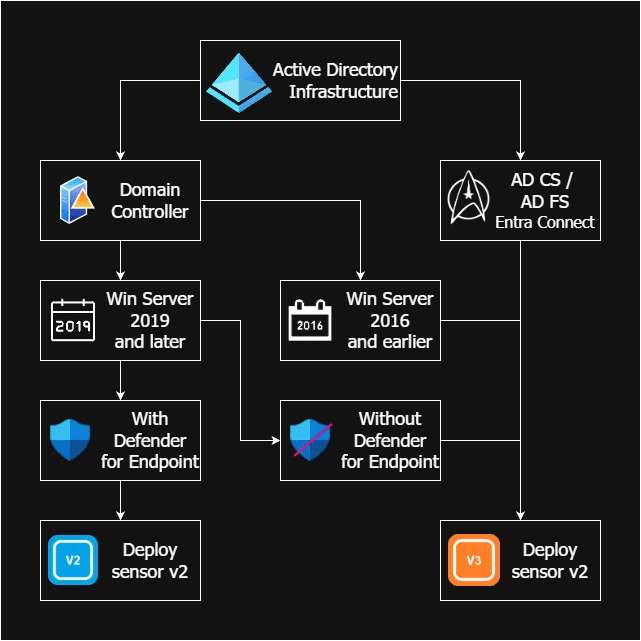
And here is a decision tree to help you decide which sensor version to use:
Current limitations of sensor v3:
- Server needs Defender for Endpoint deployed
- Doesn't support VPN integration
- Doesn't support ExpressRoute
Microsoft is activly working on closing the gaps between the two sensors, providing a migration functionality and support for running v3 without Defender for Endpoint in the future.
WARNING
You should install MDI sensors on all DC's (including RODC's) and on every AD FS, AD CS or Microsoft Entra Connect server in your environment to get full visibility and protection.
Sensor 2.x Installation
After your Workspace is prepared, you can start installing MDI sensors.
INFO
If you are using a Virtual Machine, ensure the following settings are configured:
| VM running on | Description |
|---|---|
| Hyper-V | Ensure that Enable Dynamic Memory isn't enabled for the VM. |
| VMware | Ensure that the amount of memory configured and the reserved memory are the same, or select the 'Reserve all guest memory (All locked)' option in the VM settings. |
| Other virtualization host | Refer to the vendor supplied documentation on how to ensure that memory is fully allocated to the VM at all times. |
- Under General -> Sensors you click
Add sensorand get the question about which sensor version you want to install.
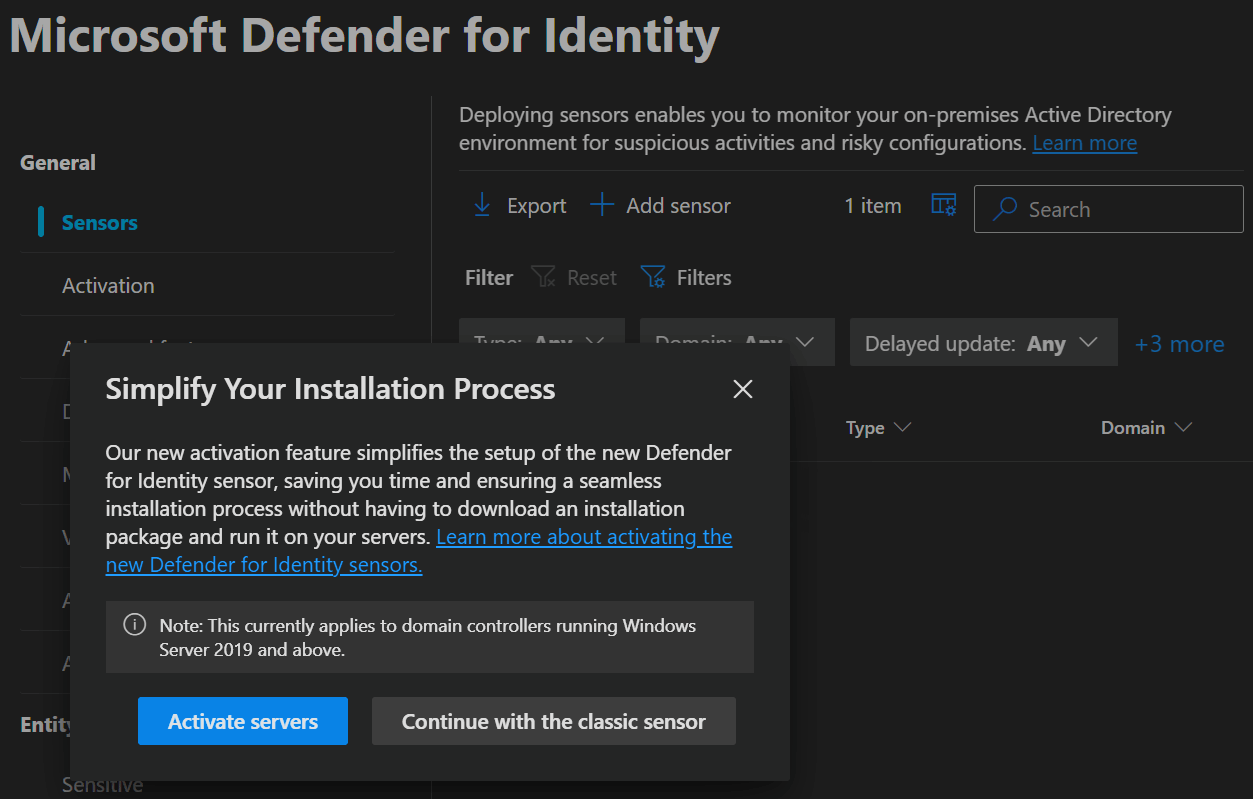
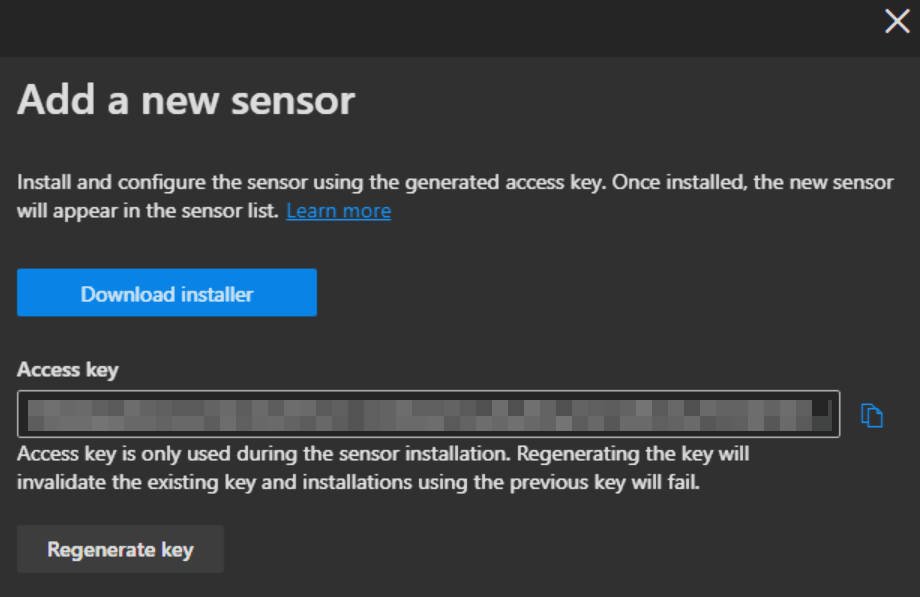
- If you click
Continue with the classic sensoryou can download the 2.x installer and get the Access Key you need during installation.
INFO
You can download the installer only directly from the portal.
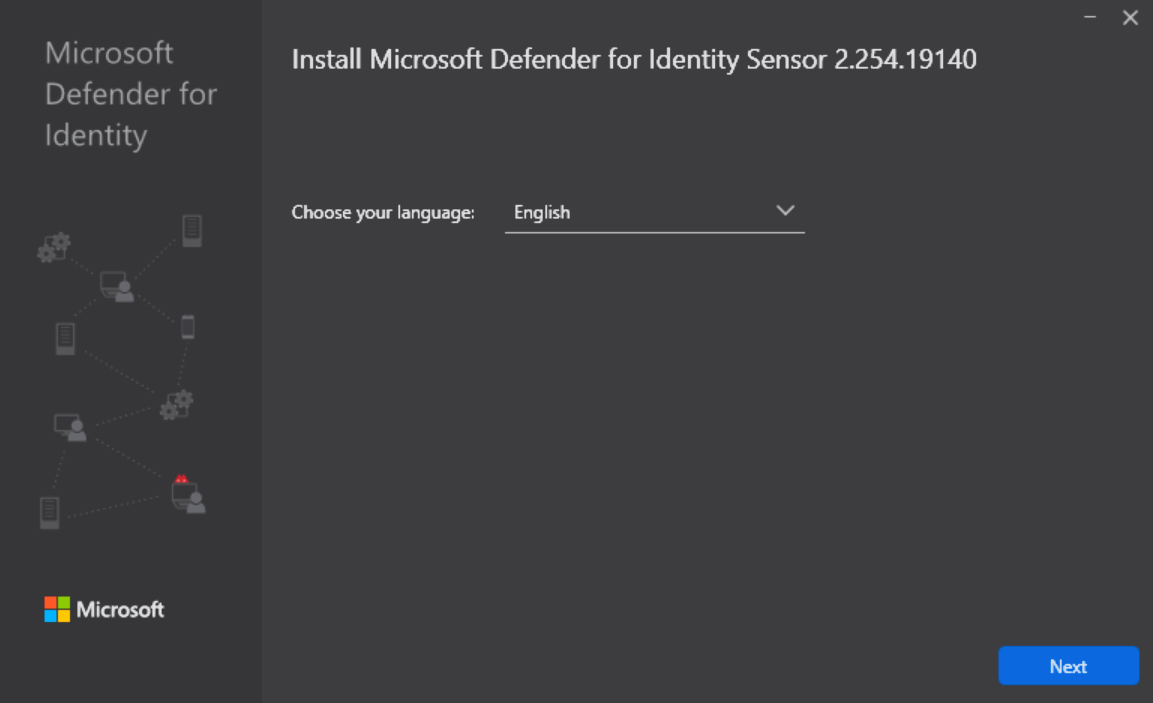
- When starting the installer you select your language and click
Next.
- Next you get the option of which type of installation you can perform. On a Domain Controller (as in the screenshot), a standalone MDI server or a AD FS / AD CS / Entra Connect server.
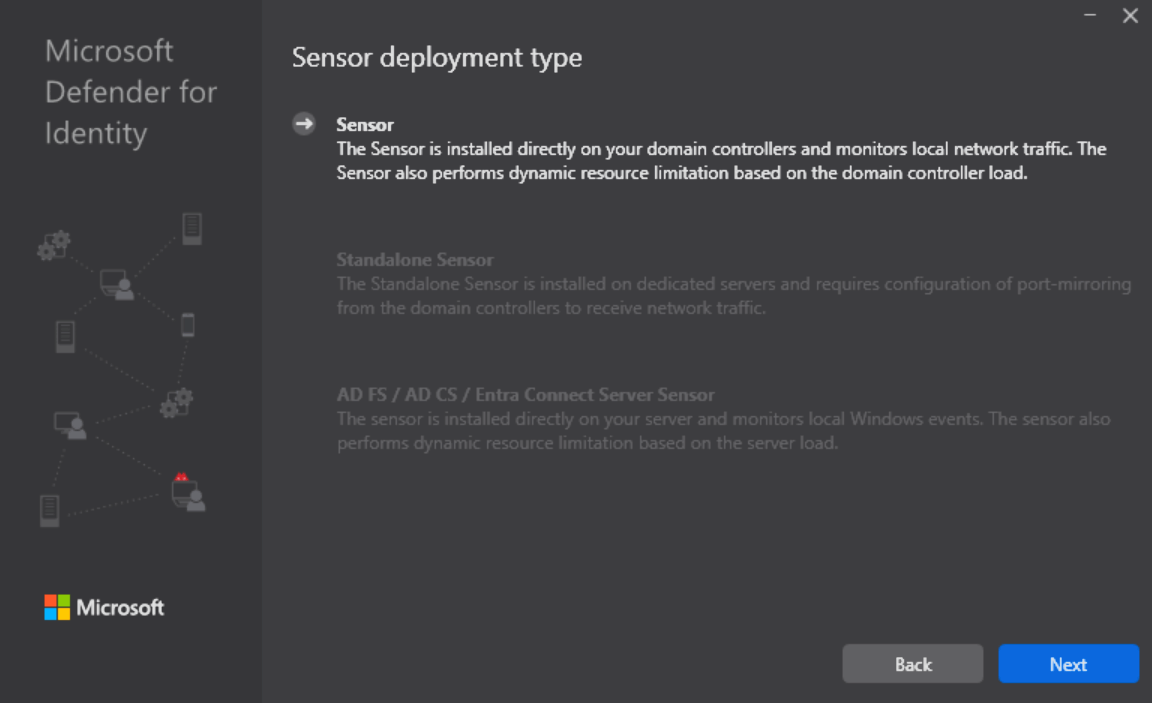
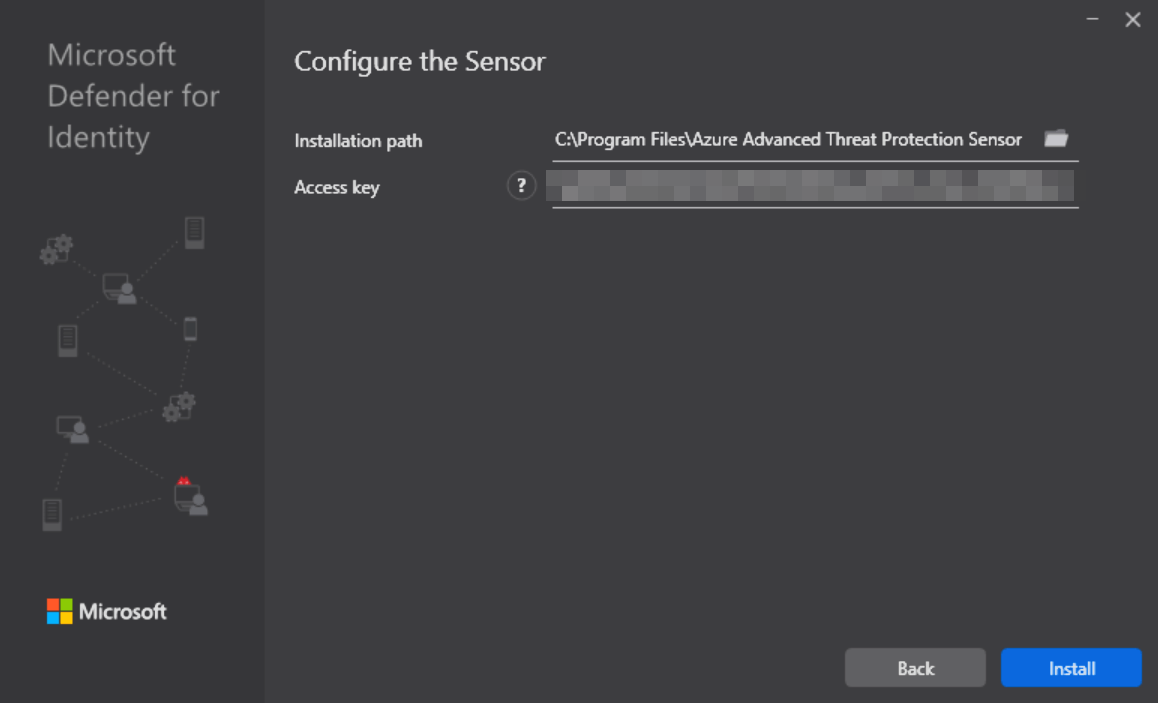
- After clicking
Next, you select the installation path, enter the Access key shown to you in the portal and clickInstall.
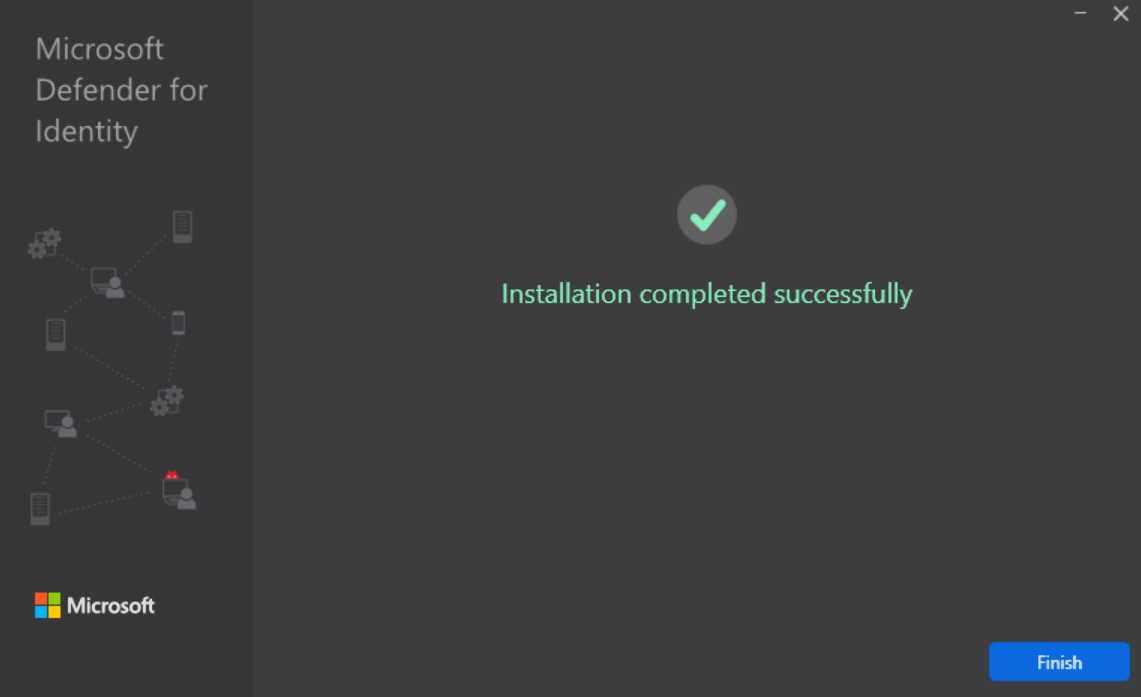
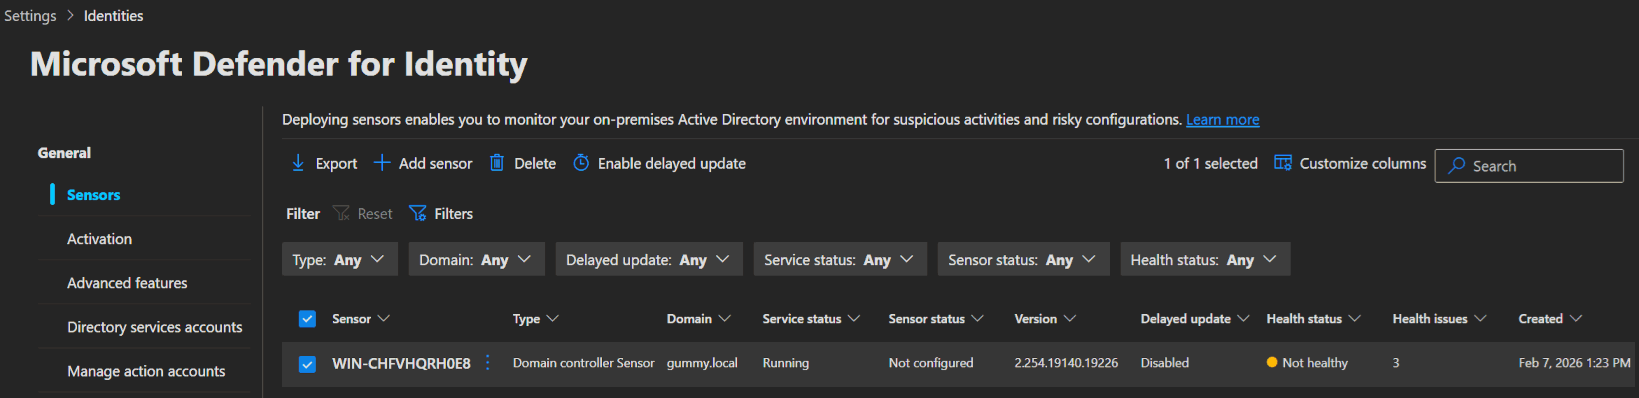
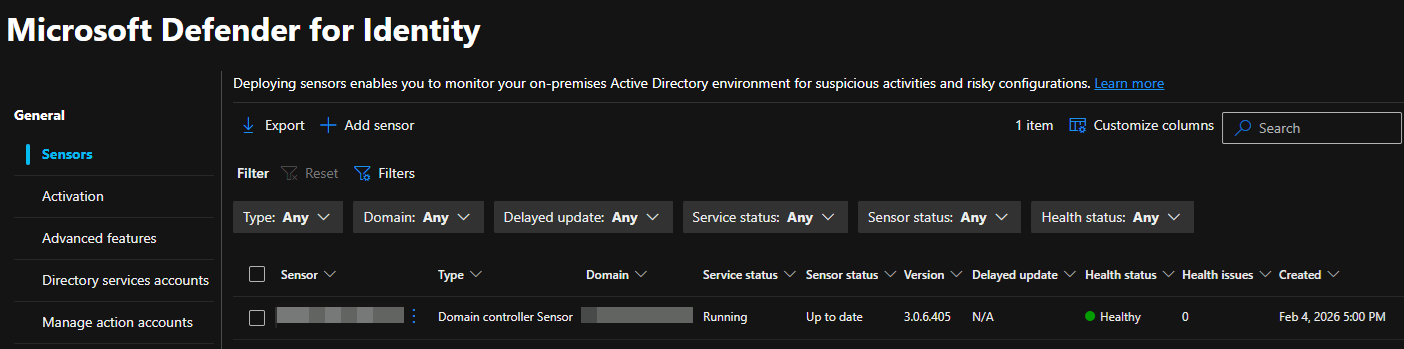
- After the Installation completes you can find the Sensor in the Sensors list in the portal.
Sensor 3.x Installation
INFO
If you are using a Virtual Machine, ensure the following settings are configured:
| VM running on | Description |
|---|---|
| Hyper-V | Ensure that Enable Dynamic Memory isn't enabled for the VM. |
| VMware | Ensure that the amount of memory configured and the reserved memory are the same, or select the 'Reserve all guest memory (All locked)' option in the VM settings. |
| Other virtualization host | Refer to the vendor supplied documentation on how to ensure that memory is fully allocated to the VM at all times. |
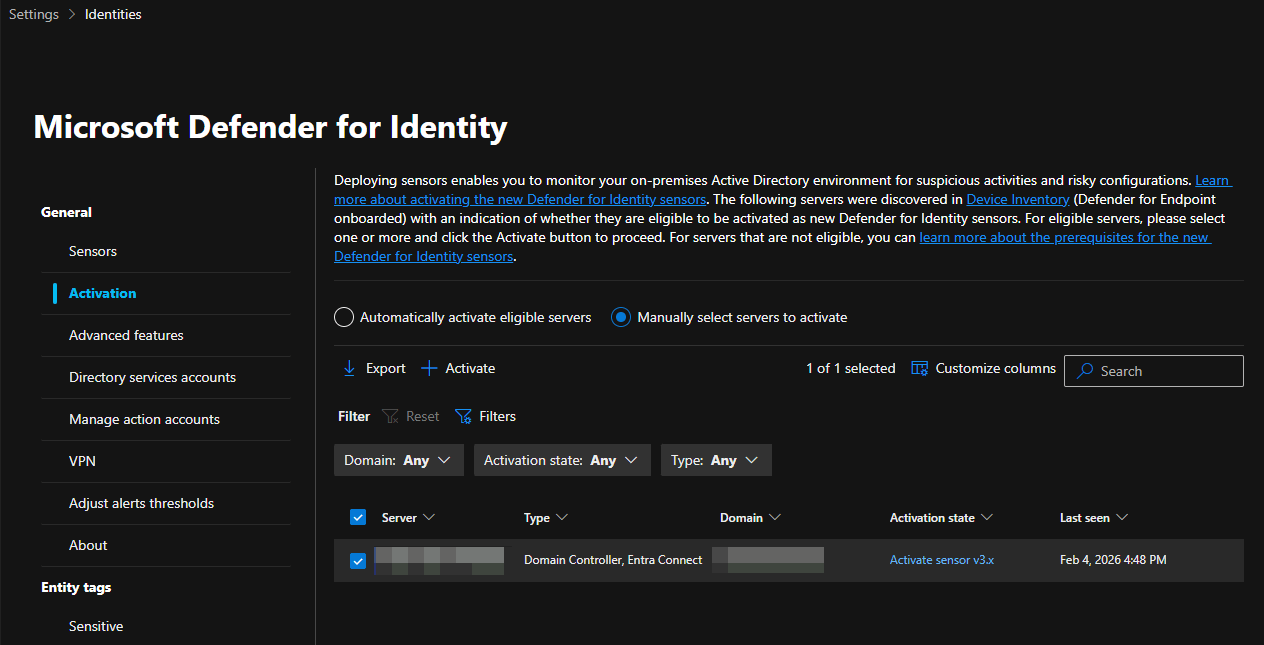
- To install the new sensor, you go to the Defender Portal -> System -> Settings -> Identities and select the Activation blade. Here you will see all the server with defender for endpoint in your environment that are eligible for the new sensor.
- Select the server and click
+ Activateto start the activation process.
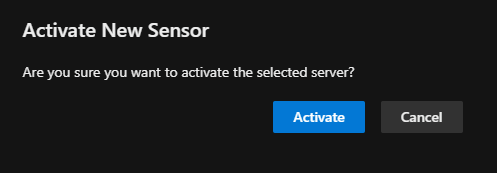
- Confirm the activation by clicking
Activatein the pop-up.
- After that, the portal will confirm the successful activation.
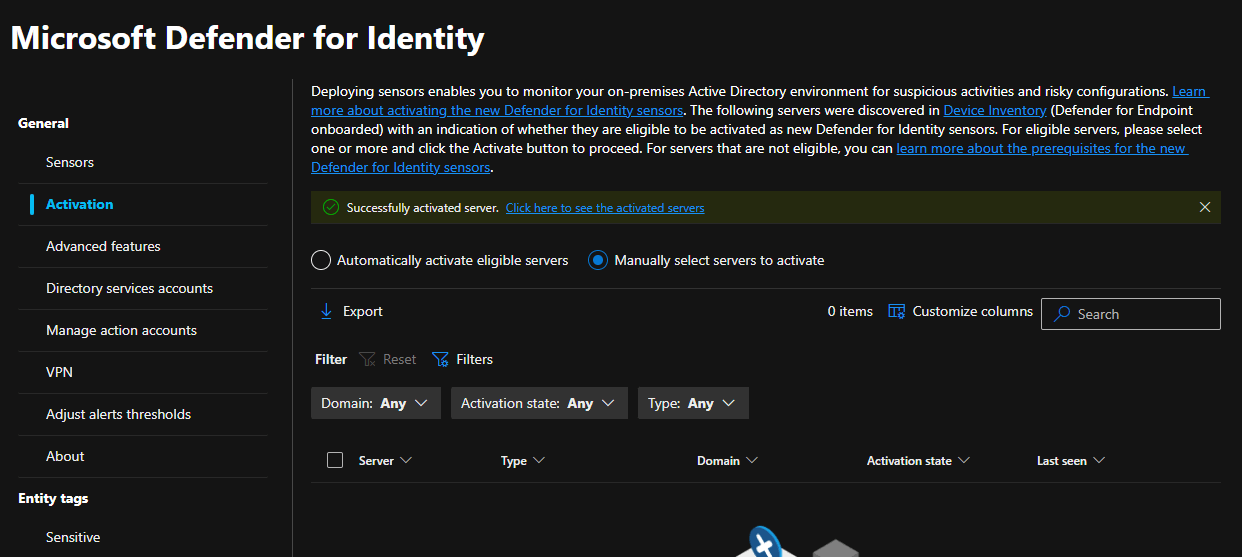
- The new sensor can then be found in the sensor list.
⚙️ Configuration
You should set up a few recommended settings for MDI now:
Audit settings
To configure the audit settings required for MDI to detect suspicious activity, you can use PowerShell, Group Policy, or if you are deploying the new sensor (v3.x), leverage the Automatic Windows auditing configuration feature.
The following audits are required to set up either way for Domain controllers:
- Directory services advanced auditing
- NTLM auditing
- Domain object auditing
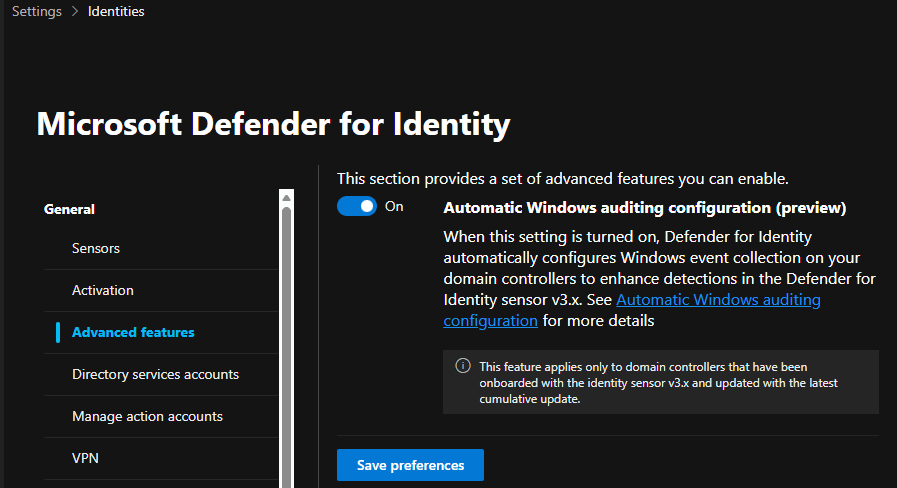
The automatic option
The automatic option applies the same settings you would configure manually, with the added benefit of checking every 24 hours for any configuration drift and automatically correcting it. You can set it up in the Defender portal -> System -> Settings -> Identities, select Advanced features and turn Automatic Windows auditing configuration on.
WARNING
Currently this is still in preview as of February 2026, but works perfectly in my experience.
The PowerShell option
To use the powershell option you first need to install the MDI powershell module on your server.
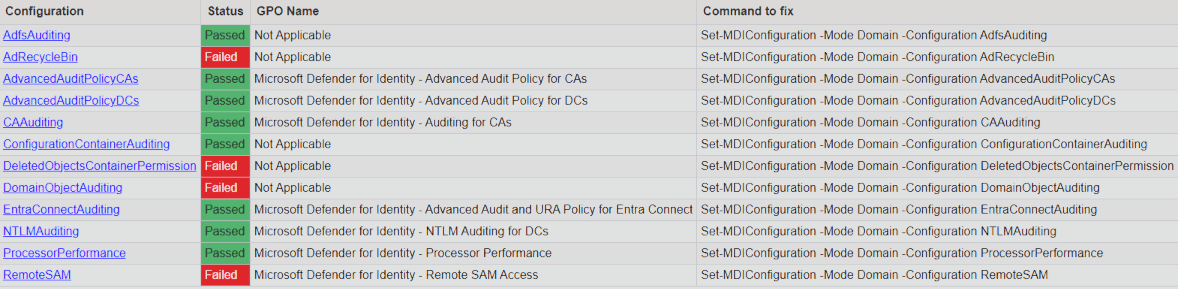
powershellInstall-Module -Name DefenderForIdentityThen you can use the following command to generate a report of all the settings and their configuration commands. These also need to be run.
powershellNew-MDIConfigurationReport -Path "C:\Reports" -Mode "Domain" -Identity "DOMAIN\AdminAccount" -OpenHtmlReport
The Group Policy option
To configure MDI via group policy, set up a new policy on your server by starting Group Policy Management and navigating to:
Computer Configuration -> Policies -> Windows Settings -> Security Settings
Configure the settings as described in the Microsoft documentation: Configure Windows event auditing.
Configure RPC auditing
Microsoft introduced a new RPC (Remote Procedure Call) Health alert for the new sensor (v3.x). This will monitor the RPC configuration on your MDI devices and should improve the detection accuracy and security coverage. For this you need to apply a tag to your sensor 3.x devices, which will enforce the configuration automatically.
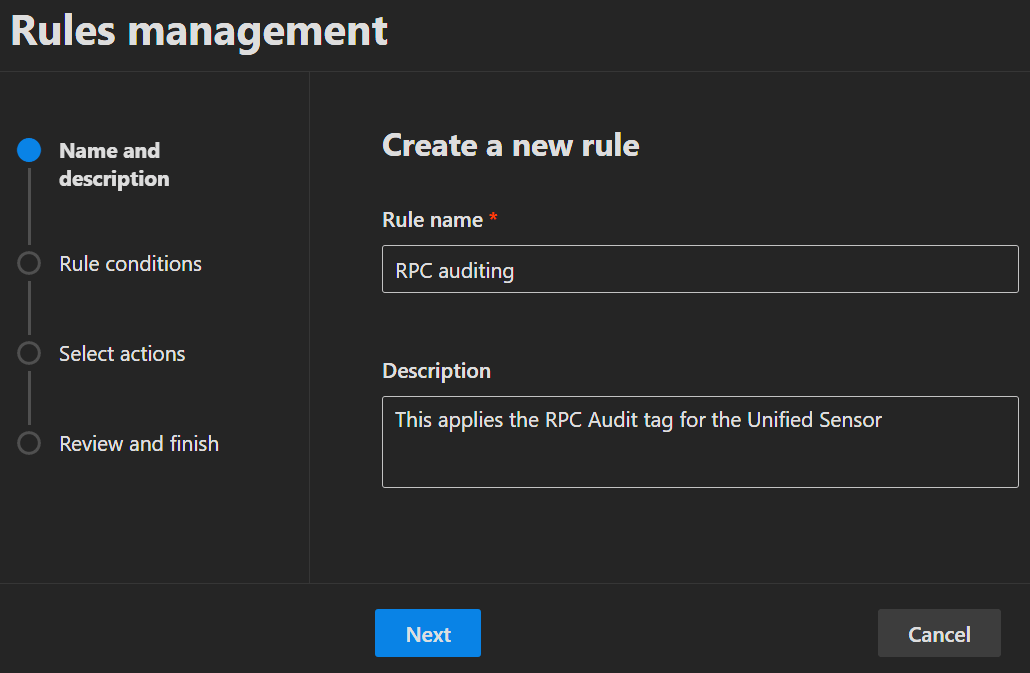
- To configure the tag, open the Defender Portal -> System -> Settings -> Microsoft Defender XDR -> Asset Rule Management and click
➕ Create a new rule. - Enter a Rule name, Description and click
Next.
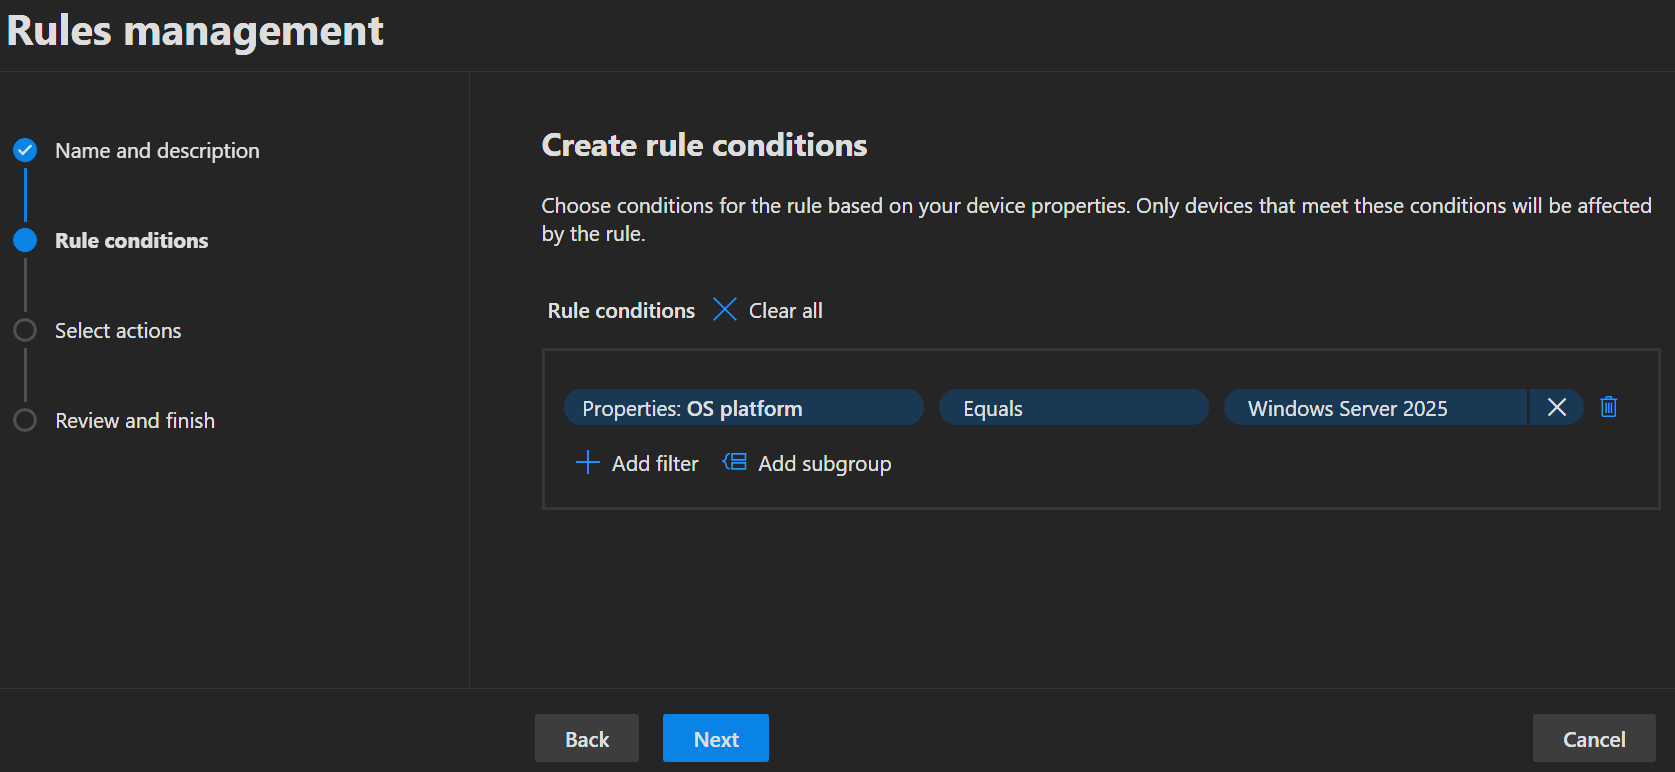
- Create rules to target the servers with the v3 sensor and click
Next.
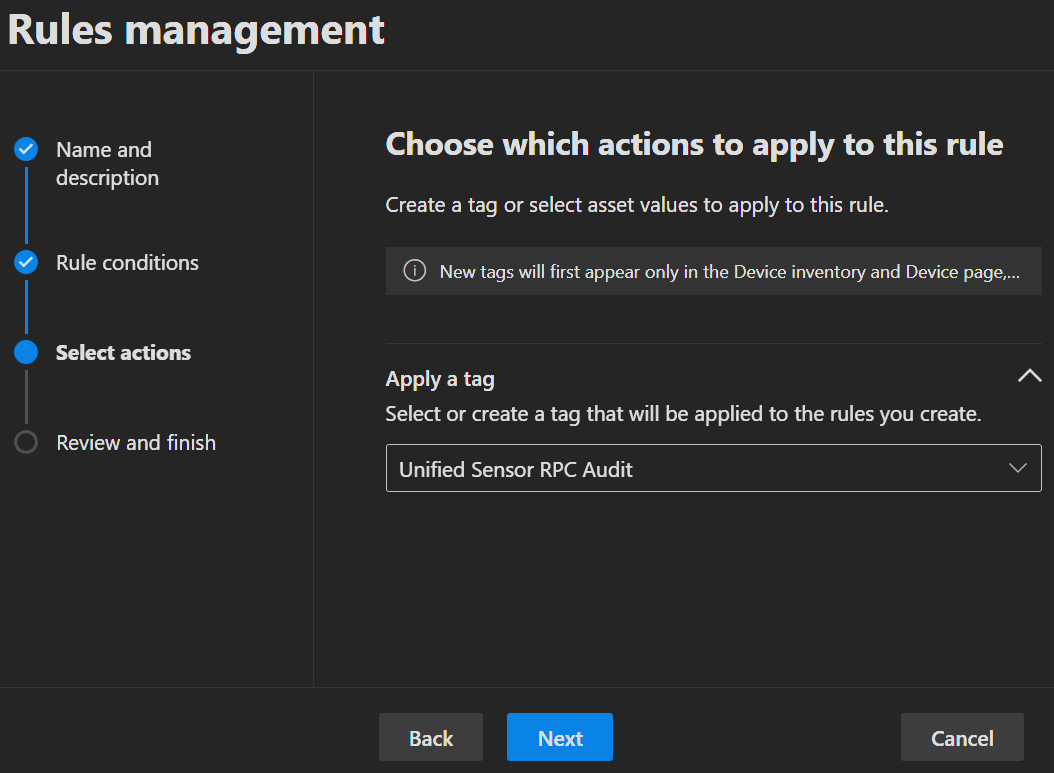
- Add the tag
Unified Sensor RPC Auditand clickNext.
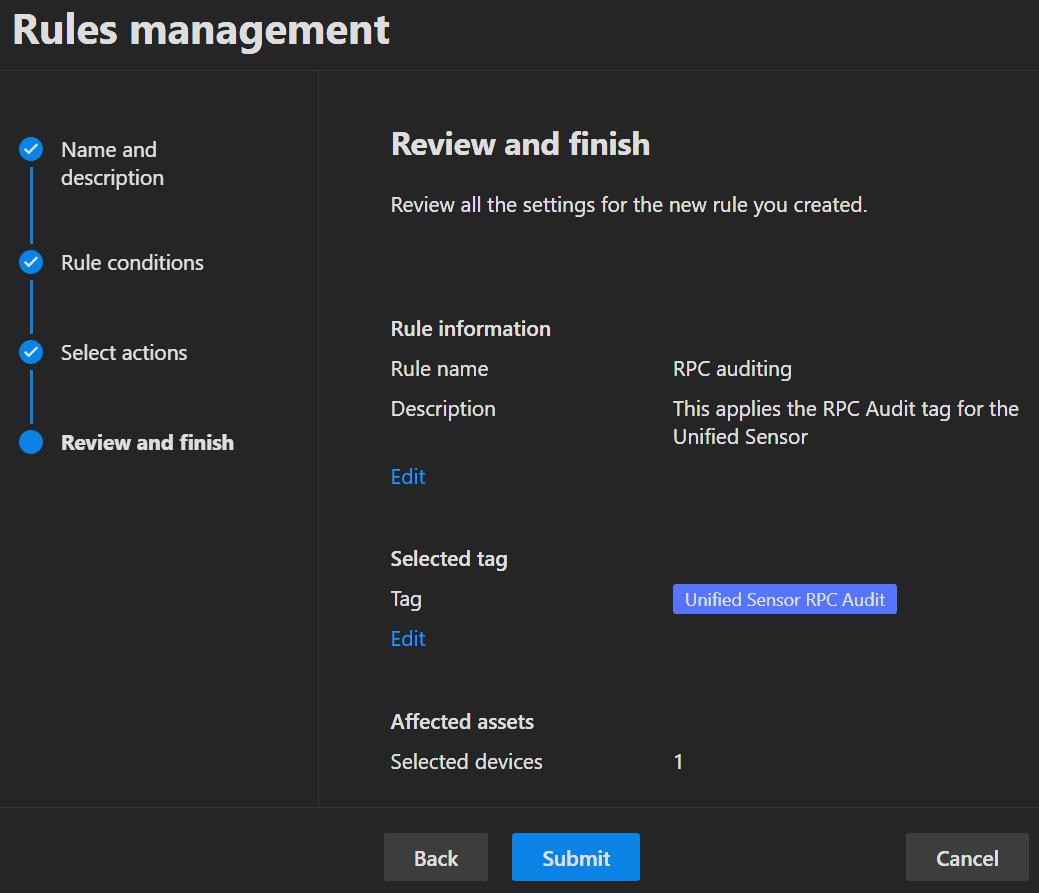
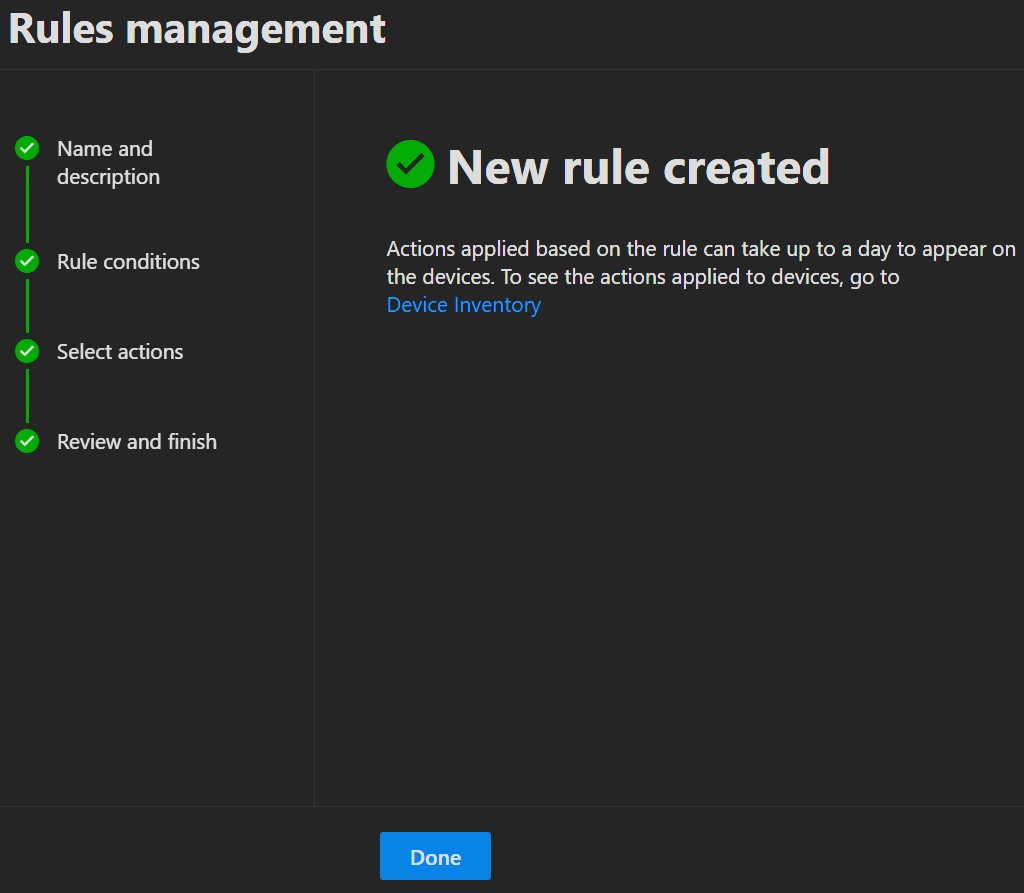
- On the last page of the wizard you do not only see a summary of the settings you just created, but also the amount of devices that will be affected. If everything looks good, click
Submitto create the rule.
 |  |
|---|
- The new rule will then be visible in the list together with its last run time and status.
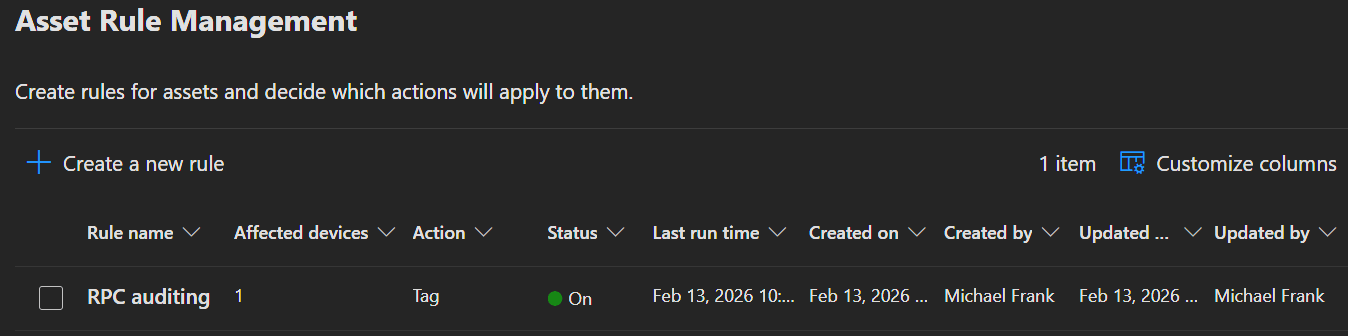
- If you display the 'Tags' column in the device overview under Assets -> Devices, you will also be able find the newly applied tag there.

INFO
Be aware that the tag is also automatically applied to all future devices that match your rules.
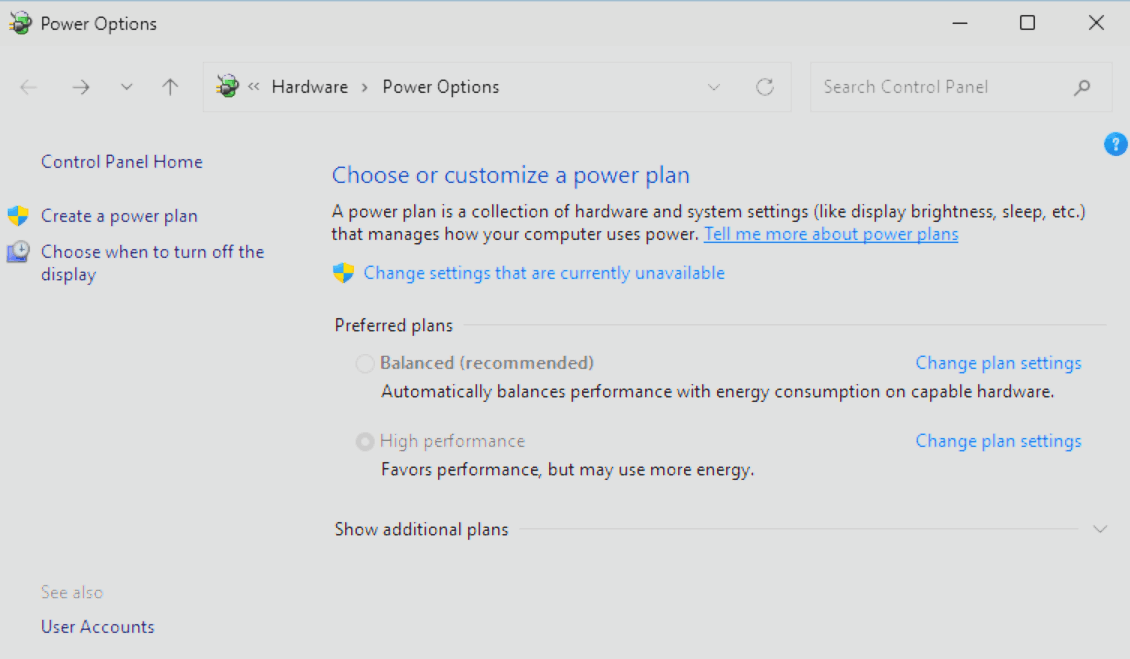
Power settings
No matter which sensor version you are using, set the Power options on the server to High Performance to ensure the best performance. You can do that either in the Control Panel of the server directly or via your policy of choice (Group Policy, Azure Arc etc.).
Time synchronization
All servers and domain controllers with an MDI sensor should have system times that are within five minutes of each other to make sure the sensors work properly.
To set that up you need to create a Group Policy and link that to your MDI Servers.
- Open the Group Policy Editor for your Domain and create a new Group Policy Object.
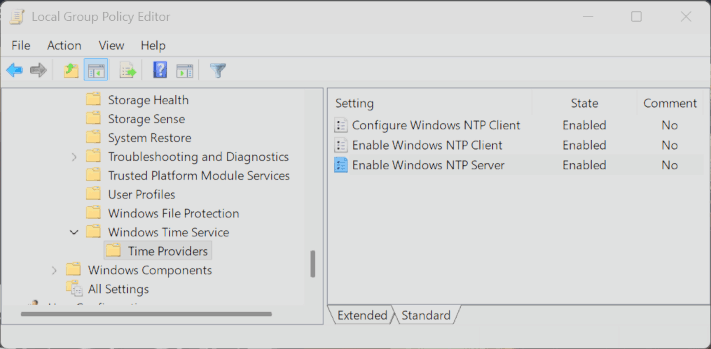
- Go to Computer Configuration -> Administrative Templates -> System -> Windows Time Service -> Time Providers and set all settings to
Enabledwith standard settings.
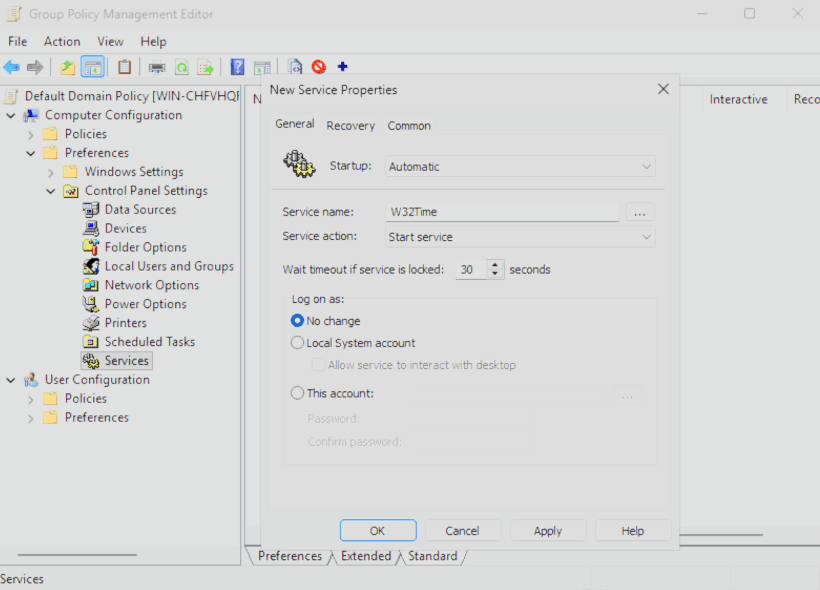
- Next got to Computer Configuration -> Preferences -> Control Panel Settings -> Services and create a new Service. Set the Service up as shown in the Screenshot below.
- Now close the Policy editor and link the GPO to the OU where your MDI Server's are.
Network Name Resolution (NNR)
As a core component of MDI, NNR maps raw network data and IP addresses to specific devices. This correlation allows for more precise event attribution and more effective threat investigation.
MDI sensor v3.x uses the Defender device inventory for name resolution, requiring no additional configuration or port openings.
MDI sensor v2.x uses network traffic and TCP fingerprinting to map IP addresses to device objects by correlating computer names with Active Directory. For this, the sensor uses a few methods:
Primary methods:
- NTLM over RPC (TCP Port 135)
- NetBIOS (UDP port 137)
- RDP (TCP port 3389) - only the first packet of Client hello
Secondary method:
- Queries the DNS server using reverse DNS lookup of the IP address (UDP 53)
INFO
If you need more information on how to configure the methods for the 2.x sensor, click here.
Manage Sensor settings
- To manage your individual sensors you can go to the Defender portal -> System -> Settings -> Identities and click on the sensor of your choosing.
- This will trigger the opening of a details pane on the right side with more information about the sensor and its status.
- On the bottom of the pane select
Manage sensorto open another pane where you can configure sensor details. - You can optionally enter a Description to provide more information about the sensor, but you must ensure that the Domain controller field is filled in and that, in the case of a v2 sensor, at least one of the Network adapters is selected.
| sensor v2.x | sensor v3.x |
|---|---|
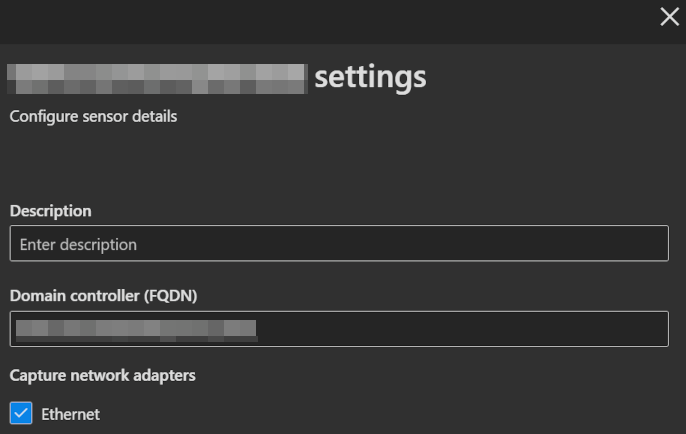 | 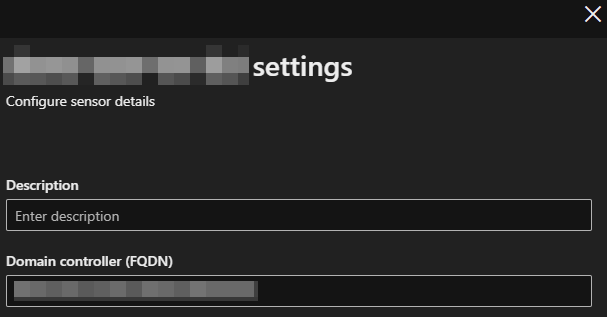 |
Directory services accounts (DSA)
You can set up a read only directory service account for your MDI sensor to connect to the domain controller. Even so the MDI service and updater will use a local account regardless, there are scenarios where a DSA can be nessecary.
- Sensors installed on AD FS or AD CS servers.
- Accessing the DeletedObjects container to gather information on deleted users and computers.
- Domain and trust mapping.
- Querying another domains over LDAP when activity from someone out of this other domain is detected.
INFO
Your DSA accounts must have read permissions across all domains in the forest.
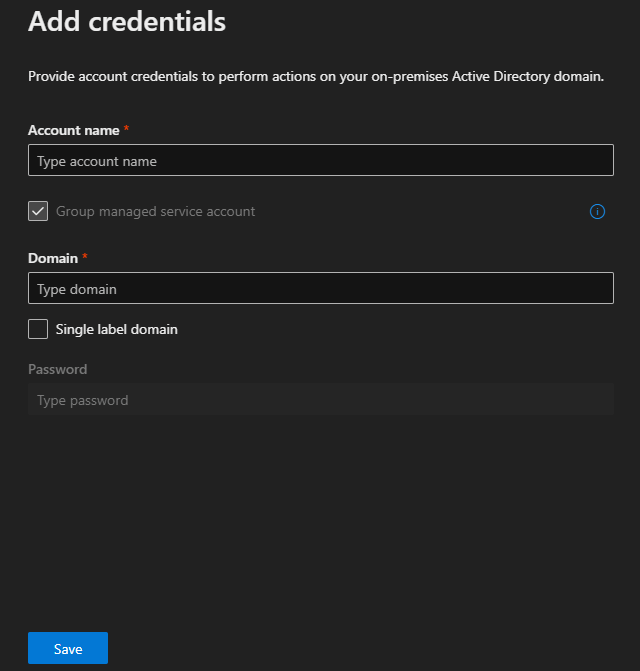
- To add a DSA, you go to the Defender portal -> System -> Settings -> Identities and navigate to Directory services accounts.
- Here you click
➕ Add credentialsand enter your account details into the flyout that appears on the right side.
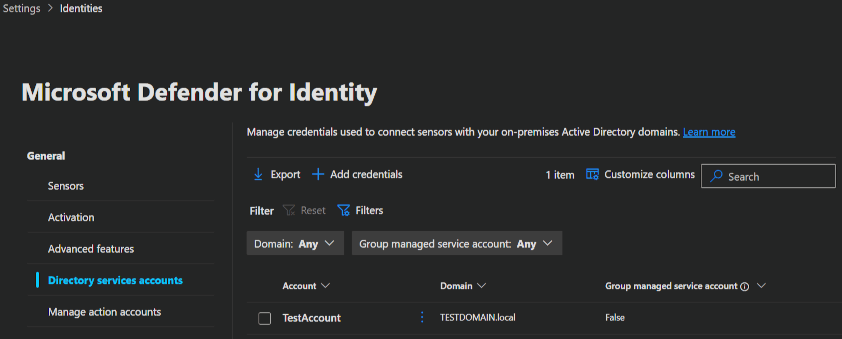 | 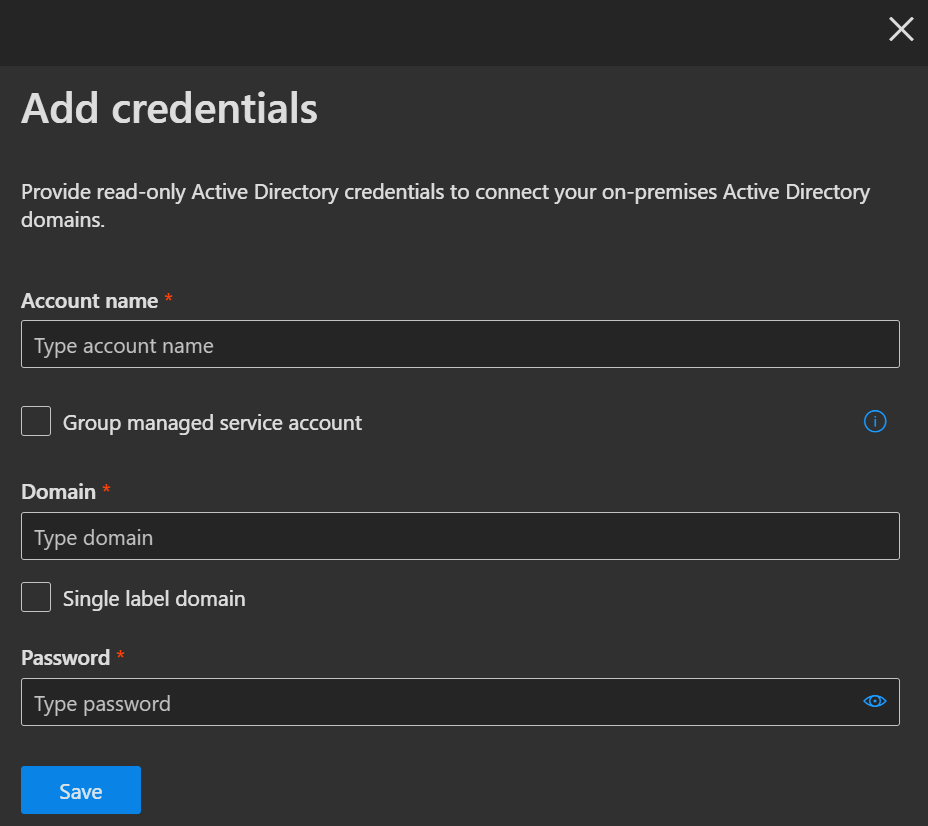 |
|---|
INFO
If you don't have a DSA account yet, here's some information to help you decide whether you need one.
- To use the build in service account, you do not need to configure a DSA at all, but be aware, that this does not support LDAP queries to other domains (regardless if it is in the same forest or not).
- U can also use a normal user account, which I would not recommend, because of the manual management.
- Or you can use a Group Managed Service Account (gMSA), which is also the Microsoft recommended way.
| AD FS/ AD CS | DeletedObjects container | Domain & Trust Mapping | LDAP to other Domains | |
|---|---|---|---|---|
| Local Service Account | ✔️ | ✔️ | ✔️ | ❌ |
| User Account | ✔️ | ✔️ | ✔️ | ✔️ |
| gMSA | ✔️ | ✔️ | ✔️ | ✔️ |
Here you will find a complete guide on how to create the gMSA needed.
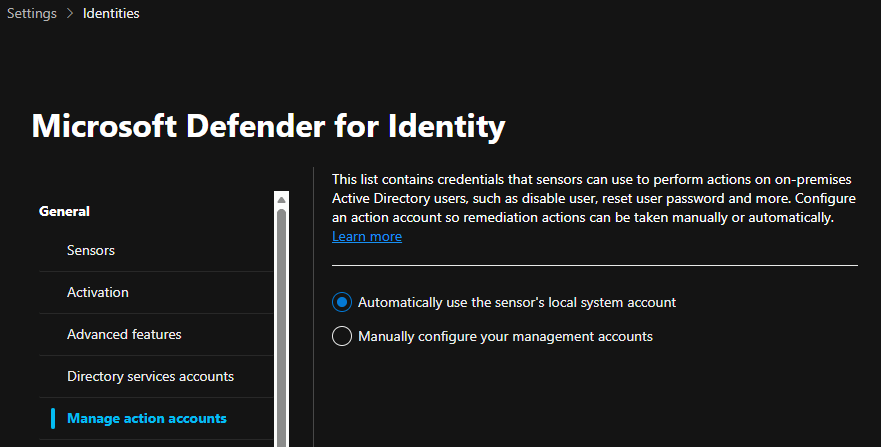
Manage action accounts
You can set up a separate management account in the case you do not want to utilize the sensors local system account for MDI response actions (e.g. Attack disruption in the AD). But be aware, that only the v2.x sensor supports separate management accounts. If you enable this gMSA account on a Server with a v3.x sensor, response actions will not work. If possible, use the default MDI Local System Account for response actions across the board.
- To add your individual management account you go to the Defender portal -> System -> Settings -> Identities and navigate to Management action accounts.
- Here you set the option to
Manually configure your management accountsand enter your account details into the flyout that appears on the right side.
 |  |
|---|
Best practices for action accounts
- Don't use the same account on DC servers and non DC servers (risk of credential exposure)
- Don't use the same account for both Directory Service (read-only permissions) and Managed Action (write permissions)
- For multi-forest environments, ensure the account is trusted across all forests or create separate accounts per forest
INFO
If you want to learn how to create a dedicated management account in your domain, click here.
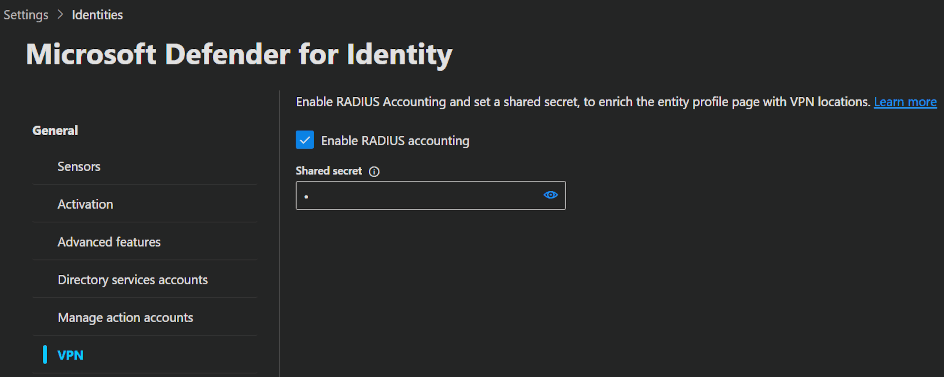
VPN
Microsoft Defender for Identity integrates with VPN solutions by ingesting RADIUS events (RFC 2866). These events include details such as source IP addresses and connection locations.
Supported VPN vendors are:
- Microsoft
- F5
- Check Point
- Cisco ASA
- To integrate your VPN you go to the Defender portal -> System -> Settings -> Identities and navigate to VPN.
- Here you set the option to
Enable RADIUS accountingand enter the shared secret you need to configure beforehand in your VPN solution.
INFO
Be aware, that VPN integration is not supported in FIPS-compliant environments.
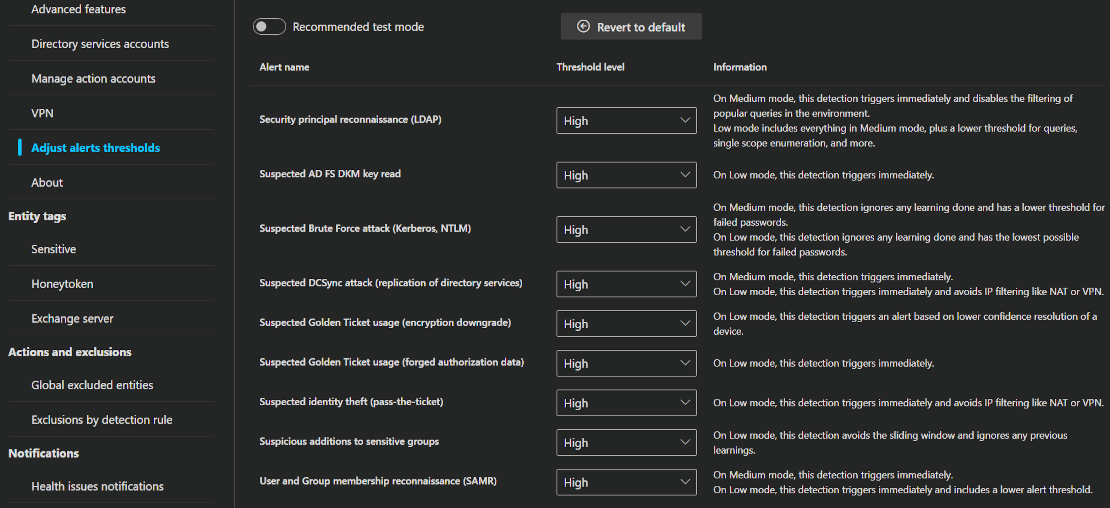
Adjust alerts thresholds
Some Microsoft Defender for Identity (MDI) alerts use a learning period to understand what normal activity looks like in your environment. After that, they can better detect suspicious behavior. Each alert also includes built-in logic, such as thresholds and activity filtering, to reduce false positives. If you set lower thresholds, you'll get more alerts, but if you set higher thresholds, you'll get less noise. You just have to let the system learn and then experiment with the settings a bit, to find the best balance with the least amount of false positives for your environment. If you enable Recommended test mode, or set the threshold to Medium or Low, you'll get immediate alerts even if the learning period isn't finished.
- To adjust the alert thresholds you go to the Defender portal -> System -> Settings -> Identities and navigate to Adjust alert thresholds.
- Here you can enable the Recommended test mode or set the thresholds you want.
Entity tags
In Microsoft Defender for Identity, Entity tags are labels that you assign to specific identities, such as users, devices or groups, to indicate a higher level of security relevance. These tags provide context about an entity’s sensitivity or role, helping Defender for Identity to prioritise, detect and respond to threats more effectively.
The following accounts, devices and groups are tagged sensitive by default:
- Administrators
- Power Users
- Account Operators
- Server Operators
- Print Operators
- Backup Operators
- Replicators
- Network Configuration Operators
- Incoming Forest Trust Builders
- Domain Admins
- Domain Controllers
- Group Policy Creator Owners
- Read-only Domain Controllers
- Enterprise Read-only Domain Controllers
- Schema Admins
- Enterprise Admins
- Microsoft Exchange Servers
- Certificate Authority Server
- DHCP Server
- DNS Server
- Microsoft Exchange Server
You can additionally configure three types of Entity tag manually: Sensitive, Honeytoken and Exchange server.
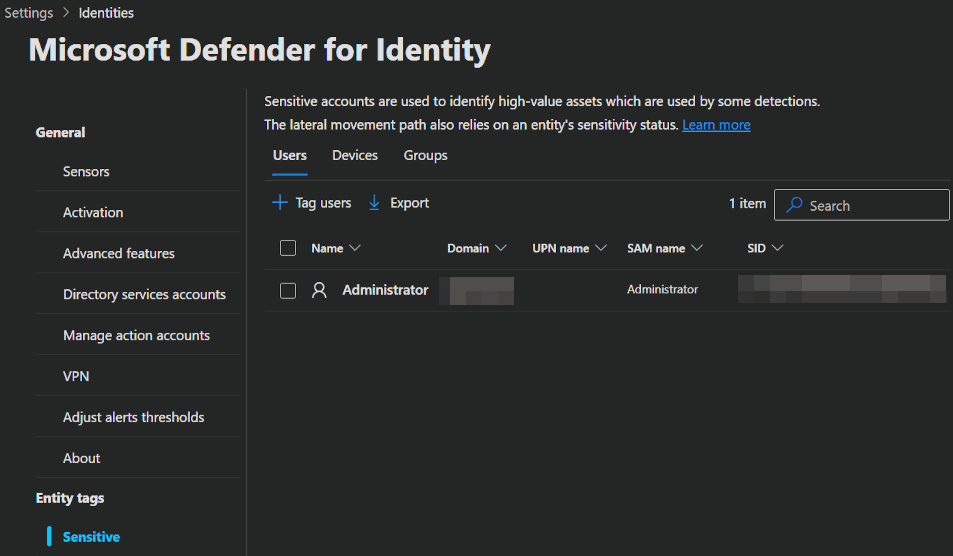
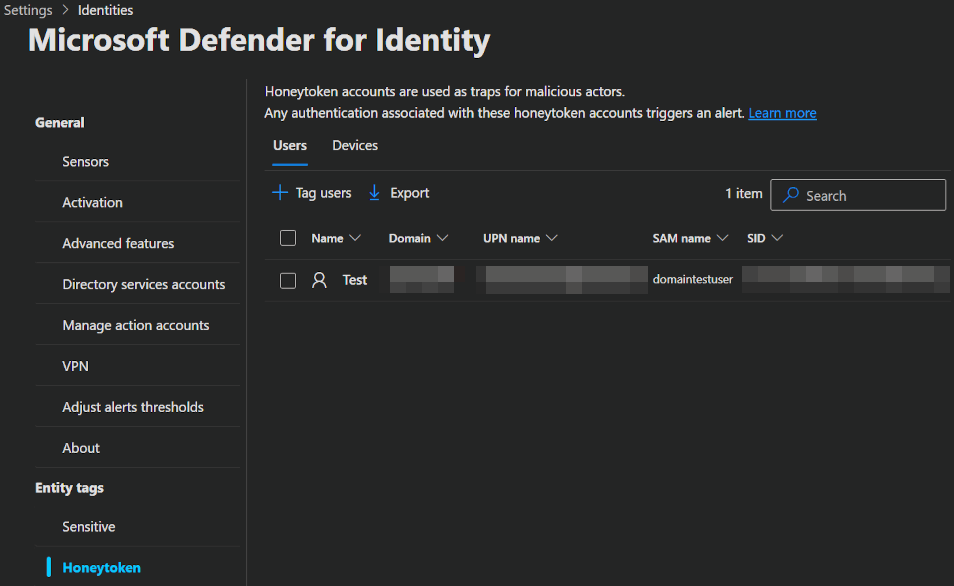
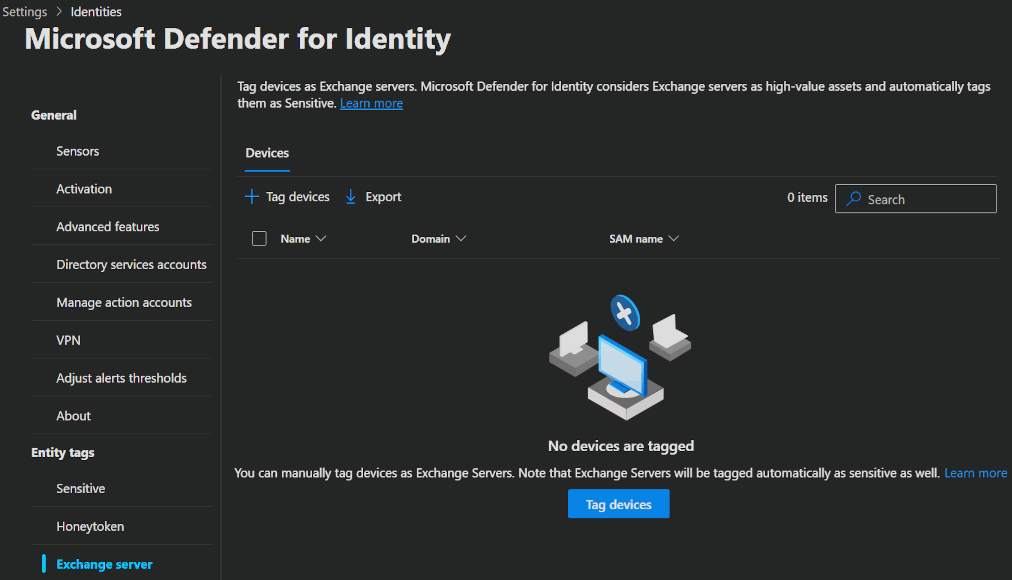
- To start creating Entity tags go to the Defender portal -> System -> Settings -> Identities and navigate to one of the 3 tag pages Sensitive, Honeytoken or Exchange server.
- Here you can start tagging users, devices or groups, depending on the tag.
Sensitive: This tag identifies high-value or sensitive assets that have not yet been tagged and which, if compromised, would pose a significant security risk.
Honeytoken: Honeytokens are deliberately planted fake accounts or digital assets designed to lure attackers and reveal unauthorized activity. To use this, you just create a account in an obvoius position with deliberatly bad security. When marked as honeytoken, the account will get tight monitoring, so when an attacker uses the account you instantly know about it.
Exchange Server: You can use this tag for devices that host additional Exchange services.
Actions and exclusions
MDI enables you to exclude specific IP addresses, devices, domains or users from detection. For instance, an authorised security scanner might trigger a DNS alerts. By creating an exclusion, you can ensure that MDI ignores these known sources, thereby reducing false positives. However, it is better to use alerts than exclusions, because exclusions are unconditional, whereas alerts can be tuned and reviewed more specifically.
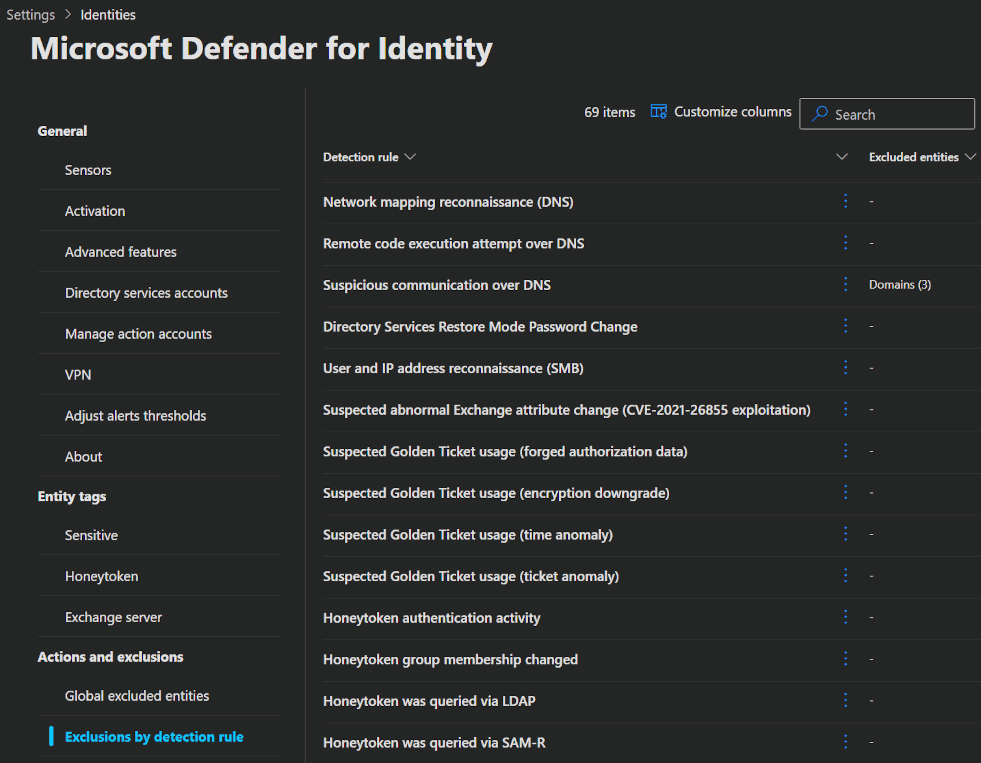
There are 2 types of exclusions: Global excluded entities and Exclusions by detection rule.
The first option simply excludes your IP addresses, devices, domains or users as you select them. The second option lets you select a threat detection rule and exclude your entities directly from a specific rule. Use this method to create clearer exclusions. This will ensure that your entities are not vulnerable to other threats.
- To configure an exclusion, you go to the Defender portal -> System -> Settings -> Identities and navigate to Global excluded entities or Exclusions by detection rule.
- Under Global excluded entities, simply click
➕ Addto exclude an entity across the board. Alternatively, use Exclusions by detection rule to apply exclusions to specific rules. Click any rule to view its details or add an entity.
Notifications
You can configure notifications for health and security alerts in MDI and let them be send via email or directly to your Syslog server.
INFO
This feature is only supported by the MDI sensor v2.x at the moment.
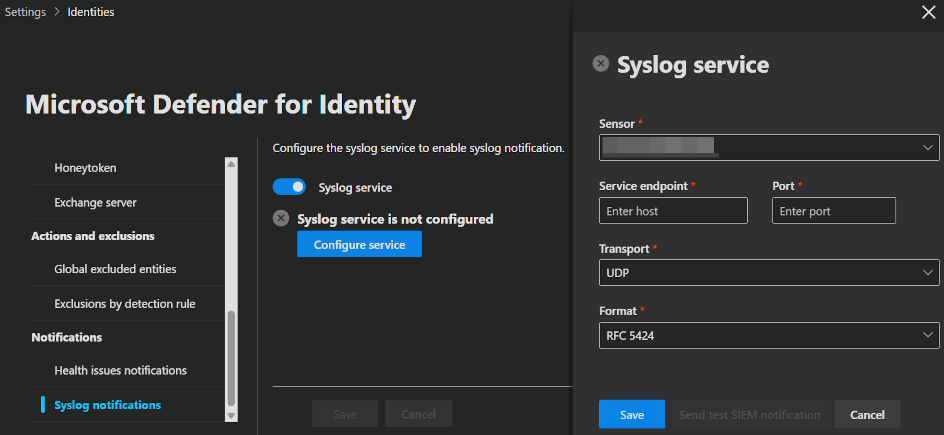
- To configure a notification, you go to the Defender portal -> System -> Settings -> Identities and navigate to Health issues notifications or Syslog notifications.
- Under Health issues notifications, simply click
➕ Addto add one or more E-Mail adresses where all notifications will go to. Or use Syslog notifications to set up your syslog service and collect notifiactions that way.
⌨️ Admin experience
After setting up MDI you can get started defending your users 👮 and for that you got a few options.
Identities blade
Dashboard
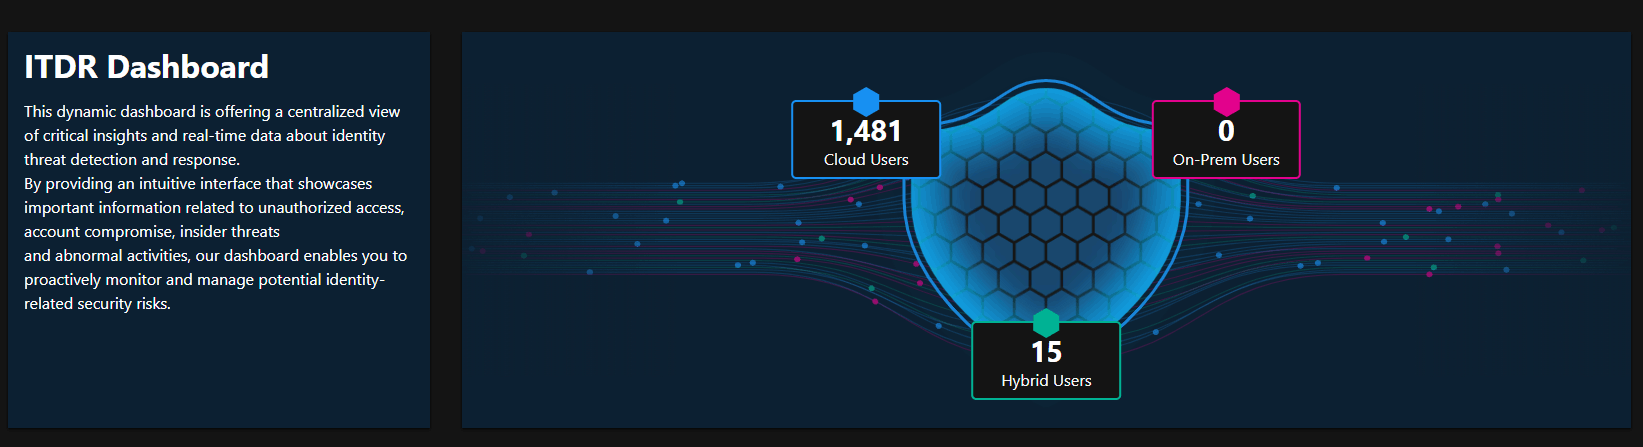
First, MDI unlocked a new section in in your Defender portal called Identities and opening that, your first blade is the Dashboard. This page shows you information about the overall identity makeup of your environment.
At the top you will first find the Identity overview shield.
This will give you a quick overview of your user numbers in hybrid, cloud, and on-premises. You can also drill down by clicking onto the different user categories.
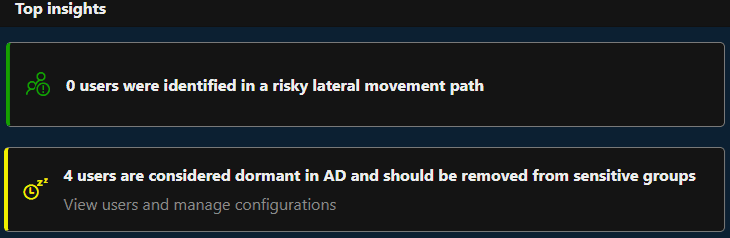
Directly underneath the overview, you find the Top insights divided into Users identified in a risky lateral movement path & Dormant Active Directory users who should be removed from sensitive groups.
The first shows sensitive accounts with risky lateral movement paths. The second lists accounts that are unused for over 180 days.
These are important clues for identifying potential attack paths and for you to investigate.
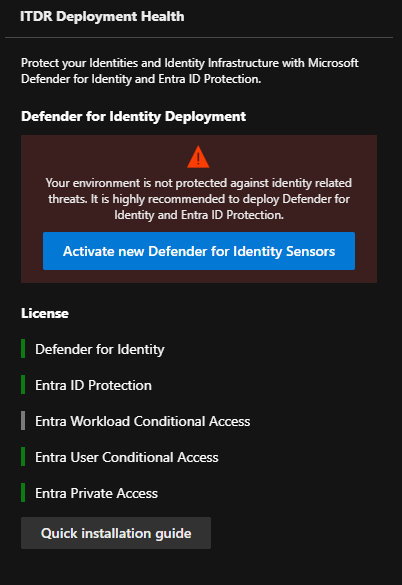
Underneath the top insights you find ITDR deployment health on the left.
This is just an overview of the MDI services you deployed and if they are healthy.
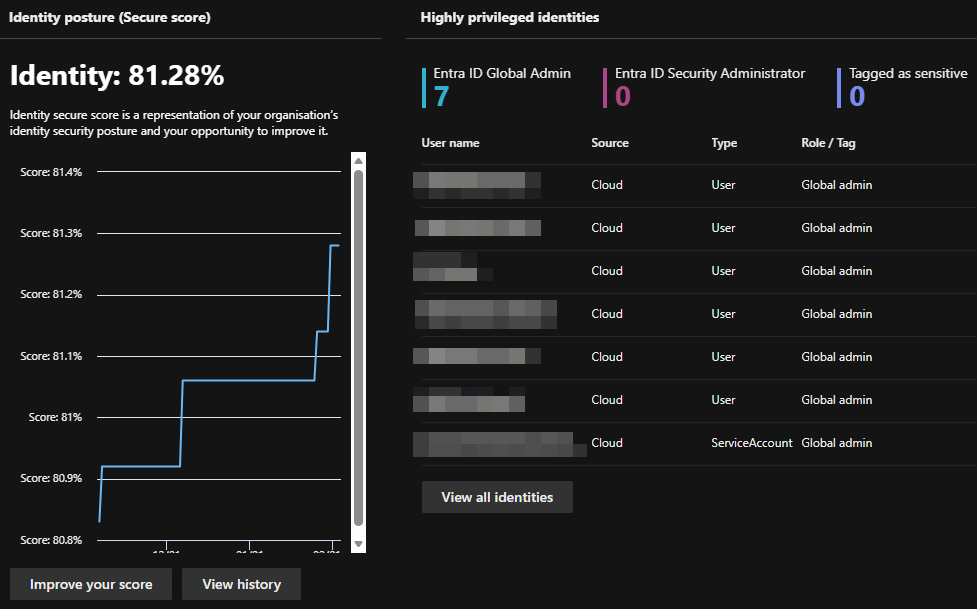
Right next to the ITDR deployment health you find the Identity Secure score and the Highly privileged identities list.
The first represents your organization's security posture in regards to identity. It is one part of the overall Microsoft secure score and gives you a good idea about how your security posture is evolving.
The second lists your sensitive accounts, with the option to drill down further.
Further down on the page you will find a few more widgets that will fill when your environment matures and indicents happen.
| Name | Description |
|---|---|
| Identity related incidents | It shows alerts from Defender for Identity and Microsoft Entra ID Protection, and any related incidents from the last 30 days. |
| Domains with unsecured configuration | It shows Active Directory domains that have unsecured configuration settings. |
| Entra ID active users at risk | It shows active user accounts that may be vulnerable. |
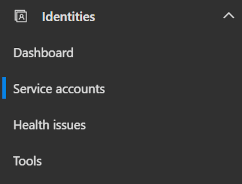
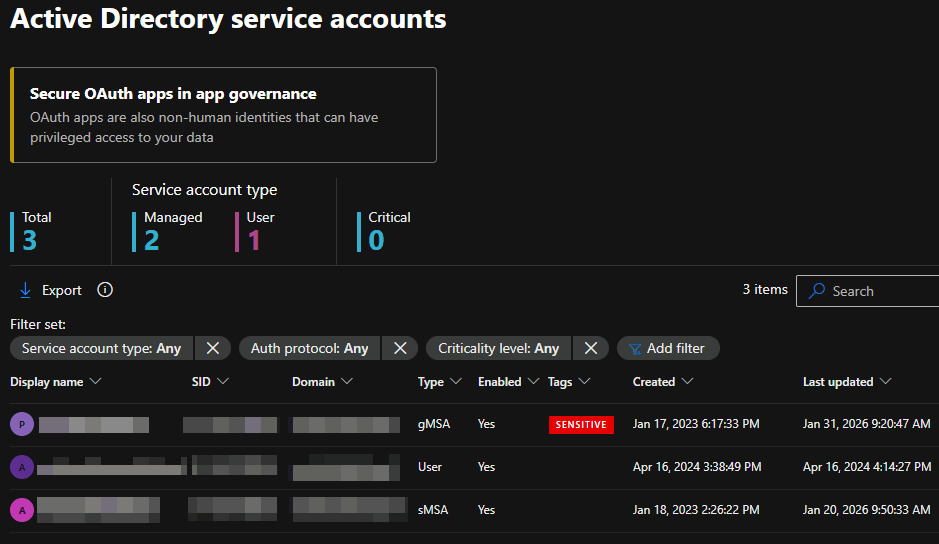
Service accounts
This page shows you a list of all your on-premises service accounts and their status. In additionan, you get a shortcut to your secure OAuth apps, but for that to function, you need an activated Defender for cloud Apps.
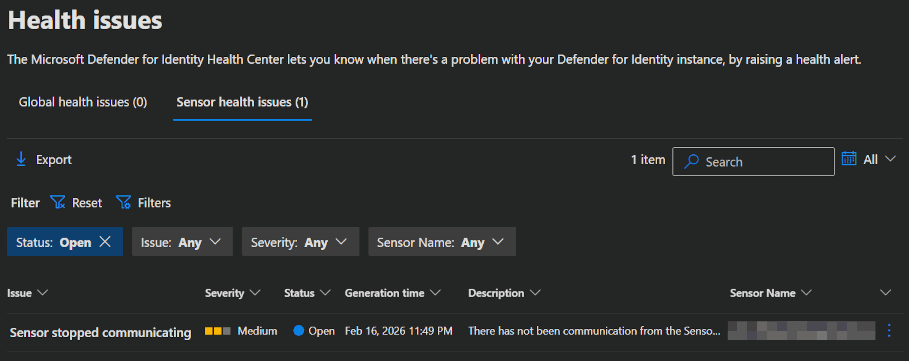
Health issues
On this page, you get a list of your Global health issues and Sensor health issues. You do not need to close these issues here. They will get closed automatically, when the problem is gone.
In the example in my screenshot, MDI detects that the sensor seem to be offline (because the server is off). This will vanish as soon as I turn the server back on and the sensor checks back in.
INFO
If you want to learn more about which health issues can come up, click here.
Tools
In the tools section you will find a few links to helpfull stuff.
- Microsoft Documentation
- Sizing Tool
- Readiness Script
- PowerShell module
Assets blade
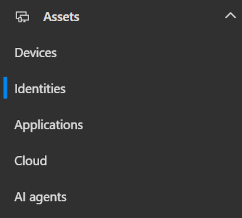
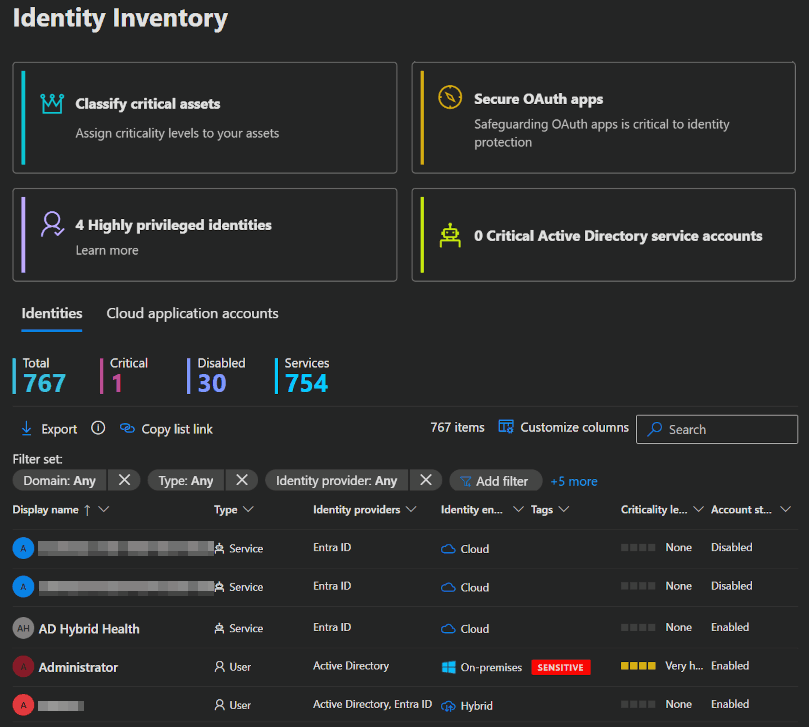
Identities
MDI also unlocked a new section in in your Assets blade, called Identities. This page shows you a list of your Identities or a list of your Cloud application account.
You can get infos about all your identities, regardless of whether there are real users or services and the option to drill down into all of it.
Users
If you drill down into a user, you will find a few interesting pages.
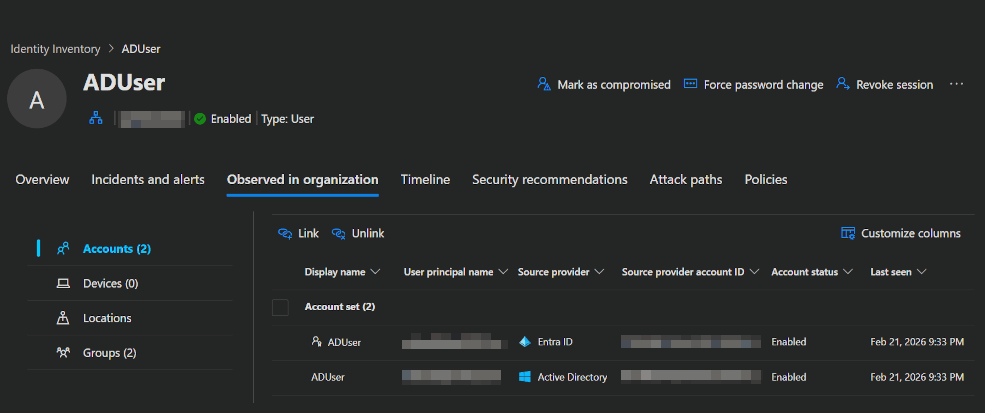
On the main page you find information about incidents, alerts, used devices, AD settings and other information from on-prem and the cloud.
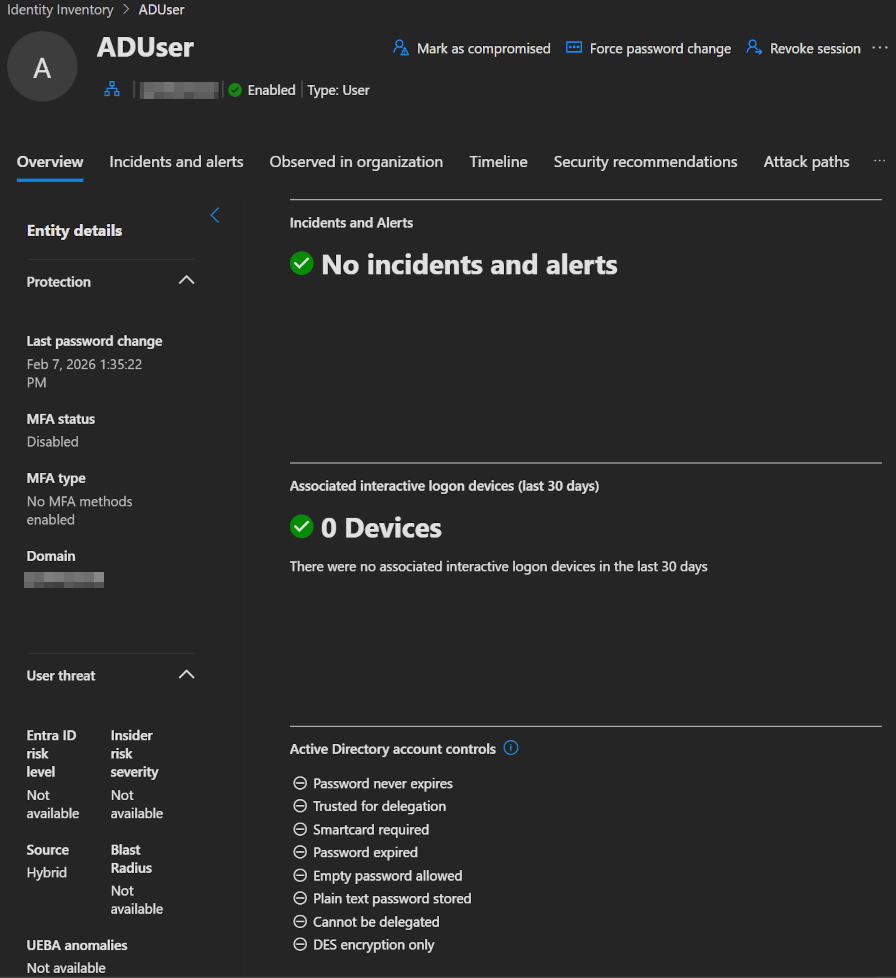 |  |
|---|
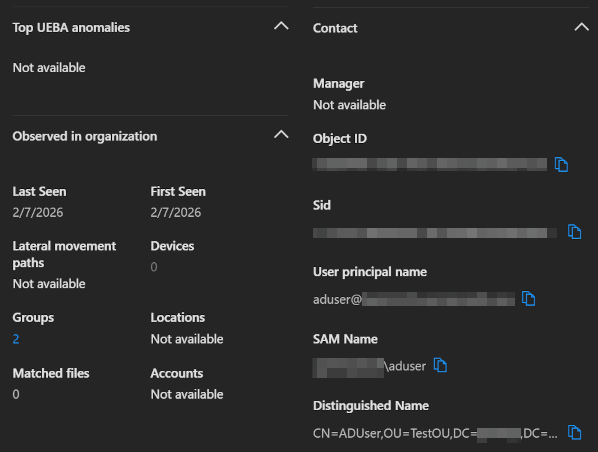
One cool feature is that MDI correlates accounts and shows you information not only about the account you are looking at, but also about all the other accounts that MDI thinks the user uses. This should help with identifying attack paths and elevations. You can also manually link accounts belonging to a specific user.
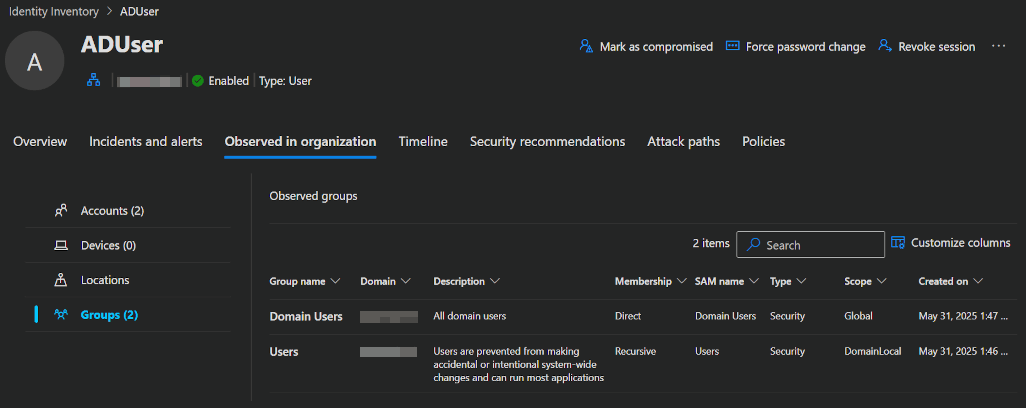
Of course, you will also see a correlated list of all the groups that this user and all his accounts belong to.
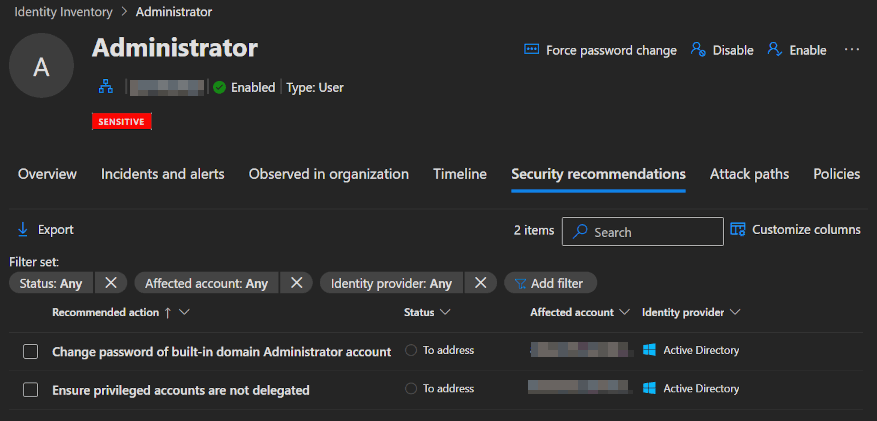
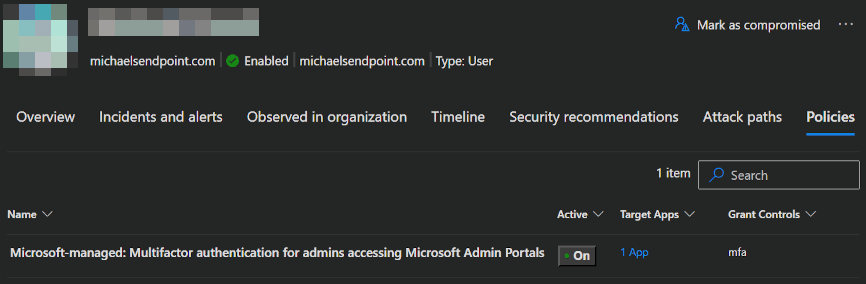
In the other tabs, you will find Security recommendations, Attack paths and, completely new as of February 2026, a list of the Conditional Access Policies to which the user must adhere.
Recommendations
In addition to the recommendations on the User page, MDI provides further recommendations to help you improve the security posture of your environment.
Sensor recommendations
When you open the Defender portal -> System -> Settings -> Identities and click on an unhealthy sensor, you will get a flyout on the right side with information / recommendations about the sensor problems and what you can do about it.
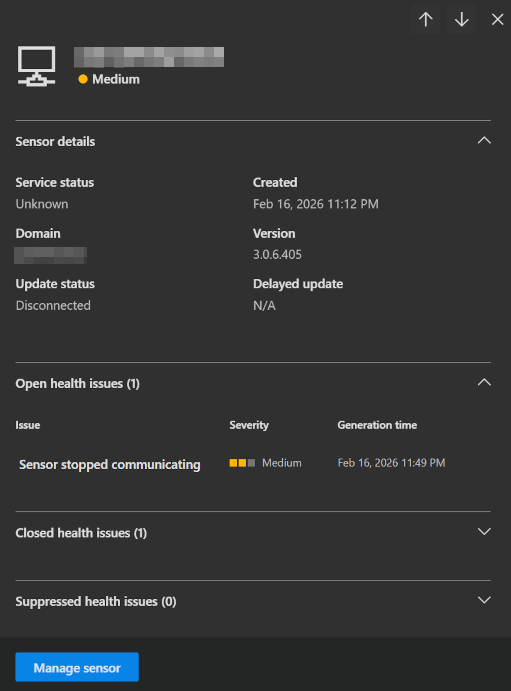 | 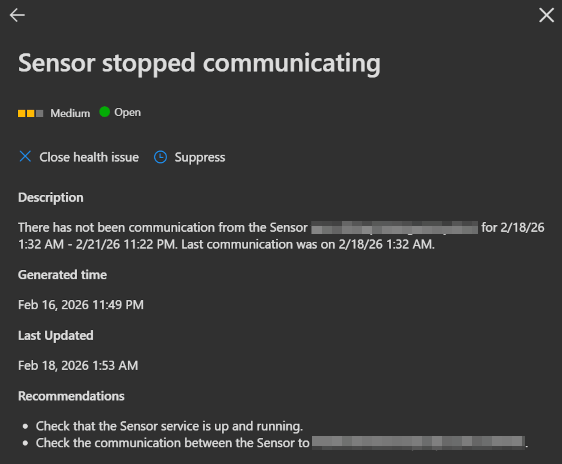 |
|---|
Exposure management
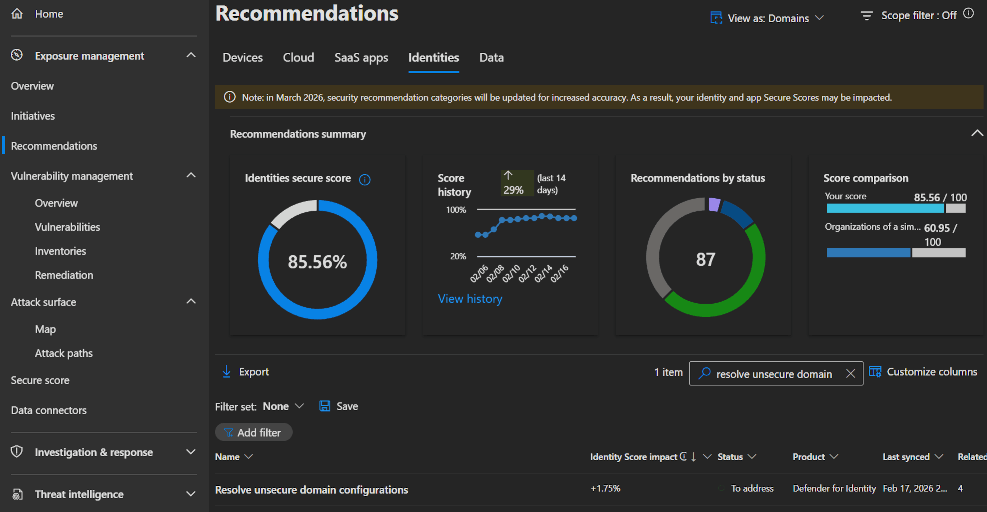
When you open the Defender portal -> Exposure management -> Recommendations and select Identities, you will get your Identities secure score, a comparison to other orgs and Recommendations to improve your score and with that, your security posture.
INFO
To calculate the Identity secure score, Microsoft looks at your security configuration every 24 hours and compares it with the best practices.
To show you, how such a recommendation workflow can work, we go through it with the recommended workflow to validate your sensor deployments.
Go to one of your domain controllers that runs MDI and run the following PowerShell command. This will missconfigure an AD setting on purpose.
powershellSet-ADObject -Identity ((Get-ADDomain).distinguishedname) -Replace @{"ms-DS-MachineAccountQuota"="10"}Then reopen the Exposure Management Recommendations and select the Resolve Unsecure Domain Configuration option.
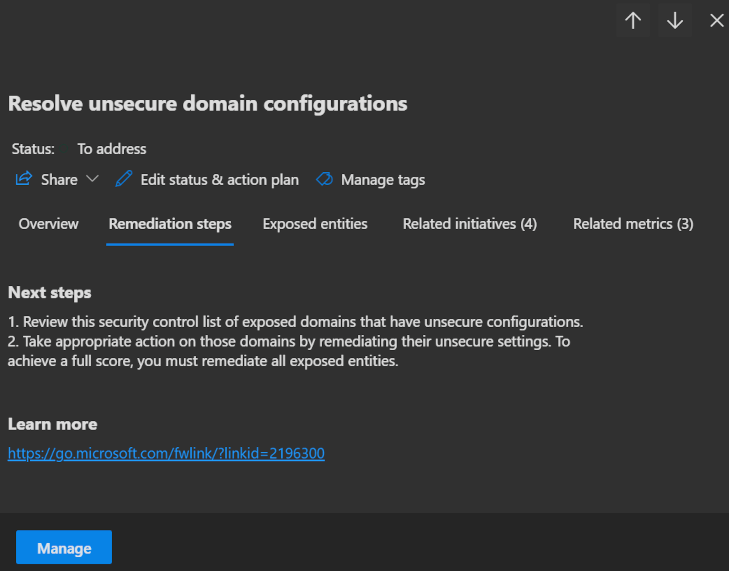
After a short period of time, this issue should show you the status To address.
Opening the recommendation, you will first see a Description of it and on the second page, you will see your next steps for resolving the problem.
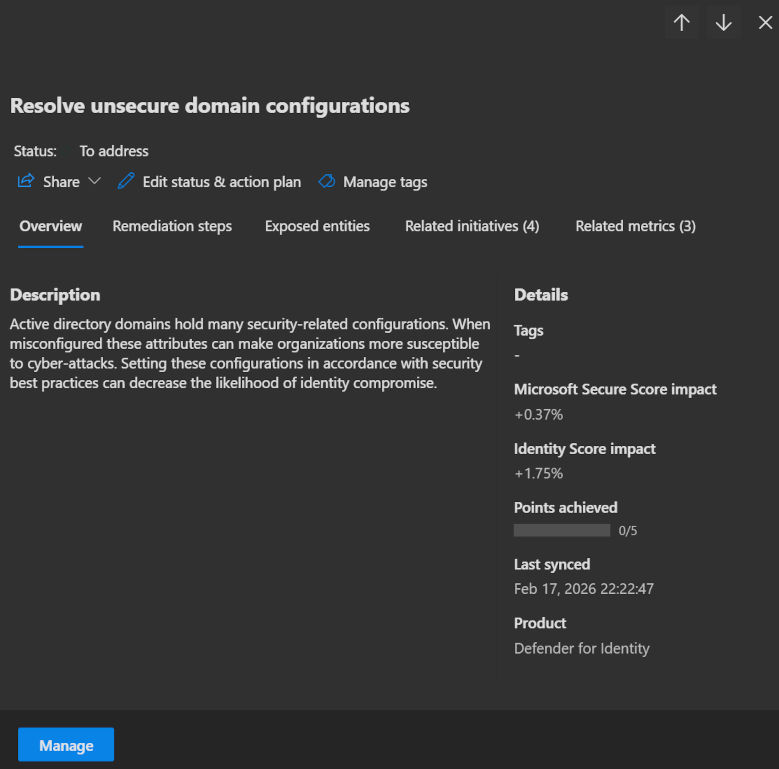
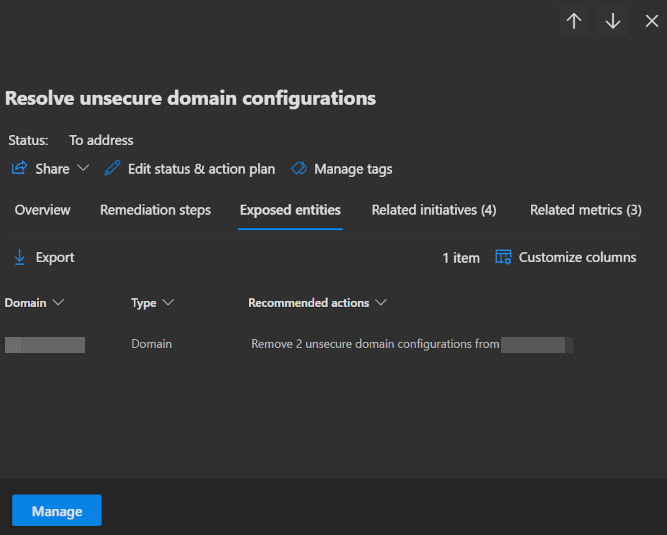
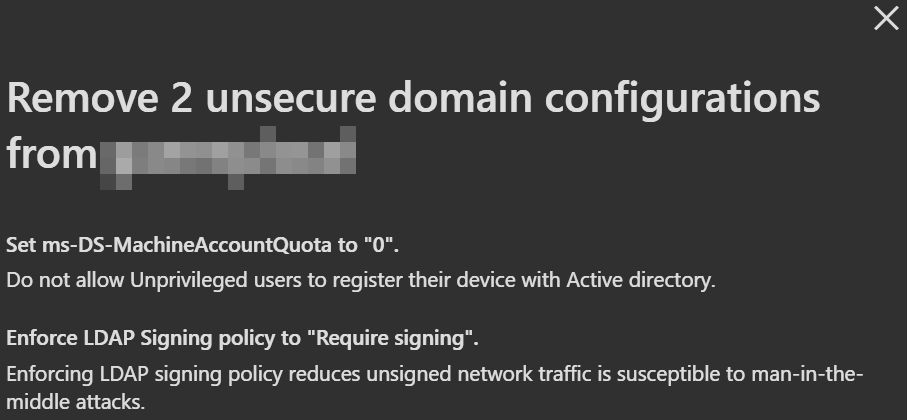
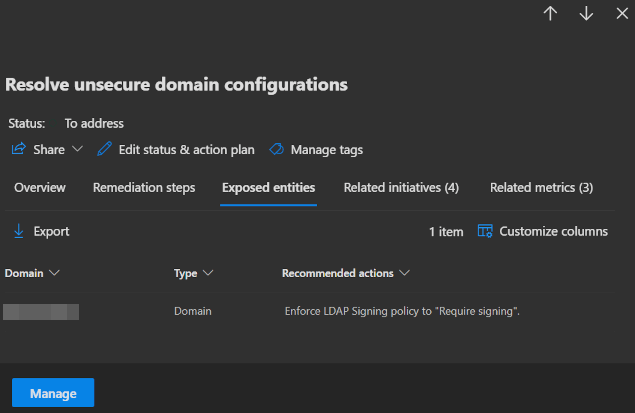
Even better, on the next page, Exposed entities, you will find the domain controller whose settings you changed. Click on it to get exact information about what is wrong with it.
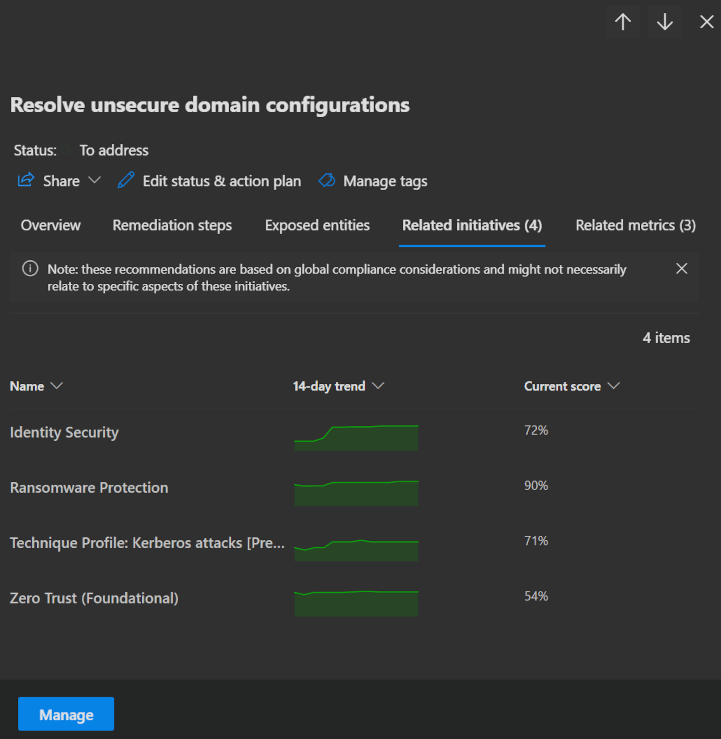
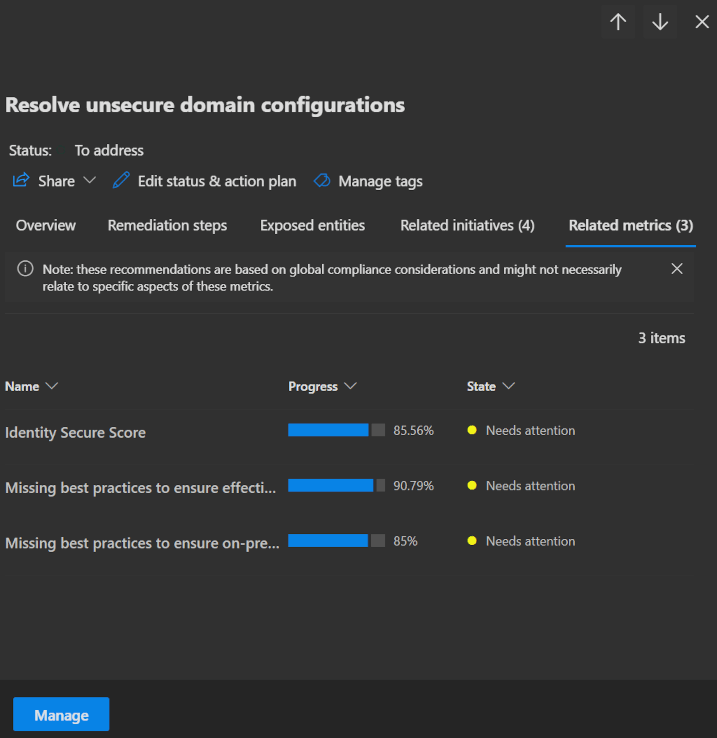
The last two pages tell you about Related initiatives and Related metrics. These show the impact that fixing this issue will have on your secure score and security initiatives that you may want to follow.
Next, go back to your domain controller and run the following PowerShell command to restore the setting to its previous state.
powershellSet-ADObject -Identity ((Get-ADDomain).distinguishedname) -Replace @{"ms-DS-MachineAccountQuota"="0"}When you now go back to the same Resolve Unsecure Domain Configuration recommendation, you will see that the previously cited issue has been resolved.
Remediation actions
MDI enables you to take immediate action on compromised accounts. These response actions can be performed directly from the user page, the user side panel, the advanced hunting page or in the action center.
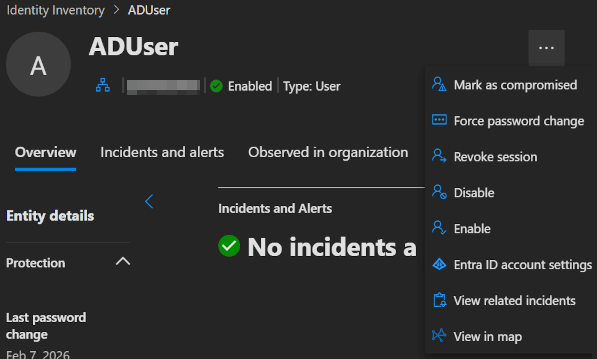
| Remediation Action | Description | Scope |
|---|---|---|
| Disable | You can disable accounts linked to an identity. Disabling blocks sign-in and network access, but does not delete the profile or related data. | Active Directory, Microsoft Entra ID and Okta |
| Enable | Re-enables previously disabled accounts. | Active Directory, Microsoft Entra ID and Okta |
| Revoke session | Revoke an active session. | Microsoft Entra ID and Okta |
| Mark as compromised | Marks all accounts linked to the selected identity as compromised in Entra. | Microsoft Entra ID |
| Force password change | Force a password change at next sign-in, preventing further impersonation. | Active Directory |
| Deactivate | Use this action to permanently deactivate a detected malicious account. | Okta |
| Set account risk to High/Medium/Low | Set the account risk score to a defined level. Available only if the Risk Scoring feature is enabled. | Okta |
INFO
To learn more about, which Entra role you need to perform these actions, click here.
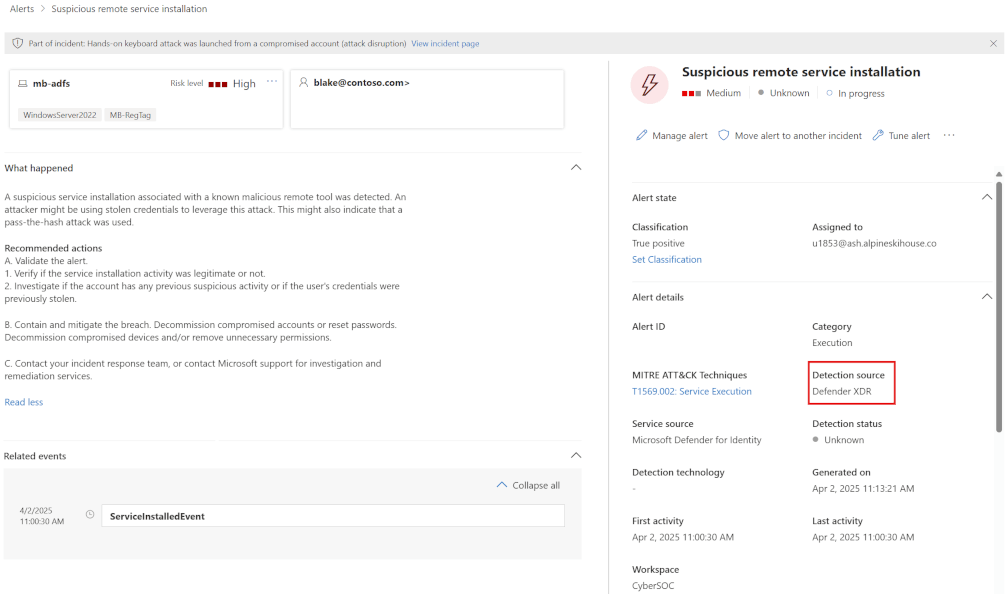
Security alerts
MDI security alerts provide information about suspicious activities detected, along with the accounts and computers involved. The Identity alerts page in Defender XDR provides a unified, cross-domain security view by correlating MDI signals with data from the other security products available.
The alerts are categorised and arrive in 2 different formats in the Defender portal. Both originate from the MDI sensor, but classic alerts are not yet migrated to the unified defender portal (A Microsoft initiative to unify security signals into a single pane of glass).
You can find a full list of all classic alerts here and of the new XDR alerts here.
To get a look at the current alerts open the Defender portal -> Investigation & response -> Incidents & alerts and select Alerts.
(Microsoft screenshot, got no Alerts 🤷)
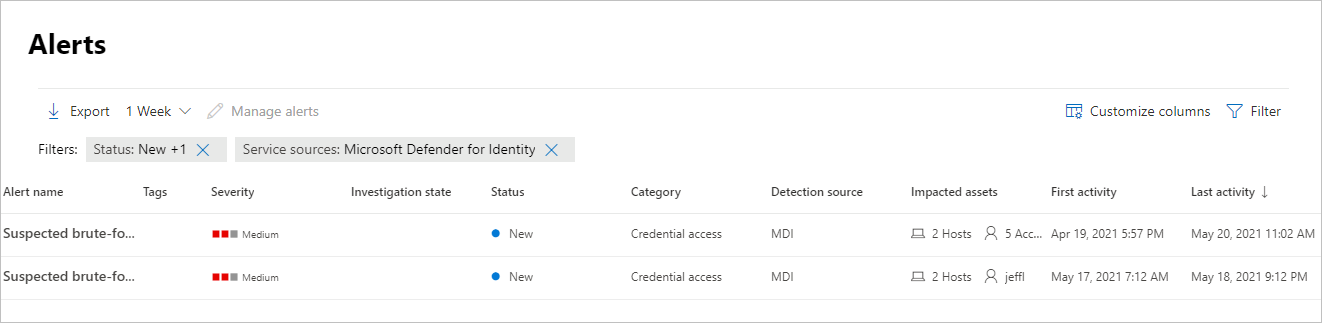
When you open one of the alerts you get the information you need to investigate, classify and remediate the problem.
Identity Security Initiative
Security metrics measure exposure risk across different initiatives by grouping related asset recommendations. Microsoft will provide a list of security initiatives that you can use to measure your security posture and progress.
- To look at these initiatives, you go to the Defender portal -> Exposure management and select Initiatives.
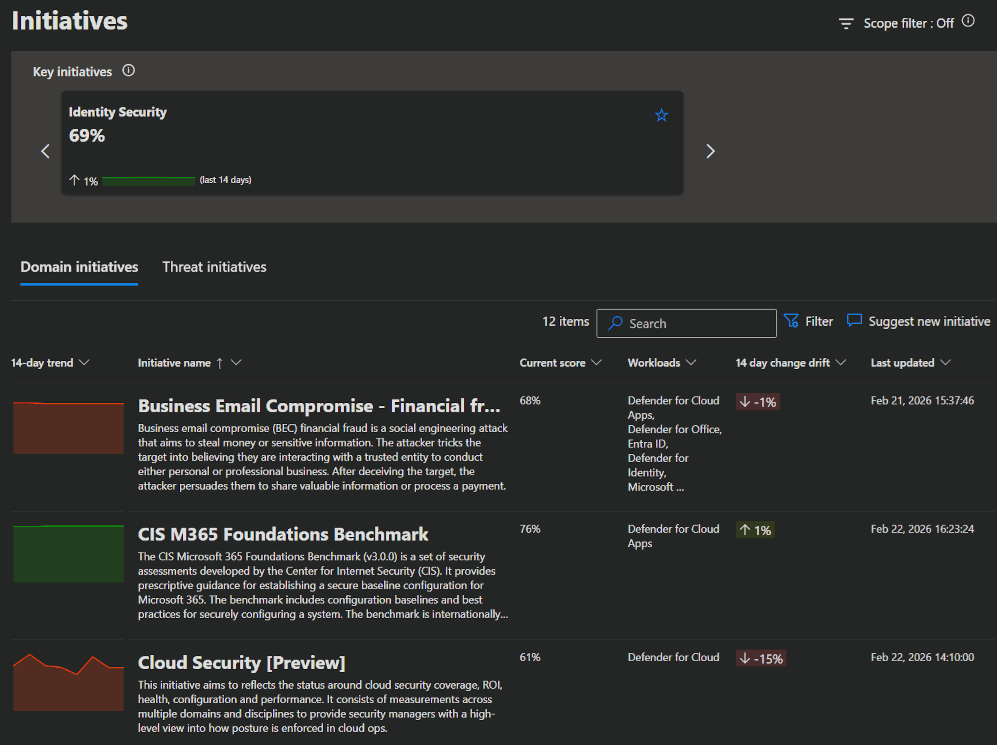
- There is also a specialised Identity Security page to help you progress to a more robust identity security posture.
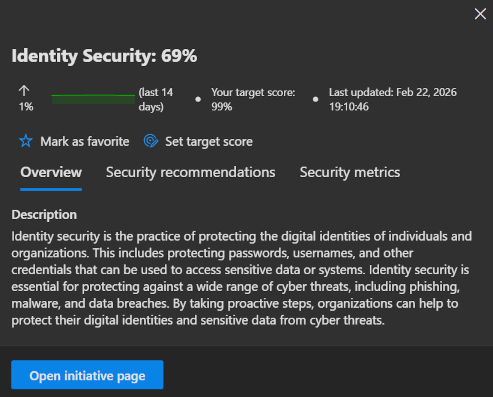
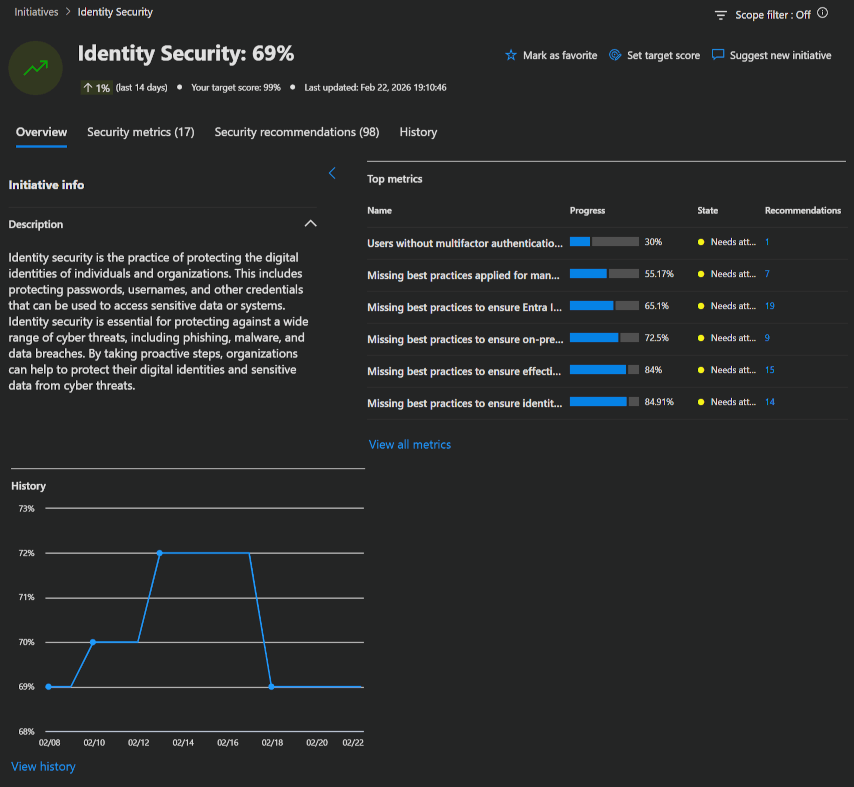
- When you click
Open initiative page, you will see an overview of your current status, as well as tabs for the security metrics included in this initiative, Security recommendations and your historical progress.
Identity's security posture assessments
MDI features continuous monitoring of on-premises and cloud environments to identify weak spots and delivers accurate assessment reports to support a proactive, ongoing security cycle. This is realized through the security scores and differend categories Microsoft provides.
Following, I listed the information Microsoft provides for the different available categories:
- Hybrid security posture assessments
- Identity infrastructure security posture assessments
- Certificates security posture assessments
- Group policy security posture assessments
- Accounts security posture assessments
- Cloud identities security posture assessments
Advanced hunting
There are also options for using the information gathered by MDI in your advanced hunting queries.
To demonstrate this, we will once again use the recommended actions to validate your sensor deployments.
In the Defender portal's Advanced hunting page, u can use the following KQL queries to check that MDI sends data as expected.
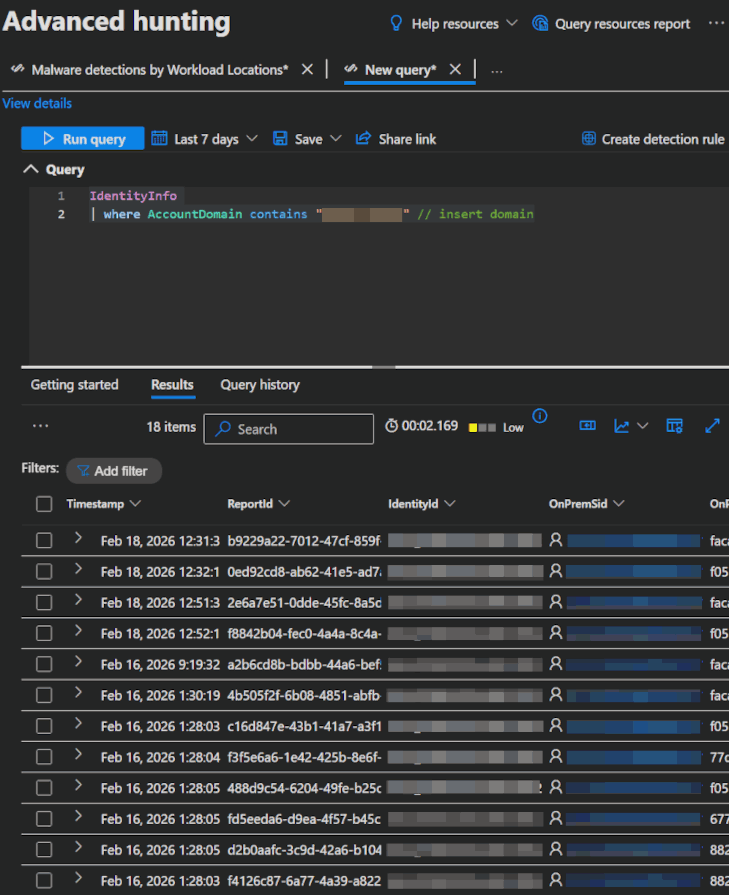
IdentityInfo
| where AccountDomain contains "domain" // insert domain
This query shows identy info with a specific domain.
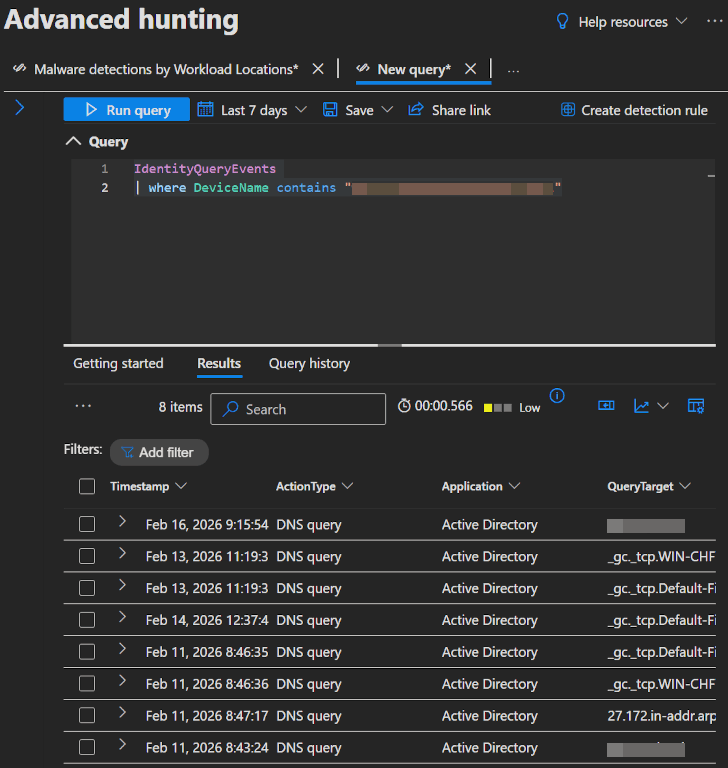
IdentityQueryEvents
| where DeviceName contains "DC_FQDN" // insert domain controller FQDN
This query shows identity query events (e.g. queries performed against AD objects) which involved a device with a specific FQDN.
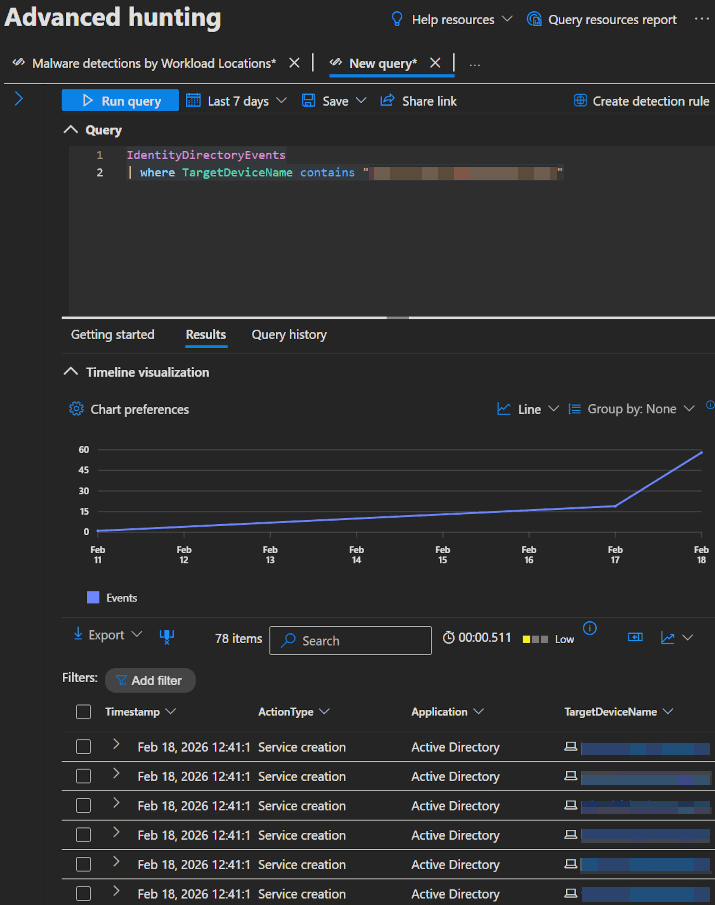
IdentityDirectoryEvents
| where TargetDeviceName contains "DC_FQDN" // insert domain controller FQDN
This query shows identity directory events (e.g. password changes, UPN changes or system events like PowerShell activity) which involved a device with a specific FQDN.
If you tried these queries and you found them returning information, then you can be sure that the sensor functions correctly.
INFO
If you want to learn more about the different tables you can use in KQL queries, click here.
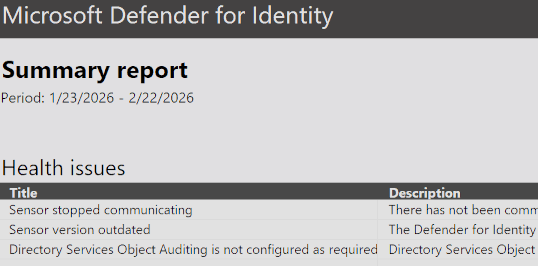
Reports
Instead of advanced hunting you can also utilize a few prepared Reports.
When opening the Defender portal you will find the Reports page directly on the left side. In here you got an Identities section with a few reports.
| Report | Description |
|---|---|
| Summary | A summary of alerts and health issues |
| Modifications to sensitive groups | Every modification to sensitive groups in Active Directory, including modifications with generated alerts |
| Password exposed in clear text | All LDAP authentications which exposed user password in clear text |
| Lateral movement paths to sensitive accounts | Sensitive accounts at risk of being compromised through Lateral movement techniques |
Sample Report: 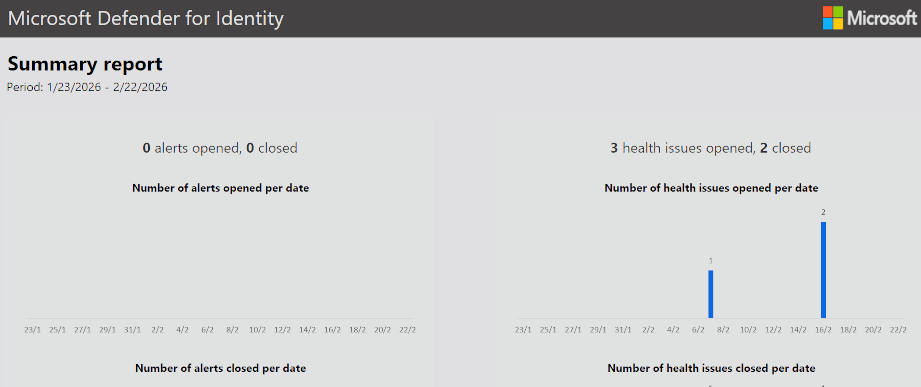
💡 Conclusion
To wrap things up, Microsoft Defender for Identity is another importand part of the Microsoft security stack. As part of the Microsoft Defender XDR ecosystem, it provides deep visibility into what’s happening with your identities and help you get the difficult edges between on-premises and cloud environments secured.
We’ve covered what Defender for Identity is, how it works, how to deploy it, how to configure it to align with best practices and how to use it.
Microsoft also provides a Checklist, with the most important things to keep a look out for:
| Recommendation | Description | MS Learn |
|---|---|---|
| Deploy MDI on all domain controllers | Install on all DCs ensures that you're getting all signals for threat detection. | Microsoft Defender for Identity deployment overview |
| Deploy MDI on all AD FS, AD CS, and Entra Connect servers | Install on all mentioned server types ensures that you're getting all signals for threat detection. | Configure sensors for AD FS, AD CS, and Microsoft Entra Connect |
| Check the health of your MDI sensors | keep your sensor healthy and reporting to ensure optimal coverage. | Microsoft Defender for Identity health issues |
| Consider integrating with Microsoft XDR | MDI was not integrated into the unified defender portal in the past, but is now by default if you start now. | Microsoft Defender |
| Check Windows event collection config | Event collection is essential for MDI to analyze and detect threats effectively. | |
| Check that NNR is configured | MDI uses NNR correlation between IP-adresses and device names. | Configure Network Name Resolution (NNR) for Microsoft Defender for Identity |
| Check if you need a DSA | Check if you really need a DSA, which will only be the case if you need to secure connections into other domains. | Directory Service Accounts for Microsoft Defender for Identity |
| Be aware of MDI learning periods | Be mindful of the learning periods MDI needs to distinguish between legitimate and suspicious activities. | Alerts overview |
| Check the alert thresholds | Keep working on your alert thresholds when you get too many false alerts. | Adjust alert threshold settings or enable recommended test mode |
| Secure Score recommendations | Follow Secure Score recommendations. | Microsoft Secure Score |
Defender for Identity should be a no-brainer for many organizations, because it is included in the M365 E5 and EMS E5 add-on licenses and is quickly deployed and configured. And for everyone else:
- If you are hybrid, extending your security to the local environment is really important and not needing a separate tool should be much easier and cheaper.
- If you are cloud-only, identity security is one of your most important security aspects, so it should be a big part of your posture management as well.
So no matter which environmental structure you run at the moment or where your identities live, as long as you are using M365 security, MDI is worth a deliberation.
References
- Microsoft Defender for Identity documentation
- Advanced Threat Analytics (ATA) to Microsoft Defender for Identity
- Activate the Defender for Identity sensor v3.x on a domain controller
- Network Name Resolution (NNR) in Microsoft Defender for Identity
- Directory Service Accounts for Microsoft Defender for Identity
- Configure Microsoft Defender for Identity action accounts
- Defender for Identity VPN integration
- Adjust alert thresholds
- Manage related identities and accounts in Microsoft Defender for Identity
- Remediation actions
- Security alerts in Microsoft Defender for Identity
- Identity Security Initiative
- Microsoft Defender for Identity's security posture assessments
- Best practices checklist
- Troubleshooting Microsoft Defender for Identity known issues