
❓ What is Global Secure Access?
Work is no longer tied to a specific location. Employees expect seamless access to applications and data from anywhere, while organizations must maintain strong security controls. As a result, identity has become the new security perimeter, requiring solutions that can securely verify users, enforce access policies and continuously protect access to corporate resources. Microsoft's Security Service Edge (SSE) solution addresses this challenge through Microsoft Entra Internet Access and Microsoft Entra Private Access, unified under Global Secure Access. Built on Zero Trust principles of verify explicitly, use least privilege, and assume breach, Global Secure Access helps organizations deliver secure, identity-centric access to applications and data wherever users work.

👋 Entra Internet Access Introduction
Entra Internet Access provides an identity-based Secure Web Gateway (SWG) solution for access to internet, SaaS and Microsoft services. It helps control and secure traffic by blocking threats, unsafe content, and malicious activity, while also providing direct connectivity to supported Microsoft services.
Unlike traditional SWGs that only look at device or network addresses, this solution is built directly into Microsoft Entra. It lets you use your existing identity controls so policies are based on who is signing in, not just where they are connecting from.
Key Features
- Traffic Forwarding: Route internet and Microsoft traffic through dedicated profiles from desktop clients or remote networks.
- Context-Aware Security: Apply policies using user, device, location, risk, and compliance data via Conditional Access.
- Secure Web Gateway (SWG): Protect internet access with identity-aware SWG, web content filtering, and FQDN rules.
- Extended Session Controls: Enforce Conditional Access policies on non-Entra ID integrated internet destinations.
- Compliant Network Checks: Simplify application access policies using Compliant Network location verification.
- Tenant Restrictions: Prevent data exfiltration to unauthorized external tenants or personal accounts.
- Source IP Restoration: Retain original client IPs in Entra ID sign-in logs to improve threat detection.
- Traffic & Security Logs: Monitor traffic, policy applications, cross-tenant access, and user-device activity through dedicated dashboards.
Licensing
- Microsoft Entra Suite
- Microsoft Entra Internet Access standalone
INFO
- For Entra Internet Access, users need an Entra ID P1 or Entra ID P2 license.
- Internet Access for Microsoft Services is already included in these Entra licenses.
- You need at least 50 combined Entra ID P1 and Internet Access licenses for the remote network connectivity capability.
Feature comparison table
| Feature | Entra P1/P2 - Microsoft traffic profile | Internet Access - Internet Access profile |
|---|---|---|
| Windows client | ✅ | ✅ |
| macOS client | ✅ | ✅ |
| Mobile client (iOS, Android) | ✅ | ✅ |
| Traffic logs (Preview) | ✅ | ✅ |
| Remote network (branch connectivity) | ✅ | ✅ |
| Direct Microsoft services connectivity | ✅ | |
| Universal Tenant Restrictions | ✅ | |
| Compliant network check | ✅ | |
| Source IP restoration | ✅ | |
| Microsoft 365 Enriched logs | ✅ | |
| Universal Conditional Access (CA) | ✅ | ✅ |
| Context-aware network security | ✅ | |
| Web category filtering | ✅ | |
| Fully qualified domain name (FQDN) filtering | ✅ | |
| TLS inspection | ✅ | |
| Threat intelligence | ✅ | |
| Prompt injection protection | ✅ | |
| Data Loss Prevention | ✅ | |
| Universal Continuous Access Evaluation (CAE) | ✅ | ✅ |
| Shadow AI discovery | ✅ | |
| Network controls for agents (requires Microsoft Agent 365) | ✅ |
🔧 How Entra Internet Access works
Web content filtering
This main feature provides granular access control for web categories and Fully Qualified Domain Names (FQDNs). By explicitly blocking unwanted sites, you protect your users and their devices.
When traffic reaches Microsoft's SSE, Entra Internet Access applies security controls. For HTTP traffic, it evaluates the URL and for HTTPS, it uses the SNI (Server Name Indication). Web filtering policies are grouped into security profiles and linked to Conditional Access policies to make this happen.
Security profiles
Security profiles are containers to group filtering policies and deliver them through Conditional Access policies.
For example: To block all Social Media websites except linkedin.com for John@michaelsendpoint.com, create two web filtering policies, add them to a security profile and link them to a Conditional Access policy scoped to the user.
Example Security Profile:
Allow linkedin.com at priority 100
Block Social Media at priority 200
INFO
- There is a global baseline security profile that acts as a catch-all policy for all routed Internet Access traffic, enforcing lowest-priority security, even without a linked Conditional Access policy.
- All changes in Global Secure Access do no simply save, but always need to deploy.


Procedure
The following flow shows web content filtering policies blocking or allowing access to the internet.

| Step | Description |
|---|---|
| 1 | The GSA client connects to the SSE and provides traffic metadata. |
| 2 | The client redirects to Entra ID for authentication and authorization. |
| 3 | The user and device authenticate, typically seamlessly with a valid PRT. |
| 4 | Conditional Access matches applicable rules, adds security profiles to the token, and enforces authorization. |
| 5 | Entra ID presents the token to the SSE for validation. |
| 6 | The tunnel establishes between the client and SSE. |
| 7 | Traffic is acquired and tunneled through Internet Access. |
| 8 | SSE evaluates policies by priority against traffic conditions until a rule matches. |
| 9 | SSE enforces the matching policy. |
| 10 | Block = returns an HTTP error or resets the HTTPS connection / Allow = forwards traffic to the destination. |
Security control sequence
- TLS inspection
- Web content filtering
- Threat intelligence
- File type
- Data loss prevention
- Third-party
Known limitations
- Limited to 256 security profiles, 1,000 policies and 1,000 rules per tenant.
- Limited to 8,000 total destinations per tenant across IPs, FQDNs, URLs and web categories.
- TLS inspection is limited to 100 policies, 1,000 rules, and 8,000 destinations.
- The service expects standard HTTP/HTTPS ports (80/443), does not tunnel IPv6 and does not support UDP.
- Source traffic type and HTTP method filtering are preview features and depend on client inspection and TLS inspection support.
⚙️ Configuration
To get started with Entra Internet Access, you can find the configuration and logs in the Entra portal under the Global Secure Access section. The first place you will land is the Dashboard.

If you already activated GSA, you will find a great overview over the state of your ZTNA (Zero Trust Network Access) environment. You can customize this dashboard however you see fit.
In the Entra -> Global Secure Access menu you will find the following options:
 |  |  |
|---|
 |  |  |
|---|

Activation
- Entra admin portal -> Global Secure Access -> Dashboard
- When you never used GSA before, you can
Activateit here.

Traffic forwarding profiles
Traffic forwarding profiles are the core of Global Secure Access with the control of which network traffic gets secured and managed by the service.
When traffic enters Global Secure Access, it's checked against your configured policies. If it matches configured endpoints from one of your profiles, it gets routed through GSA. There are three main and one system profile that get evaluated in the order shown:
- Microsoft Entra traffic: Always enabled system profile for authentication and identity traffic with the highest priority that gets automatically assigned to all users (Authentication endpoints and Graph API).
- Microsoft traffic: Forwards traffic for Microsoft Services (M365 Apps like Teams, SharePoint Online or Exchange Online) and is the Microsoft traffic part of Entra Internet Access (but works already with an Entra P1 license).
- Private access: Routes individual traffic to private resources (Like an Identity based VPN).
- Internet access: Routes traffic to public internet sites and services using prepopulated FQDNs and IP addresses (HTTP and HTTPS traffic).
Any traffic that doesn't match these profiles simply bypasses the service.
What you can configure for each profile:
- Users & connectivity – Decide which users get the profile and how they connect
- Traffic routing – Choose what types of traffic to forward through the service
- Security policies – Apply Conditional Access policies to control access

To start routing traffic with Entra Internet Acces (or any of the other profiles), you need to activate the coresponding profile by opening the Entra admin portal -> Global Secure Access -> Connect -> Traffic forwarding and activating the toggle.
After that you click the View button under the User and group section of the profile and select which users get the profile assigned in general.
WARNING
Without this assignment, traffic will not be aquired and no policy will be implemented.

When you select the View button in the Microsoft traffic policies, you will see the pre-set M365 forward and bypass settings, which you can customize.
When selecting View on the Internet access policies you can see all standard Aquire and Forward policies. You can enable/disable the Aquire policies and set custom Bypass policies for your traffic.
IMPORTANT
This controls on a fundamental level, which traffic will get picked up by the GSA client and which will not.

When looking at the Linked Conditional Access policies and the Remote network assignments, you can only look at what was configured in your settings. You can not make changes here.
Web content filtering
Web content filtering lets you enforce domain- and URL-based web content filtering. Fully integrated with Entra ID and Conditional Access, these policies are easy to manage, user-aware and context-aware.
Core Capabilities
- Filtering Options: Web categories, explicit URLs, and FQDNs.
- Traffic-Aware Conditions: Scope rules by traffic source (agent vs. user) or filter specific HTTP request methods (e.g.,
GET,POST,PUT,DELETE).
Web content filtering V1 vs. V2
The evolution from V1 (Web Content Filtering) to V2 (Web Filtering) in web content filtering shifts it from modular policy-stacking (V1) to deterministic and single-profile (V2). While V2 introduces deeper inspection capabilities, it fundamentally trades administrative inheritance for execution predictability.
- In the V1 architecture, web filtering relies on policy stacking across profiles. Administrators can define independent, single-purpose policies (e.g., Global Category Blocklist, Marketing Exceptions) and layer them under a Security Profile. Evaluation is non-terminal: the engine scans down the entire stack of linked policies until a rule matches. While this inheritance model minimizes code duplication, with supoptimal planning it can introduce complexity with multiple hirachies to keep track of.
- V2 shifts to a strict, single-policy execution model per Security Profile. Stacking multiple policies within a profile is replaced by a single Web Filtering policy containing an ordered list of rules. Evaluation follows a terminal, "first-match wins" workflow: as soon as a request hits a matching rule or falls back to the profile's Default Action, execution halts immediately. Lower-priority profiles or global fallbacks are never evaluated.
V2 Information
- Granular Traffic Inspection: Beyond execution logic, V2 moves beyond basic domain matching to inspect full URL sub-paths and context-aware attributes. This enables targeted operational controls, such as blocking HTTP
POSTrequests (file uploads) while preserving read access to a web application. - Tenant-Wide Provisioning Lock: You can only use V1 or V2 policies. Mixing is not possible.
- New Default Action - Continue Evaluation: On 17.09.2026, Microsoft introduced a new Default Action for V2 policies in Preview.
Continue Evaluationallows V2 policies to be stacked, similar to V1 policies. This gives you the benefits of the new V2 policies while also providing the flexibility to stack multiple policies without the need to duplicate standard policies.

Creating V1 Web content filtering policies
- To get startet open the Entra admin portal -> Global Secure Access -> Secure -> Web Content Filtering Policies and click
+ Create policy.

- Add a Name and Description on the Basics tab, then click
Next.
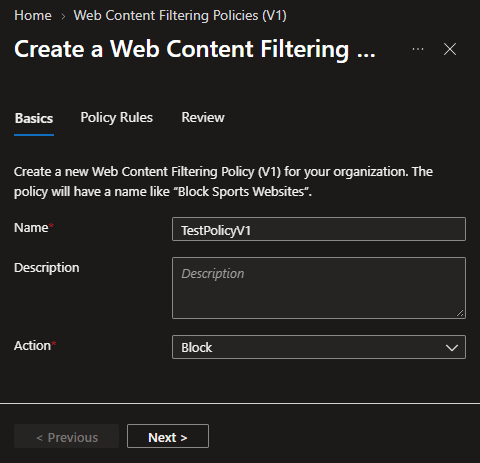
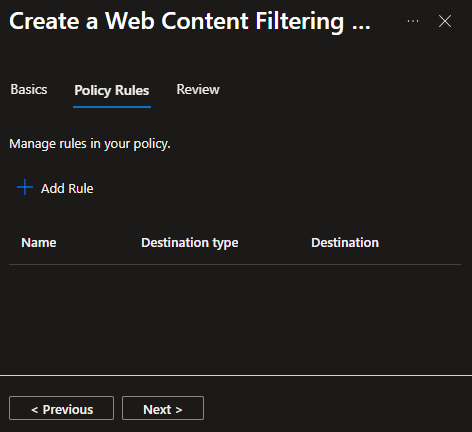
- On the Policy Rules tab, you click
Add Ruleto add a rule.
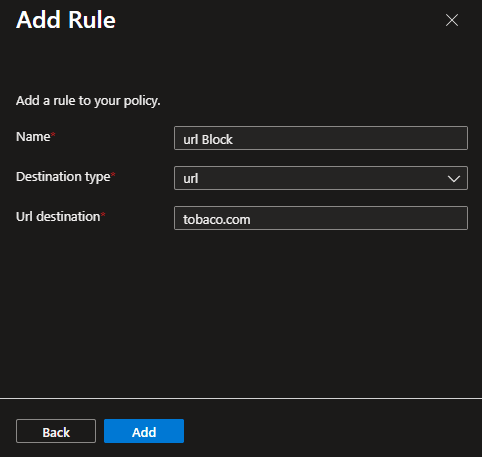
First enter a Name for your Rule and then select under Destination type, if you want to use a
webCategory, anFQDNorURL. Then select the categories you want or enter the FQDN / URL Destination and clickAdd.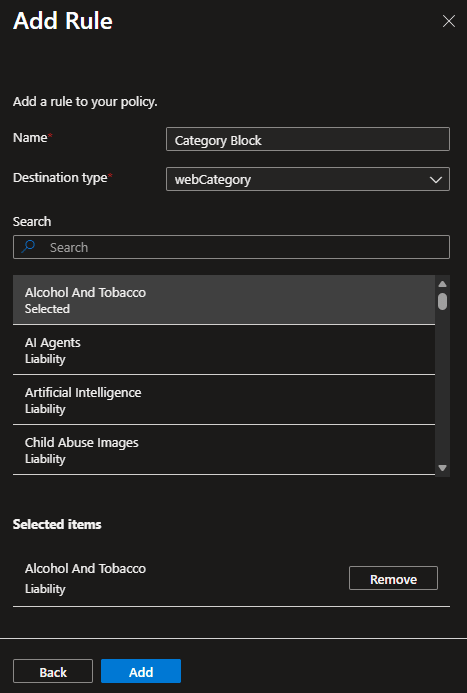
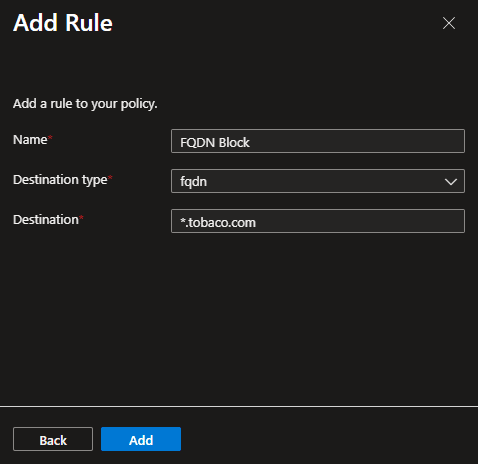
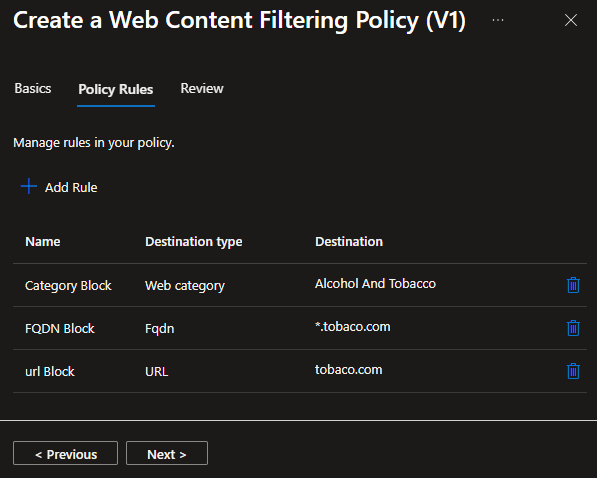
Back in the Policy Rules tab you will be able to see all the rules you created and their types / Destinations.
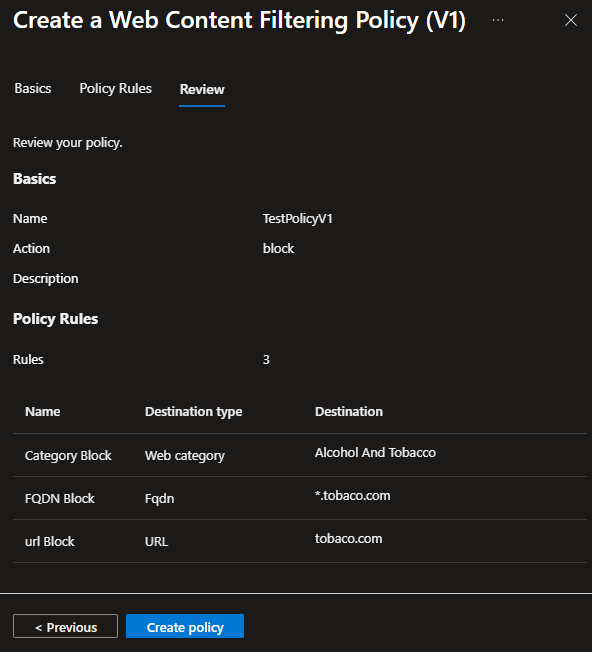
- After clicking
Next, you can create the policy withCreate policy.
INFO
- When multiple policies match with conflicting actions, the most restrictive action wins (block over allow).
- Dont include the protocol (https://) or ports in the destinations.
- You can enter multiple FQDNs or URLs separated only by commas, with no spaces in between.
- You can filter max. 1000 URLs per tenant.
Creating V2 Web content filtering policies
- To get startet open the Entra admin portal -> Global Secure Access -> Secure -> Web Content Filtering Policies.
- To switch from V1 to V2 web content filtering, you find a banner right beneath the button to create a new policy, where you can switch to the V2 policy experience.
IMPORTANT
Make sure that there are no V1 policies left (except the default All websites policy) before you switch. Else you will not be able to create V2 policies.

- When you arrive at the V2 experience, you can create a new policy by clicking
+ Create policy.

- Add a Name and Description on the Basics tab, then click
Next.

On the Policy settings tab you can set the Default Action to
Allow(this makes sure the polciy operates like a Blacklist instead of a Whitelist), clickNextand create the policy.

When you now open the policy again and got to the Rules tab, you can add individual filtering rules by clicking
Add rule.

- First you add a Rule name, Rule description and Priority in the Basics section.
- In the Rule settings section you need to make sure to
Enablethe policy and in V2 can set a Source as target for this rule.- Source: Session type =
UserorAgent
- Source: Session type =
- In the Destination matching section, you can set targeted URLs or FQDNs and Web categories. New in V2, you can also select an HTTP method request to target.
- HTTP method request: HTTP methods =
GET(Retrieve data),POST(Submit data),PUT(Replace data),PATCH(Update data) orDELETE(Remove data)
- HTTP method request: HTTP methods =

- After that you click
Create ruleand thenSaveback in the rule overview.
Security profiles
A security profile acts as a container for one or more filtering policies. It defines which filtering policies are grouped together and can then be applied as a single security configuration.
Security profiles can be linked to Conditional Access policies. This connection makes the filtering policies user- and context-aware, allowing them to be applied based on the conditions defined in Conditional Access.
A security profile can contain multiple V1 Web content filtering policies or one V2 Web filtering Policy, and the same security profile can be linked to multiple Conditional Access policies.
Security profiles are also applied according to priority. Additionally, there is a Security Baseline at the lowest priority that acts as a catch-all at the end. However, this baseline is no longer needed in V2 because each Web Content Filtering policy now contains its own priority logic and default action.
Security profiles
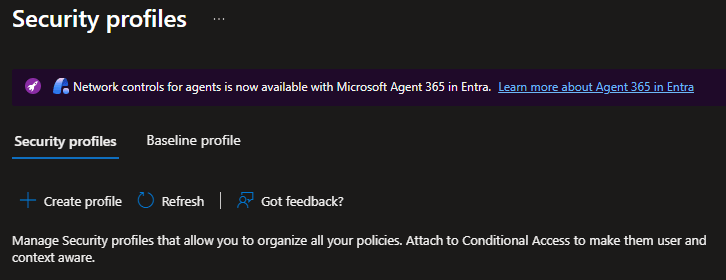
- To get startet open the Entra admin portal -> Global Secure Access -> Secure -> Security profiles and click
+ Create policy.
- Add a Profile name, Description, State and the Priority on the Basics tab, then click
Next.
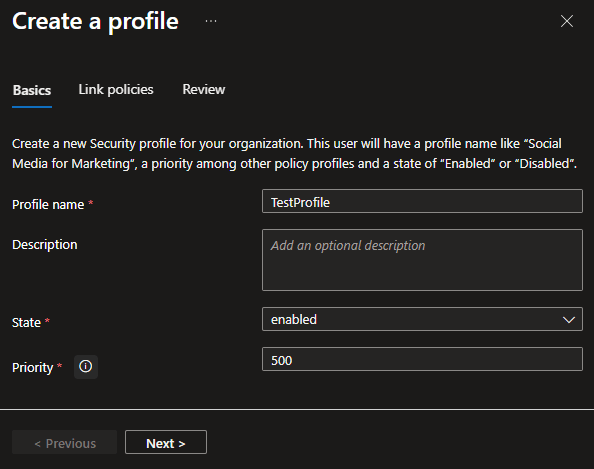
- In the Link policies tab, you can link multiple V1 policies with a secondary priority, but only one V2 policy can be linked.
- Create new Web Content Filtering Policy (V1)
- Existing Web Content Filtering Policy (V1)
- Existing Web Filtering Policy (V2)
- Existing prompt policy
- Existing content policy
- Existing Threat Protection policy
- Existing TLS inspection policies
- Existing Netskope DLP policy
- Existing threat intelligence policy
- Existing cloud firewall policy
- Existing MCP policy
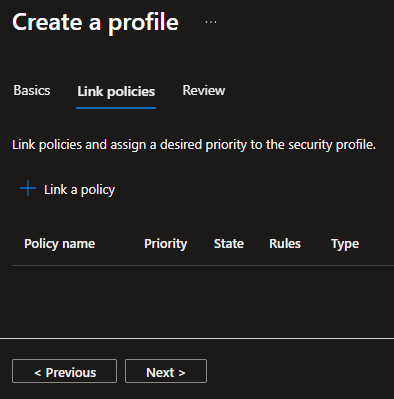
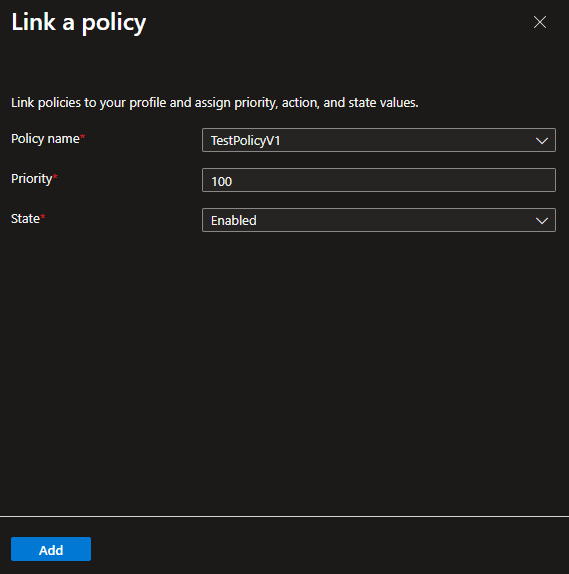
- To link the policy you just enter a Policy name, the Priority, set the State and click
Add.
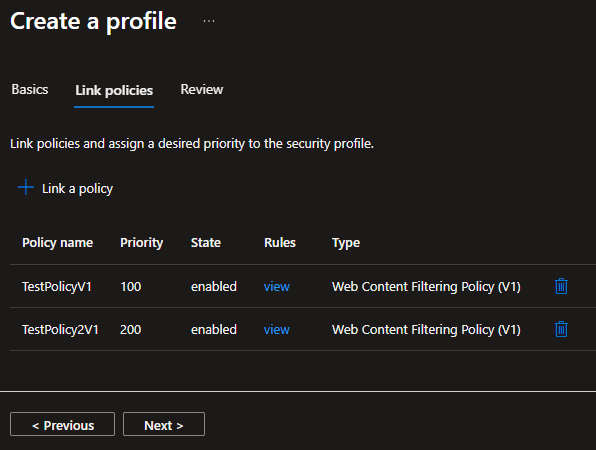
- The linked Web content filtering policies will get ordered by priority in the list. All other linked policies have no priority, because only one can be linked of each (e.g. TLS encryption profile).
- After clicking
Next, you check what you set up and clickCreate a profile.
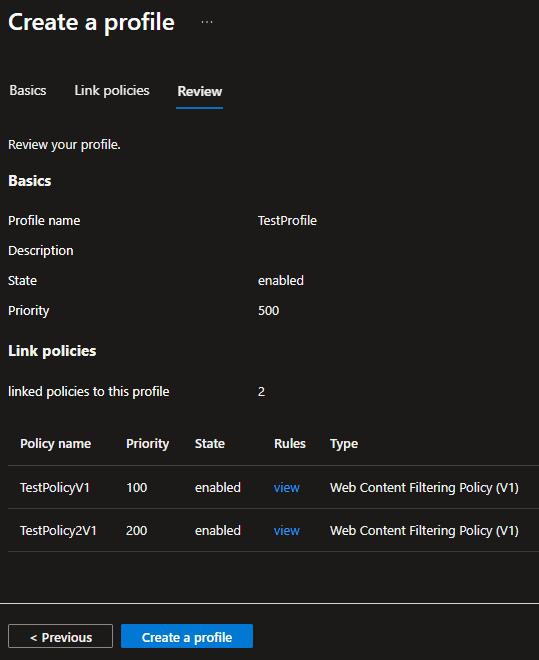
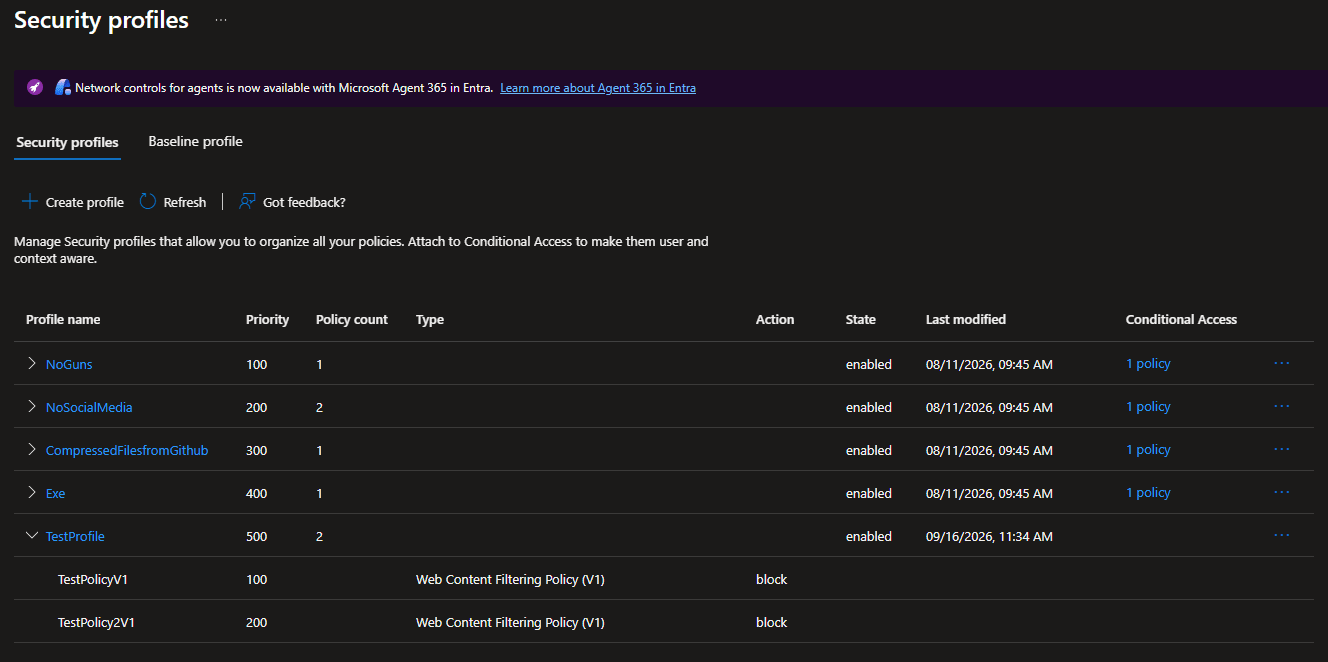
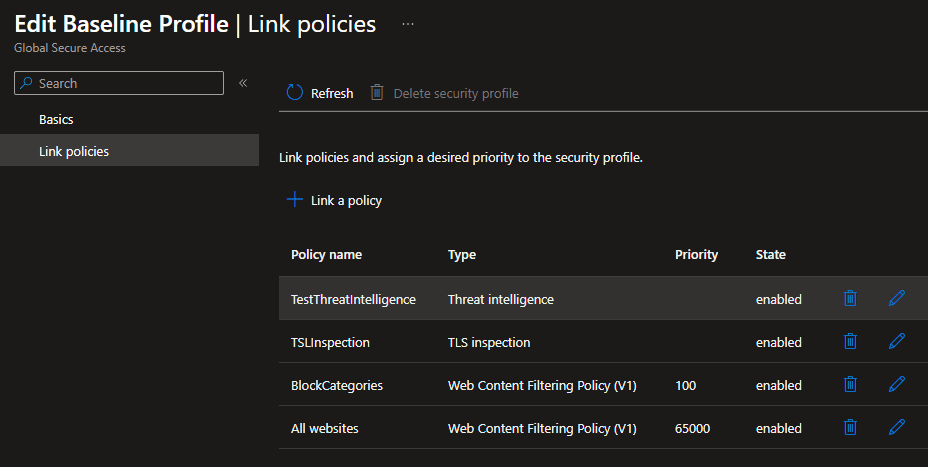
In the following screenshot you can see how a prioretization with V1 profiles would look / work.
Why does this look different with V2?
It does not really look much different. It just works different. Like mentioned above, with V1 policies you can stack and prioretize policies and rules and build a comprehensive rule set like this.
For example:
Priority Name Description 100 Allow Web Storage Allows Google Drive for IT 200 Allow LinkedIn Allows LinkedIn for Marketing 300 Block web categories Blocks a lot of standard categories like Social Media 65000 Allow websites Allowes all websites This would, with V1 policies, Allow Google Drive for the IT, but block any other Web Storage because they still get blocked by the policy 300.
In a V2 scenario, you need to build the complete logic in each profile, because every user only ever gets to one Security Profile / Web filtering policy with V2. V2 policies terminate after finding a match and because V2 policies have always a Default action (like the catch all baseline for V1), after getting there first policy, they will not see another one.
INFO
Applying a new security profile can take up to 60–90 minutes to take effect. This is because the security profile is enforced through access tokens. The user must receive a new access token containing the new security profile ID as a claim before the profile becomes active.
Changes to an existing security profile are enforced much faster.
Baseline profile
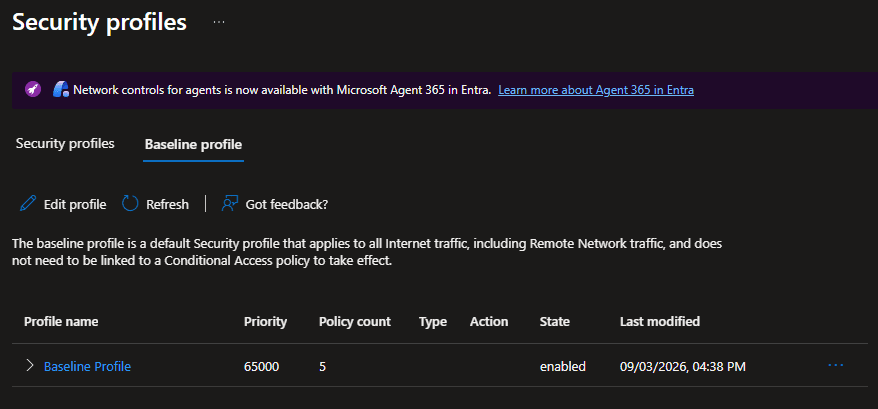
The Baseline is, as statet above, a catch all point, for all traffic / sites / users not gotten before, at the lowest priority (65000).
- To get startet open the Entra admin portal -> Global Secure Access -> Secure -> Security profiles and select the
Baseline profiletab. - Here you click
Edit profile, because you can not create aditional baselines.
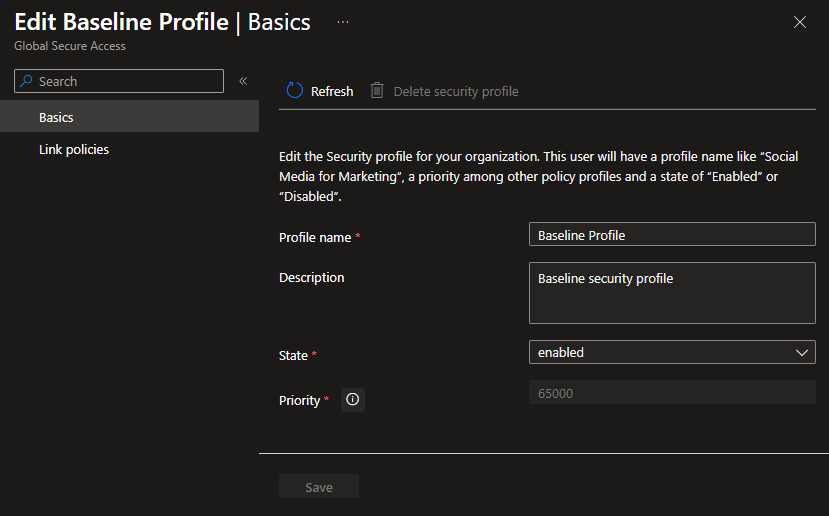
- In the Basics tab you can change the Profile name, Description and State, but not the Priority.
- In the Link policies tab, you can link multiple V1 policies with a secondary priority or one of all the other policies, including one V2.
- Create new Web Content Filtering Policy (V1)
- Existing Web Content Filtering Policy (V1)
- Existing Web Filtering Policy (V2)
- Existing prompt policy
- Existing content policy
- Existing Threat Protection policy
- Existing TLS inspection policies
- Existing Netskope DLP policy
- Existing threat intelligence policy
- Existing cloud firewall policy
- Existing MCP policy
Create and link Conditional Access policy
After creating all required Security profiles, link each profile to a Conditional Access policy. This allows the profiles to be assigned to users and applied based on context.
The exception is the Baseline policy, which does not need to be linked to a Conditional Access policy. It acts as the fallback and catches all traffic that is not covered by the other policies.
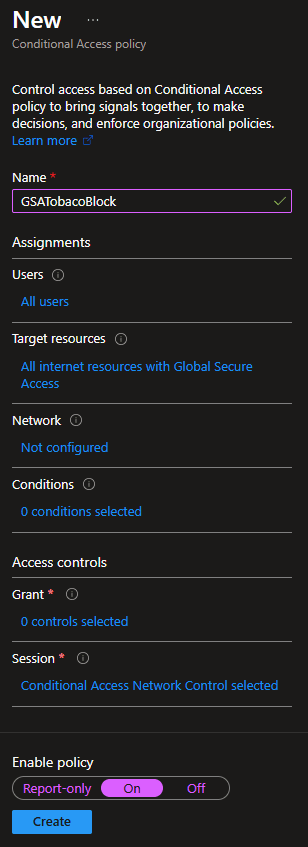
- To start, open the Entra admin portal -> Entra ID -> Conditional Access and select the
Policiesblade. - Here you click
New policyand enter a Name for your policy at the top. - Under Users select all users, groups or roles you want the Security profile to be assigned to.
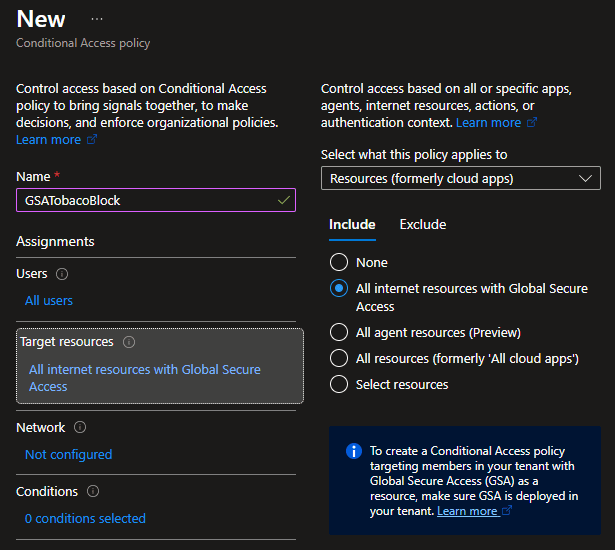
- Under Target resources you need to select
All internet resources with Global Secure Access.
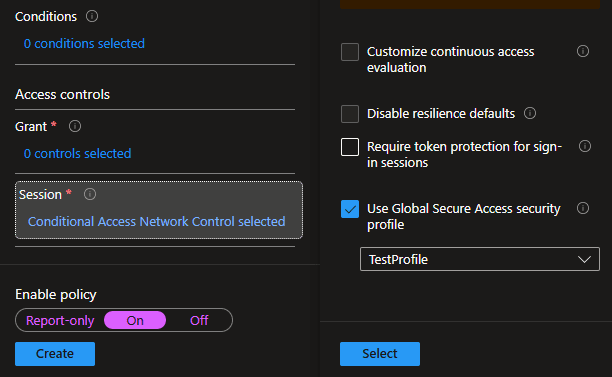
- Under Session you need to toggle
Use Global Secure Access security profileand select the Security profile you want to assign.
- You can then, of course, also add all the conditions and other Conditional Access goodness you need (e.g. Access a specific web app / site only from your corporate network).
- After you set the policy to
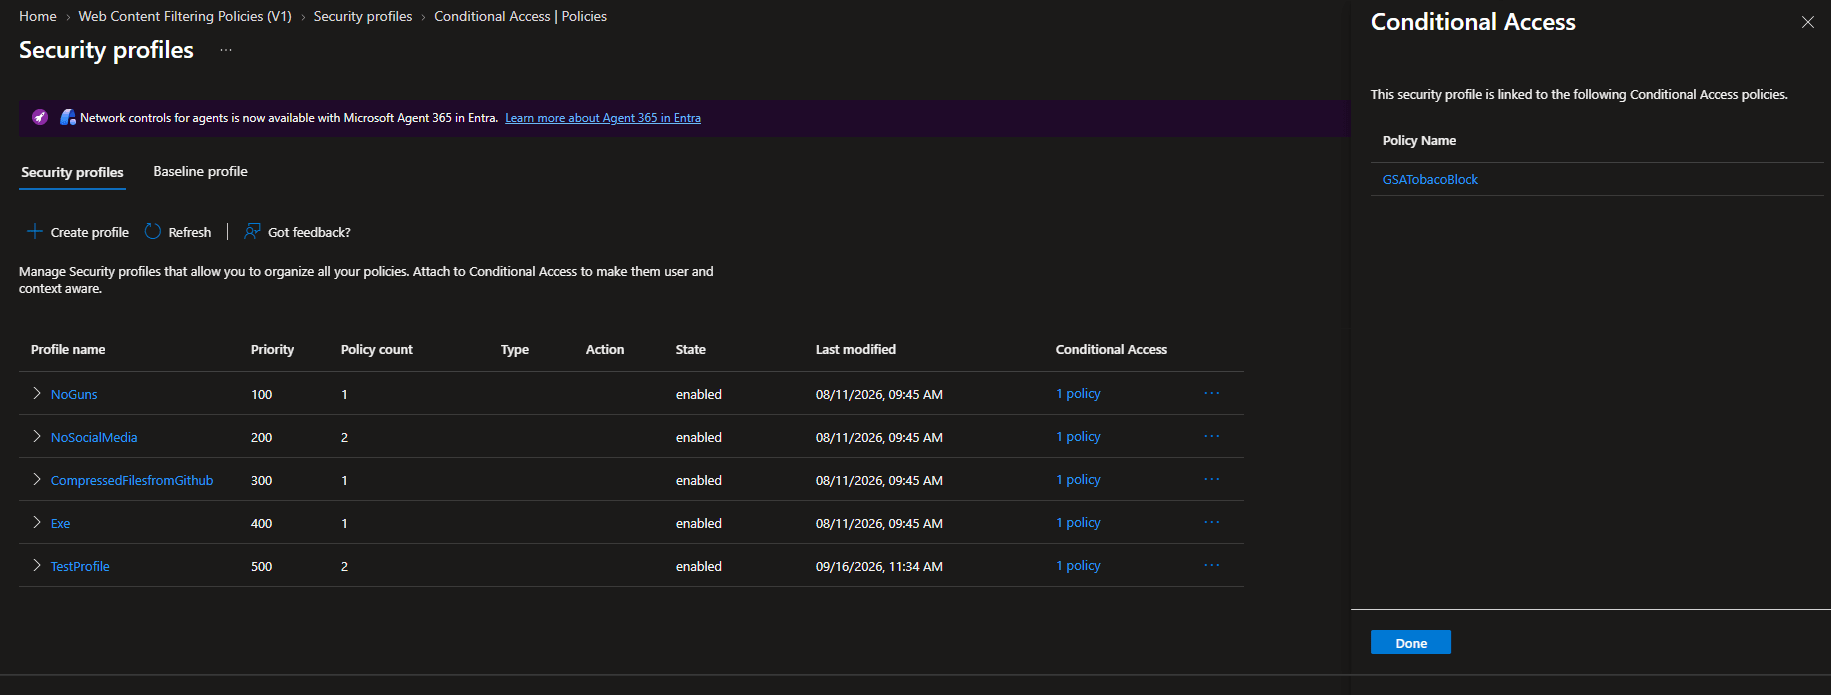
Onand create it withCreate, you can go back to the Security profiles screen, where you can see all conditional access policies assigned to every profile and directly drill down into the individual policy again.
TLS inspection
Most internet traffic is encrypted ith TLS (Transport Layer Security) encryption. You can see that, when the side has https instead of http. But while this is great so nobody can intercept and read the users traffic, we ourselfs can also not do it. This leads to not being able to check it for threats or filter it in any way.
So to get around this, there is TLS inspection, which gives us the possebility to check the traffic and still leave it encrypted for others.
This works in using two different certificates. One on the device and one in Entra.
- The Device encrypts its traffic with TLS as usual, the traffic gets captured by the GSA client and sent to the SSE.
- There Internet Access now also has this certificate the client used and so can decrypt the traffic and check it.
- Then it encrypts it again with its own certificate, if the traffic is allowed by your rules, and sends it on into the internet.

Supported encryption ciphers
- ECDHE-ECDSA-AES128-GCM-SHA256
- ECDHE-ECDSA-CHACHA20-POLY1305
- ECDHE-RSA-AES128-GCM-SHA256
- ECDHE-RSA-CHACHA20-POLY1305
- ECDHE-ECDSA-AES128-SHA
- ECDHE-RSA-AES128-SHA
- AES128-GCM-SHA256
- AES128-SHA
- ECDHE-ECDSA-AES256-GCM-SHA384
- ECDHE-RSA-AES256-GCM-SHA384
- ECDHE-ECDSA-AES256-SHA
- ECDHE-RSA-AES256-SHA
- AES256-GCM-SHA384
- AES256-SHA
Create certificate
- To get startet open the Entra admin portal -> Global Secure Access -> Secure -> TLS inspection policies and select the TLS inspection settings tab.
- Here you can click
+ Create certificateand select if you want to use your own TLS certificate or a Microsoft managed certificate.

If you select to use a Microsoft managed certificate, you just select it and click
Create. Thats it!
(This is in preview as of September 2026)If you want to use your own certificate, you will see a flyout window after selecting the option, where you can set the Name of your certificate, the Common name and Organization name. After that you can download the CSR (Certificate Signing Request) and create the TLS certificate with it, which you can upload in the same flyout together with the Certificate Chain certificate.
If you want to learn more on how to create your certificate with a CSR, consult the documentation of your CA vendor (Microsoft prepared a PowerShell script to Use PowerShell to generate and sign TLS certificates using Active Directory Certificate Services or OpenSSL).
INFO
The standard validity period for Microsoft managed certificates is 10 years, but you can configure a shorter one with the API.

- After created / uploaded the certificate, it enrolls for a minute and then needs to switch to the status Active.

- When you use a Microsoft managed certificate, you can select
Download root certificatein the context menu of the newly activated certificate. When using you own, you already have this.

Deploy certificate
- Open the Intune admin portal -> Devices -> Configuration and click
+ Create->New Policy. - Select your Platform of choice, Profile type
Trusted certificateand clickCreate. - Add a Name and Description on the Basics tab, then click
Next.

- On the Configuration settings tab, upload the TLS certificate downloaded from the portal / your CA. (On windows select
Computer certificate store - Rootas Destination store. On the other platforms there is no such option.)

- Click
Next, assign the policy to your GSA group and create the policy.
Create TLS inspection policy
- To get startet open the Entra admin portal -> Global Secure Access -> Secure -> TLS inspection policies and click
+ Create policy. - Add a Name, Description and set the Default Action to
Inspecton the Basics tab, then clickNext.

- On the Rules tab, you can add exception rules if needed, click
Nextand create the policy.

- Now you can open the created policy again, see on the Basics blade the default action as Inspect and on the Rules blade the additionally created deafult policies, that inspect all TLS traffic.
- If needed, you can add additional exception rules with
Add rule.

- If so, you first add a Rule name, Rule description and Priority for the rule.
- Next you make sure that the rule is set to
Enabled, set the Action toBypassand then add the FQDNs or web categories you which to exclude from the inspection. Then hitAdd. After that create the policy withSubmit.

After creating the policy, you can see the before invisible standard rules in the rule blade of the policy.

After creating the policy with all your rules, we need to link it to the Security profiles Baseline or an individual policy for which you can find instructions above.
INFO
- To enforce source traffic type and HTTP method rules, enable TLS inspection, otherwise only SNI-based filtering applies.
- Many mobile apps use certificate pinning which break under TLS inspection, causing handshake failures or application errors. Use bypass rules for these apps.
On the enduser device you will find the certificate in the certificate store of your OS. If you used the Microsoft managed certificate, it will be called Microsoft Entra TLS Inspection Root CA.

To check if the TLS inspection works, you can look on the users device at the certificate a website uses. For this click on the little icon on the left in your search bar, click Connection is secure and then click Certificate is valid.

Here you can see that the certificate was signed by Global Secure Access, which means that the TLS inspection worked.
 |  |
|---|
You can also open a blocked site and it will look different if it was blocked with TLS inspection vs. without.
| https Block without TLS inspection | https Block with TLS inspection |
|---|---|
 |  |
Known limitations
- Up to 100 policies, 1,000 rules and 8,000 destinations are supported.
- Use a unique certificate name for each CSR. Do not reuse CSRs. The signed certificate must be valid for at least six months.
- Only one certificate can be active at a time.
- TLS inspection doesn't support HTTP/2. Most sites fall back to HTTP/1.1, but HTTP/2-only sites require a TLS bypass rule.
- TLS inspection doesn't follow AIA or OCSP links when validating destination certificates.
Threat intelligence
Threat intelligence helps you protect your users from high-risk malicious sites on the internet, based on real-time data on current threats.
Internet Access uses Microsoft and third-party threat feeds to automatically block dangerous domains and URLs like active phishing, malware, or C2 servers. In addition, you can add an allow list to fix false positives.
- To get startet open the Entra admin portal -> Global Secure Access -> Secure -> Threat Intelligence policies and click
+ Create policy. - Add a Name and Description on the Basics tab, then click
Next.

- On the Policy settings tab the Default Action is fixed to
Allow, clickNextand create the policy.

- Now you can open the created policy again, see on the Basics blade the default action as allow and on the Rules blade the additionally created deafult policy, that blocks sites recognized as high risk.
- If needed, you can add additional exception rules with
Add rule.

- If so, you first add a Rule name, Rule description and Priority for the rule.
- Next you make sure that the rule is set to
Enabledand then add the FQDNs that you want to allow, even if they are recognized as high risk. Then hitAdd.

After creating the policy with all your rules, we need to link it to the Security profiles Baseline or an individual policy for which you can find instructions above.
WARNING
Please check to make sure, that these sites are safe before createn exceptions. Even if you know the sites, they still can be compromised.
If you want to manually check if this policy works, you can open test sites like entratestthreat.com or smartscreentestratings2.net.
INFO
If you got problems with the created threat intelligence policy, you may need to clear your browser's cache.
Remote Network
Setting up a remote network lets you connect a whole branch office to Global Secure Access without putting software on every single device. You just link your office router to the nearest Global Secure Access hub using an IPSec tunnel and all your internet traffic automatically routes through the cloud to get checked against your security rules.
CPE (Customer Premises Equipment) Technical Requirements
- Supported Protocols:
- Internet Key Exchange Version 2 (IKEv2)
- Internet Protocol Security (IPSec)
- Border Gateway Protocol (BGP)
- AES-GCM (128, 192, or 256-bit) encryption for IKE Phase 2 negotiation
- VPN Configuration:
- Must use a Route-Based VPN setup.
- Must configure any-to-any (wildcard
0.0.0.0/0) traffic selectors on your CPE.
- Connection Mode:
- The remote network operates in Responder mode.
- Your CPE must be configured to initiate the IPsec connection.
To get startet open the Entra admin portal -> Global Secure Access -> Connect -> Remote networks and click
+ Create remote network.Add a Name and Region on the Basics tab, then click
Next.INFO
Region specifies the destination of the IPsec tunnel comming from your router or CPE.

- On the Connectivity tab you can add a device link or IPsec tunnel to your remote network by clicking
Add a link.

- To create that link you need to add a few information on the General tab about the remote network:
- Link name: The unique name for your Customer Premises Equipment (CPE).
- Device info
- Device type: Select your CPE model or type from the dropdown menu.
- Device IP address: The public IP address of your CPE device.
- Device BGP address: The BGP (Peer and Local Border Gateway Protocol) IP address assigned to your CPE. Configure this value as the local BGP IP address on the CPE itself.
- Device ASN: The Autonomous System Number (ASN) for your CPE. Ensure it differs from the cloud gateway's ASN. Look here for supported values.
- Enter tunnel preference
- Redundancy = No redundancy or Zone redundancy (Requires you to enter a Zone Redundancy Local BGP Address. A secondary BGP IP address outside your on-premises network subnet that differs from the Device BGP Address.)
- Bandwidth capacity (Mbps) = 250, 500, 750, 1000
- Enter a private IP address you want to use for Microsoft gateway
- Local BGP address: The cloud-side BGP IP address assigned to this connection.
- Must fall outside your on-premises network range (e.g., use
10.2.0.4if your local network is10.1.0.0/16).- Configure this value as the peer BGP IP address on your CPE.
- Check Valid BGP Addresses to avoid reserved ranges.
- On the Details tab you can add a custom IPSec/IKE policy if needed (Must match the IPSec/IKE policy on your CPE). You can find possible combinations here.
- On the Security tab you enter your CPE's pre shared key and click
Save(The secret keys must match the configuration on your CPE).


On the Traffic profiles tab, you can select the Internet and Microsoft traffic forwarding profiles to tell the IPsec tunnel which traffic from the Remote network to acquire.
INFO
You should always use both, because they are the two parts that make Entra Internet Access and it can lead sometimes too dropped packages if you do not.

- After that, you can click
Review + createon the next tab to create the remote network.

INFO
If you want to learn more about, how to view the connectivity configuration of the IPSec tunnel in Entra, look here. You can take that information to configure the IPSec tunnel on your equipment.
To apply we content filtering policies to a remote network, you add the policies to the Baseline security profile. This will enforce tenant-wide web rules to all network traffic.
IMPORTANT
If you add specific roules into the baseline, be aware that traffic without the client (explicite forward proxy in remote networks) does not support the source traffic type filtering. That needs the GSA client on the device to provide task and processor metadata for traffic classification.
Cloud Firewall
The GSA Cloud Firewall is basically a normal firewall, but hosted in the cloud. It enforces filtering for Internet-bound traffic from branch offices that have a Remote Network configured in GSA. The Firewall gives you centralized control over what traffic, Port etc. is allowed or blocked.
With cloud firewall, you can:
- Define policy rules based on source and destination IPs, ports, and protocol.
- Set a default action for traffic that does not match a rule.
- Allow or block traffic by rule priority.
- To get startet open the Entra admin portal -> Global Secure Access -> Secure -> Cloud firewall policies and click
+ Create firewall policy. - Add a Name and Description on the Basics tab, then click
Next.

- On the Policy settings tab set the Default Action to
Allow, clickNextand create the policy.

This now created the baseline policy, witch by default lets all traffic through.

INFO
This is basically nothing more then a Blacklist approach, where you let everything pass, except what is explicitly blacklistet. The great thing here is that it is a great first step with no risk of interrupting business.
The other approach is the Whitlist, which is just the complete opposite. You would set the default action to Block and then allow explicitly what needs to get through. This of course has more risk of blocking legitimate stuff and potentially more mantenance, but on the other side it is much more secure.
If you click on the Policy again, you can change Name and Description, but not the Default action.
 |  |
|---|
If you go to the Rules blade, you can add additional rules beyond the standard action.
- Click
+ Add ruleand fill out the sections as needed. - First add a Name, Description and select the priority for the rule.

INFO
If you create new kind of rules, it is best practice to create them with priorities 100 appart. This gives you wiggle room for the future to add additional policies, without needing to change the priority in all the existing rules to accomidate the new one.
The lower the number the highter the priority. It needs to beginn with 100 and end with 65000.
- Then off course make sure that the policy is acutally
Enabledwhen you create it. - After that add whatever IPs, Ports, FQDNs or Protocols you want to control.
- And at the end, make sure you select the action for this specific rule.

INFO
All rules in created in a single policy are and connected. That means the traffic needs to meet all rules at the same time.
After creating the policy with all your rules, we need to link it to the Security profiles Baseline for which you can find instructions above.
INFO
It can take up to 20 minutes for firewall policy updates to work.
MCP firewall
An MCP (Model Context Protocol) server functions as an inbetween that allows AI models to talk directly to other software systems, external APIs or databases. This makes AI models much more powerfull for enterprises because you don`t have to use the same data that the general public is using. You can use AI that also knows your data. And not only what is in M365, but your Business data aswell.
With that in mind, this powerfull information needs security, to make sure your data does not get exposed.
The GSA MCP firewall lets you extend the GSA controls to MCP traffic, so you can control who is connecting and where the traffic is going. This adds a great security layer without the need to tinker with the MCP protocol itself or the client/server implementations.
The MCP firewall inspects JSON-RPC 2.0 traffic over HTTP/SSE, applying your custom Allow or Block rules. You can Block all MCP traffic, Allow or block specific MCP servers, Allow or block MCP primitives or Allow or block specific methods and protocol versions.
INFO
For this to work, TLS inspection needs to be enabled.
- To get startet open the Entra admin portal -> Global Secure Access -> Secure -> MCP policies and click
+ Create policy. - Add a Name and Description on the Basics tab, then click
Next.

- On the Policy settings tab set the Default Action to
Allowand clickNext.

- On the Add rule tab you can create custom rules for your MCP traffic and then click
Next.

- When creating a rule, in the Basics section you first add a Name, Description and set a Priority.
- In the rule settings section you need to make sure, the rule is
Enabled. - In the MCP destination matching section and MCP matching conditions section you can set explicite conditions to match the traffic you want to control.
- Beneath that in th Action section you can the set, if you want to
AlloworBlockthe configured traffic.


- On the last page, in addition to the policy you created, you can also look at it in JSON. Then create the policy with
Create.

After creating the policy with all your rules, we need to link it to a Security profile for which you can find instructions above and link that security policy to a conditional access policy, for which you can find the instructions here.
TIP
To discover active MCP servers and tools, check the Monitor -> Generative AI Insights blade. Select an initialize response event to view a server's tools and capabilities or use View suggested MCP servers from recent activity.
Known limitations
- The MCP Firwall supports only streamable HTTP and Server Sent Event, stdio and other non-HTTP transports are not inspected.
- Only remote MCP servers are inspected, local servers on devices are not visible.
- JSON-RPC batches are not inspected.
- MCP tool, resource and prompt details are not shown in the portal, but they are visible with the Graph API.
Session Management
Universal Tenant Restrictions
Universal Tenant Restrictions (UTR) is a Microsoft Entra ID access control feature that builds on tenant restrictions v2 (TRv2). It is not about allowing people from another tenant into your environment,it controls which external tenants and applications users on your managed devices can access, even when they are connecting outside a traditional company proxy path. This helps prevent users from signing in to an unauthorized organization or accidentally sending company data to an external tenant.
In practice, this means that when a user signs in to Entra ID or an app protected by Entra ID, the sign-in is evaluated against your TRv2 allowlist. If the target tenant or app isn't allowed by policy, the user is blocked before they can complete authentication. This matters because users may legitimately collaborate with guests, partners or suppliers from another tenant, while you still need to prevent access to unrelated external tenants and unapproved cloud services. The control reduces the risk of data exposure and unauthorized cross-tenant access.
Microsoft Example
If you configure a tenant restrictions v2 policy in the tenant domain.com to block all organizations except domain2.com, the policy applies according to this table:
| User | Type | Tenant | Tenant restrictions v2 policy processed? | Authenticated access allowed? |
|---|---|---|---|---|
| alice@domain.com | Member | domain.com | No (same tenant) | Yes |
| alice@domain2.com | Member | domain2.com | Yes | Yes (tenant allowed by policy) |
| bob@domain3.com | Member | domain3.com | Yes | No (tenant not allowed by policy) |
| bob_domain3.com#EXT#@domain.com | Guest | domain.com | No (guest user) | Yes |
To make this work, Global Secure Access applies your tenant restrictions policy to the user session and enforces it wherever the user is located, as long as the device is covered by GSA. This is especially useful for remote workers, contractors and branch users who are not always routed through a managed proxy.
Before you can use UTR, you need to configure the required tenant restrictions foundations and ensure the traffic is being routed the way GSA expects:
- You must enable the Microsoft traffic profile
- You must configure both the default tenant restrictions and any tenant restrictions for specific partners.
- Go to the Entra admin portal -> Global Secure Access -> Settings -> Session management and open the Universal Tenant Restrictions tab.
- Toggle Enable Tenant Restrictions for Microsoft Entra ID and Microsoft Graph to
Active.

Known Error
If you enable universal tenant restrictions and then access the Entra admin center for a tenant that is on the tenant restrictions v2 allow list, you might receive an "Access denied" error. To fix this issue, add the following feature flag to the Entra admin center URL: ?feature.msaljs=true&exp.msaljsexp=true.
Example: Instead of using this:
https://entra.microsoft.com/, use this:https://entra.microsoft.com/?feature.msaljs%253Dtrue%2526exp.msaljsexp%253Dtrue#home.
Adaptive Access
Adaptive Access brings real network context into Conditional Access. When you route traffic through a proxy, the user's actual IP address and local context are typically lost. The destination only sees the proxy's egress IP address.
Adaptive Access fixes this with these two core features:
- Source IP Restoration: This feature passes the user's real public IP address to Entra ID, allowing location-based policies, risk detections, sign-in logs, and other solutions to evaluate the user's actual location.
- Compliant Network: Instead of managing static IP lists, you can require users to connect through an approved Global Secure Access client or network. If someone steals a session token and tries to use it from an untrusted network, Entra blocks them instantly.
In short, you get tighter Zero Trust security and protection against token theft.
- Go to the Entra admin portal -> Global Secure Access -> Settings -> Session management and open the Adaptive Access tab.
- Toggle Enable Conditional Access Signaling for Microsoft Entra ID to
Active.

Explicit Forward Proxy
Explicit Forward Proxy in GSA is a lightweight way to handle web traffic without needing the GSA client installed on your devices. Instead, it routes browser requests straight through Entra Internet Access using simple PAC (Proxy Automatic Configuration) files and standard web protocols. This makes it a great fit for setups where installing software is not possible, like shared kiosks, Linux machines or Industrial controller.
- Go to the Entra admin portal -> Global Secure Access -> Settings -> Session management and open the Explicit Forward Proxy tab.
- Toggle Internet Access to
Enabledand check the settings you need.- Smart Session Management
- HTTP Header Session Management

Enabling Internet Access activates the Explicit Forward Proxy service for the tenant and generates a PAC file for you. It allows browser traffic sent to the proxy to be evaluated by Entra Internet Access and forwarded to the internet. It does not, by itself, redirect all device traffic. Clients must be configured to use this proxy. This can be done, by setting the clients up to use the PAC file directly or by using the Remote Network configuration from Entra Internet Access.
- Smart Session Management creates a unique session identifier in the PAC file downloaded from the portal. The identifier lets the service associate requests using that PAC file with the user's authenticated session and maintain session affinity. Enable this for the standard user-based Explicit Forward Proxy experience.
- HTTP Header Session Management allows an outbound proxy in front of Global Secure Access to identify the originating device by adding the
x-ms-gsa-efp-forwarded-forheader. Configure this only when your proxy can add the header with a unique device IP. The header must not be accepted from untrusted clients, because it is used for device/session association.
Explicit Forward Proxy session management
Explicit Forward Proxy authenticates users with Microsoft Entra ID and maintains the user's session while browser traffic is sent through the proxy.
Session management can use:
- Smart session management: The preferred option for PAC files used directly by browsers. A unique session ID links requests to the authenticated user.
- IP affinity: Associates requests with the source IP address used during authentication. It works best with a stable public IP.
- HTTP header session management: For deployments with an upstream proxy that adds
x-ms-gsa-efp-forwarded-forwith a unique device IP. - Cookie affinity: Uses cookies when supported by the browser or proxy flow.
These options determine how subsequent requests are associated with the authenticated session. Use Smart Session Management for the standard user-based experience, or HTTP Header Session Management when an upstream proxy identifies devices behind it.
INFO
- Explicit Forward Proxy works only when TLS inspection is enabled.
- Conditional Access should be configured to only allow Explicit Forward Proxy connections from trusted networks.
Custom Block Page
With the help of the Custom block page you can customize the default body of the Block Message.
- Go to the Entra admin portal -> Global Secure Access -> Settings -> Session management and open the Custom Block Page tab.
- Toggle Custom body message to
Onand enter a message to display to your users (Limited Markdown support). - Then click Save.
 | |
|---|
INFO
- The custom block page works only when TLS inspection is configured and only for inspected traffic.
- The message body is limited to 1024 characters.
GSA Client install
The Global Secure Access client secures organizational network traffic on your devices. Guided by your previously set up forwarding profiles, it routes the traffic through the cloud service while directing all other traffic straight to the network / internet.

The client can be downloaded and installed manually or installed via MDM.
Windows
INFO
- The client needs a device joined, hybrid joined or registered to your tenant
- Registered devices only support Entra Private Access
- Azure Virtual Desktop single-session is supported
- Azure Virtual Desktop multi-session isn't supported
- Windows 365 is supported
- Windows on Arm devices (e.g. Surface Pro) needs a separate client that you can download here
- Open the Entra admin center -> Global Secure Access -> Connect -> Client download, select Download Client and rename the .exe to
GlobalSecureAccessClient.exe. - Now we need to package the Client.
- Save the following PowerShell script prepared by Microsoft as
GSAInstaller.ps1to your computer or download it here. This script, once packaged, runs the installer, sets theIPv4Preferredregistry key and triggers a restart. This is needed because the Client does not support IPv6 at the moment. - Put the script and the installer in to the same Folder.
- Go to the Microsoft Win32 Content Prep Tool, select
IntuneWinAppUtil.exe, click on the 3 dots in the upper-right corner andDownload. - Now right click in an open space in the folder you downloaded to and click
Open in TerminalorOpen PowerShell herewhich will open a terminal window already navigated to that folder. - Run
IntuneWinAppUtil.exe. - Enter the full path of the Folder where you saved the .exe and .ps1 file and hit
Enter. - Enter
GSAInstaller.ps1and hitEnter. - Enter the full path of the Folder where you saved the .exe and .ps1 file again and hit
Enter. - Enter
nand hitEnter. - After we packaged the installer, we can deploy it via Intune.
- Open the Intune admin center -> Apps -> All Apps and click
Create. - Platform =
Windows - App type =
Windows app (Win32) - Click
Select app package file, select the previously created .intunewin file and go to the next page. - Enter a Name, Description any other needed information, then go to the next page.
- On the Program tab enter the following install and uninstall commands.
- Install command =
powershell.exe -ExecutionPolicy Bypass -File GSAInstaller.ps1 - Uninstall command =
"GlobalSecureAccessClient.exe" /uninstall /quiet /norestart - Select
Nofor Allow available uninstall,Systemfor Install behavior andDetermine behavior based on return codesfor Device restart behavior with the following codes configured. - On the Requirements tab enter the following configurations.
- Check operating system architecture =
Select x64 and x86 - Minimum operating system =
Whatever your minimum is - On the Detection rules tab, select
Manually configure detection rules, clickAddand selectFileas Rule type. - Path =
C:\Program Files\Global Secure Access Client\TrayApp - File or folder =
GlobalSecureAccessClient.exe - Detection method =
String (version) - Operator =
Greater than or equal to - Value = GSA version
- Associated with a 32-bit app on 64-bit client = No
- On the Assignments tab, add your Entra Internet Access group as required and choose
enableas Restart grace period to make sure your users do not get an unexpected restart on there machine. - Then click
Createand you are done. - After we installed the client, we can configure a few settings about the client.
- In Intune, open Devices, select [Scripts and remediations](http://inprorem.cmd.ms/) and click
Create. - Enter a Name and Desciption and click
Next - With the following detection and remediation scripts you can hide the
Sign outbutton, hide theDisable Private Accessbutton, hide theDisablebutton and hide options with theRestrict non privileged usersbutton. - After that you can assign and create the script.
- At the moment, the client does not support DNS over HTTPS and Quick UDP Internet Connections (QUIC) traffic. That's why we need to disable these via Intune.
- In the Intune admin center, select Devices -> Manage devices -> Configuration and select
+ Create->+ New Policy. - Select
Windows 10 and lateras Platform,Settings catalogas Profile type and clickCreate. - Add a Name and Description on the Basics tab, then click
Next. - On the Configuration settings tab, add the following settings, set them to
Disabledand clickNext. - Microsoft Edge -> Allow QUIC protocol
- Google Chrome -> Allow QUIC protocol
- Microsoft Edge -> Control the mode of DNS-over-HTTPS
- Google Chrome -> Control the mode of DNS-over-HTTPS
- Then click through the tabs, assign the policy to your GSA users and create the settings profile.
PS Script
# Create log directory and log helper
$logFile = "$env:ProgramData\GSAInstall\install.log"
New-Item -ItemType Directory -Path (Split-Path $logFile) -Force | Out-Null

function Write-Log {
    param([string]$message)
    $timestamp = Get-Date -Format "yyyy-MM-dd HH:mm:ss"
    Add-Content -Path $logFile -Value "$timestamp - $message"
}

try {
    $ErrorActionPreference = 'Stop'
    Write-Log "Starting Global Secure Access client installation."

# IPv4 preferred via DisabledComponents registry value
    $ipv4RegPath    = "HKLM:\SYSTEM\CurrentControlSet\Services\Tcpip6\Parameters"
    $ipv4RegName    = "DisabledComponents"
    $ipv4RegValue   = 0x20  # Prefer IPv4 over IPv6
    $rebootRequired = $false

# Ensure the key exists
    if (-not (Test-Path $ipv4RegPath)) {
        New-Item -Path $ipv4RegPath -Force | Out-Null
        Write-Log "Created registry key: $ipv4RegPath"
    }

# Get current value if present
    $existingValue = $null
    $valueExists = $false
    try {
        $existingValue = Get-ItemPropertyValue -Path $ipv4RegPath -Name $ipv4RegName -ErrorAction Stop
        $valueExists = $true
    } catch {
        $valueExists = $false
    }

# Determine if we must change it
    $expected = [int]$ipv4RegValue
    $needsChange = -not $valueExists -or ([int]$existingValue -ne $expected)

if ($needsChange) {
        if (-not $valueExists) {
            # Create as DWORD when missing
            New-ItemProperty -Path $ipv4RegPath -Name $ipv4RegName -PropertyType DWord -Value $expected -Force | Out-Null
            Write-Log ("IPv4Preferred value missing. Created '{0}' with value 0x{1} (dec {2})." -f $ipv4RegName, ([Convert]::ToString($expected,16)), $expected)
        } else {
            # Update if different
            Set-ItemProperty -Path $ipv4RegPath -Name $ipv4RegName -Value $expected
            Write-Log ("IPv4Preferred value differed. Updated '{0}' from 0x{1} (dec {2}) to 0x{3} (dec {4})." -f $ipv4RegName, ([Convert]::ToString([int]$existingValue,16)), [int]$existingValue, ([Convert]::ToString($expected,16)), $expected)
        }
        $rebootRequired = $true
    } else {
        Write-Log ("IPv4Preferred already set correctly: {0}=0x{1} (dec {2}). No change." -f $ipv4RegName, ([Convert]::ToString($expected,16)), $expected)
    }

# Resolve installer path
    $ScriptRoot = if ($PSScriptRoot) { $PSScriptRoot } else { Split-Path -Parent $MyInvocation.MyCommand.Path }
    $installerPath = Join-Path -Path $ScriptRoot -ChildPath "GlobalSecureAccessClient.exe"
    Write-Log "Running installer from $installerPath"

if (Test-Path $installerPath) {
        $installProcess = Start-Process -FilePath $installerPath -ArgumentList "/quiet" -Wait -PassThru

if ($installProcess.ExitCode -eq 1618) {
            Write-Log "Another installation is in progress. Exiting with code 1618."
            exit 1618
        } elseif ($installProcess.ExitCode -ne 0) {
            Write-Log "Installer exited with code $($installProcess.ExitCode)."
            exit $installProcess.ExitCode
        }

Write-Log "Installer completed successfully."
    } else {
        Write-Log "Installer not found at $installerPath"
        exit 1
    }

if ($rebootRequired) {
        Write-Log "Reboot required due to registry value creation or update."
        exit 3010  # Soft reboot required
    } else {
        Write-Log "Installation complete. No reboot required."
        exit 0
    }
}
catch {
    Write-Log "Fatal error: $_"
    exit 1603
}

| Return code | Code type |
|---|---|
| 0 | Success |
| 3010 | Soft reboot |
| 1618 | Retry |

Detection script
# Check Global Secure Access registry keys
$gsaPath = "HKLM:\SOFTWARE\Microsoft\Global Secure Access Client"
$gsaSettings = @{
    "HideSignOutButton" = 1
    "HideDisablePrivateAccessButton" = 1
    "HideDisableButton" = 0
    "RestrictNonPrivilegedUsers" = 0
}
$nonCompliant = $false
foreach ($setting in $gsaSettings.GetEnumerator()) {
$currentValue = (Get-ItemProperty -Path $gsaPath -Name $setting.Key -ErrorAction SilentlyContinue).$($setting.Key)
if ($currentValue -ne $setting.Value) {
    Write-Output "Non-compliant: $($setting.Key) is $currentValue, expected $($setting.Value)"
    $nonCompliant = $true
}
}
if (-not $nonCompliant) {
    Write-Output "Compliant"
    exit 0
} else {
    Write-Output "Non-compliant"
    exit 1
}
Remediation script
# Ensure Global Secure Access registry keys are present
$gsaPath = "HKLM:\SOFTWARE\Microsoft\Global Secure Access Client"
$gsaSettings = @{
    "HideSignOutButton" = 1
    "HideDisablePrivateAccessButton" = 1
    "HideDisableButton" = 0
    "RestrictNonPrivilegedUsers" = 0
}
if (-Not (Test-Path $gsaPath)) {
    New-Item -Path $gsaPath -Force | Out-Null
}
foreach ($setting in $gsaSettings.GetEnumerator()) {
    Set-ItemProperty -Path $gsaPath -Name $setting.Key -Value $setting.Value -Type DWord -Force | Out-Null
    Write-Output "Set $($setting.Key) to $($setting.Value)"
}
INFO
If you support the Firefox browser in your company, look here for guidance on how to configure these settings.
macOS
INFO
- The client needs a device registered to your tenant
- The device needs an Intel, M1, M2, M3 or M4 processor
- The device needs to be running macOS version 14 or later
- Open the Entra admin center -> Global Secure Access -> Connect -> Client download and select Download Client.
- You can start an automated installation with the following command on the mac device or use Intune to deploy the app remotly.
sudo installer -pkg ~/Downloads/GlobalSecureAccessClient.pkg -target / -verboseR- Deploy the app via Intune
- Open the Intune admin center -> Apps -> All Apps and click
Create. - Platform =
macOS - App type =
macOS app (PKG) - Click
Select app package file, select the previously downloaded client and clickOK. - Enter a Name, Description any other needed information, then go to the next page.
- Skip the program tab and select
macOS Sonoma 14.0as Minimum operating system on the Requirements tab. - On the Detection rules tab, verify that the GSA client is listed under Included apps.
- Next you add your GSA group as required in the Assignments tab, click to the next tab and create the App.
- Allow system extensions through Intune
- In the Intune admin center, select Devices -> Manage devices -> Configuration and select
+ Create->+ New Policy. - Select
macOSas Platform,Settings catalogas Profile type and clickCreate. - Add a Name and Description on the Basics tab, then click
Next. - On the Configuration settings tab, add the following setting and click
Next. - Allowed System Extensions
- Bundle identifier =
com.microsoft.globalsecureaccess.tunnel,com.microsoft.globalsecureaccess - Team identifier =
UBF8T346G9 - Then click through the tabs, assign the policy to your GSA users and create the settings profile.
- Allow a transparent application proxy through Intune
- In the Intune admin center, select Devices -> Manage devices -> Configuration and select
+ Create->+ New Policy. - Select
macOSas Platform,Templatesas Profile type,Customas Profile and clickCreate. - Add a Name and Description on the Basics tab, then click
Next. - On the Configuration settings tab, enter a Custom configuration profile name, select
Device channelas Deployment channel, add the following .xml as Configuration profile file and clickNext. - Next assign the policy to your GSA users and create the settings profile.
- Configure menu buttons in the system tray through Intune
- In the Intune admin center, select Devices -> Manage devices -> Configuration and select
+ Create->+ New Policy. - Select
macOSas Platform,Templatesas Profile type,Preference fileas Profile and clickCreate. - Add a Name and Description on the Basics tab, then click
Next. - On the Configuration settings tab, enter
com.microsoft.globalsecureaccessas Preference domain name, add the following .xml as Property list file and clickNext. - Next assign the policy to your GSA users and create the settings profile.


xml
<?xml version="1.0" encoding="UTF-8"?>
<!DOCTYPE plist PUBLIC "-//Apple//DTD PLIST 1.0//EN" "http://www.apple.com/DTDs/PropertyList-1.0.dtd">
<plist version="1.0">
    <dict>
    <key>PayloadUUID</key>
    <string>87cbb424-6af7-4748-9d43-f1c5dda7a0a6</string>
    <key>PayloadType</key>
    <string>Configuration</string>
    <key>PayloadOrganization</key>
    <string>Microsoft Corporation</string>
    <key>PayloadIdentifier</key>
    <string>com.microsoft.globalsecureaccess</string>
    <key>PayloadDisplayName</key>
    <string>Global Secure Access Proxy Configuration</string>
    <key>PayloadDescription</key>
    <string>Add Global Secure Access Proxy Configuration</string>
    <key>PayloadVersion</key>
    <integer>1</integer>
    <key>PayloadEnabled</key>
    <true/>
    <key>PayloadRemovalDisallowed</key>
    <true/>
    <key>PayloadScope</key>
    <string>System</string>
    <key>PayloadContent</key>
    <array>
        <dict>
        <key>PayloadUUID</key>
        <string>04e13063-2bb8-4b72-b1ed-45290f91af68</string>
        <key>PayloadType</key>
        <string>com.apple.vpn.managed</string>
        <key>PayloadOrganization</key>
        <string>Microsoft Corporation</string>
        <key>PayloadIdentifier</key>
        <string>com.microsoft.globalsecureaccess</string>
        <key>PayloadDisplayName</key>
        <string>Global Secure Access Proxy Configuration</string>
        <key>PayloadDescription</key>
        <string/>
        <key>PayloadVersion</key>
        <integer>1</integer>
        <key>TransparentProxy</key>
        <dict>
            <key>AuthenticationMethod</key>
            <string>Password</string>
            <key>Order</key>
            <integer>1</integer>
            <key>ProviderBundleIdentifier</key>
            <string>com.microsoft.globalsecureaccess.tunnel</string>
            <key>ProviderDesignatedRequirement</key>
            <string>identifier "com.microsoft.globalsecureaccess.tunnel" and anchor apple generic and certificate 1[field.1.2.840.113635.100.6.2.6] /* exists */ and certificate leaf[field.1.2.840.113635.100.6.1.13] /* exists */ and certificate leaf[subject.OU] = UBF8T346G9</string>
            <key>ProviderType</key>
            <string>app-proxy</string>
            <key>RemoteAddress</key>
            <string>100.64.0.0</string>
        </dict>
        <key>UserDefinedName</key>
        <string>Global Secure Access Proxy Configuration</string>
        <key>VPNSubType</key>
        <string>com.microsoft.globalsecureaccess</string>
        <key>VPNType</key>
        <string>TransparentProxy</string>
        </dict>
    </array>
    </dict>
</plist>
xml
    <key>HidePauseButton</key>
    <false/>
    <key>HideDisableButton</key>
    <false/>
    <key>HideQuitButton</key>
    <true/>
    <key>HideDisablePrivateAccessButton</key>
    <true/>
Android
INFO
- The device needs to be running Android version 11 or later
- The client needs a device registered to your tenant
- Corporate-owned, fully managed user devices are supported
- Corporate-owned devices with a work profile are supported
- Personal devices with a work profile are supported
- On Android, the Global Secure Access client is built into Defender for Endpoint, so you only need to deploy the one app.
- Open the Intune admin center -> Apps -> All Apps and click
Create. - Platform =
Android - Category =
Store app - App type =
Managed Google Play app - Search for
Defender for endpoint, open it, clickSelectand clickSync. - Now you can open the synced app from the android app list, select the
propertiesblade and add your GSA group as required. - Deploy app settings
- Open the Intune admin center -> Apps -> Configuration and click
Create->Managed devices. - On the Basics tab add a Name and Description, then select
Android Enterpriseas Platform,All Profile Typesas Profile Type and then select the priviously synced appMicrosoft Defender: Antivirusas Targeted app. - On the Configuration settings tab, choose
Use configuration designeras Configuration settings format and then set the following configuration keys with+ Addand clickNext. - Global Secure Access
- GlobalSecureAccessPrivateChannel
- Now assign the policy to your GSA users and create the settings profile.


| Value | Details |
|---|---|
| No value | Global Secure Access defaults to value 1 behavior. |
| 0 | Global Secure Access isn't enabled and the tile isn't visible. |
| 1 | The tile is visible and defaults to false (disabled state). The user can enable or disable Global Secure Access by using the toggle in the app. |
| 2 | The tile is visible and defaults to true (enabled state). The user can override Global Secure Access. The user can enable or disable Global Secure Access by using the toggle in the app. |
| 3 | The tile is visible and defaults to true (enabled state). The user can't disable Global Secure Access. |
| Value | Details |
|---|---|
| No value | Global Secure Access defaults to value 2 behavior. |
| 0 | Private Access isn't enabled and the toggle option isn't visible to the user. |
| 1 | The Private Access toggle is visible and defaults to the disabled state. The user can enable or disable Private Access. |
| 2 | The Private Access toggle is visible and defaults to the disabled state. The user can enable or disable Private Access. |
| 3 | The Private Access toggle is visible but unavailable, and it defaults to the enabled state. The user can't disable Private Access. |

iOS
INFO
- The device needs to be running iOS/iPadOS 16.0 or later
- The client needs a device registered to your tenant
- Userless or shared devices are not supported by Defender for Endpoint on iOS -The Global Secure Access client on iOS uses a local, self-looping VPN rather than a standard VPN
- On iOS, the Global Secure Access client is built into Defender for Endpoint, so you only need to deploy the one app.
- Open the Intune admin center -> Apps -> All Apps and click
Create. - Platform =
iOS/iPadOS - App type =
iOS store app - Click
Search the App Store, search forMicrosoft Defender: Securityand clickSelect. - Select
iOS 16.0as Minimum operating system and clickNext. - Assign the app to your GSA group, click
Nextand create the app. - Create a VPN profile and configure GSA for Defender for Endpoint
- In the Intune admin center, select Devices -> Manage devices -> Configuration and select
+ Create->+ New Policy. - Select
iOS/iPadOSas Platform,Templatesas Profile type,VPNas Template name and clickCreate. - Add a Name and Description on the Basics tab, then click
Next. - On the Configuration settings tab, set Connection type as
Custom VPNand add the following settings under the Base VPN section. - Connection name =
Microsoft Defender for Endpoint - VPN server address =
127.0.0.1 - Authentication method =
Username and password - Split tunneling =
Disable - VPN identifier =
com.microsoft.scmx - Add this following Key/Value pairs:
- Under the Automatic VPN section add the following settings.
- Type of automatic VPN =
On-demand VPN - For On-demand rules click
Addand set: - I want to do the following =
Connect VPN - I want to restrict =
All domains - Block users from disabling automatic VPN =
Yes - Then click
Nextassign the policy to your GSA users and create the settings profile.

| Key | Value | Details |
|---|---|---|
| EnableGSA | No value | Global Secure Access defaults to value 1 behavior. |
| 0 | Global Secure Access isn't enabled and the tile isn't visible. | |
| 1 | Global Secure Access tile is visible and defaults to a disabled state. The user can enable or disable the tile by using the toggle. | |
| 2 | Global Secure Access tile is visible and defaults to an enabled state. The user can enable or disable the tile by using the toggle from the app. | |
| 3 | Global Secure Access tile is visible and defaults to an enabled state. The user *can't* disable Global Secure Access. |
| Key | Value |
|---|---|
| SilentOnboard | True |
| Key | Value | Details |
|---|---|---|
| EnableGSAPrivateChannel | No value | Optional to activate Entra Private Access. |
| 0 | Private Access isn't enabled and the toggle option isn't visible to the user. | |
| 1 | The Private Access toggle is visible and defaults to a disabled state. The user can enable or disable it. | |
| 2 | The Private Access toggle is visible and defaults to an enabled state. The user can enable or disable it. | |
| 3 | The Private Access toggle is visible but unavailable, and it defaults to an enabled state. The user *can't* disable Private Access. |


Exclude the Global Secure Access client from EDR and antivirus solutions
To avoid performance issues (e.g. CPU spikes) when running your EDR solution together with the GSA client, exclude the following processes:
C:\Program Files\Global Secure Access Client\GlobalSecureAccessClientManagerService.exeC:\Program Files\Global Secure Access Client\GlobalSecureAccessEngineService.exeC:\Program Files\Global Secure Access Client\GlobalSecureAccessETLController.exeC:\Program Files\Global Secure Access Client\GlobalSecureAccessTunnelingService.exeC:\Program Files\Global Secure Access Client\TrayApp\GlobalSecureAccessClient.exeC:\Program Files\Global Secure Access Client\PolicyService\GlobalSecureAccessPolicyRetrieverService.exeC:\Program Files\Global Secure Access Client\LogsCollector\LogsCollector.exeC:\Program Files\Global Secure Access Client\AuthenticationRunner\GlobalSecureAccessAuthenticationRunner.exeC:\Program Files\Global Secure Access Client\AdvancedDiagnostics\GlobalSecureAccessClientAdvancedDiagnostics.exe
For Defender for Endpoint, you can do this via settings in Intune admin center -> Endpoint security -> Antivirus, when you create a new policy with the profile type Microsoft Defender AntiVirus exclusions.

INFO
You can find all currently known limitations of the different GSA clients here.
Agents
Global Secure Access has now Agents section. In there you can find two blades Discovered agents and Discovered MCPs. While Discovered MCPs is not yet available, Discovered agents is.

In here you can find all agents found on your devices that got the GSA client installed. If you got licensing for Agent 365, this data will feed into this. In the same blade you can also activate security settings to protect your agents, by clicking Enable GSA Security Policies.

But in the end this will only bring out to a fly out window which will tell you if you got a Threat Intelligence policy and Web content filtering policy active in your environment that targets the Session type Agent.

Web Category checker tool
There is also a new tool to check the web category for any URL, to help you test policies. The tool is currently only available via the Graph API.
- Sign in to Graph Explorer with the Global Secure Access Administrator role.
- Set the HTTP method to GET and the API version to beta.
- Send the following request to check the web category:
https://graph.microsoft.com/beta/networkAccess/connectivity/microsoft.graph.networkaccess.getWebCategoryByUrl(url='michaelsendpoint.com')
🧑💻 User Experience
From a user perspective, Entra Internet Access is pretty straightforward. The client installs quietly in the background and uses single sign-on to log in without much friction. In most cases, the only thing users really notice is a blocked site or a policy enforcement message.
INFO
Web content filtering updates take effect in under 5 minutes for GSA, but take about 1 hour for Conditional Access. Applying a new security profile can take 60-90 minutes because the user needs a new access token with the updated profile claim. Changes to existing profiles take effect much quicker.
Client interface
If you want to interact with the client directly there are a few things you can do.
First, the client can have the following statuses:
| Icon | Message | Description |
|---|---|---|
 | Global Secure Access | Initializing and checking the connection to GSA |
 | Global Secure Access - Connected | Connected to GSA |
 | Global Secure Access - Disabled | Services are offline or client is disabled |
 | Global Secure Access - Disconnected | Failed to connect to GSA |
 | Global Secure Access - Some channels are unreachable | Connection to one or more channels failed |
| Global Secure Access - Disabled by your organization | Client got disabled by your org |
| Global Secure Access - Private Access is disabled | Private Access was disabled |
| Global Secure Access - could not connect to the Internet | No internet connection |
To open the GSA client interface, double click the Global Secure Access tray icon. In the Connections blade you get a view of the current connection status, the configured channels and a view additional details about your device.

In the Settings blade you can only see the current client version.

The interesting features are actually in the Troubleshooting blade. Here your can pull the latest policies from GSA, Export logs or start the diagnostics tool.
When you export logs, it will create a .zip file with all manner of usefull information for troubleshooting networking issues into the GSA logs folder (C:\Program Files\Global Secure Access Client\Logs).
The difference between Export logs and Collect advanced logs is actually, that the advanced logs will start the diagnostics tool, for which you need local admin priviledges. But disregarding that, the real difference is not in the files collected, but in the way the data is collected. You first run a traffic collection, during which you do the actions you want to analyze and this traffic is then also included in the logs.
Log Collection content
- RootCAs
- Application-Crash.evtx
- ClientCert.cer
- ClientChecker.log
- DeviceInformation.log
- dsregcmd.txt
- ForwardingProfile.json
- GlobalSecureAccess-Boot-Trace.etl
- GlobalSecureAccess-LTR-Trace.etl
- GlobalSecureAccess-Trace.etl
- HKEY_CURRENT_USER_SOFTWARE_Microsoft_Global Secure Access Client.reg
- HKLM_SOFTWARE_Microsoft_Global Secure Access Client Volatile Shared.reg
- HKLM_SOFTWARE_Microsoft_Global Secure Access Client.reg
- HKLM_SYSTEM_CurrentControlSet_Control_Lsa_Kerberos_Parameters.reg
- HKLM_SYSTEM_CurrentControlSet_Services_Dnscache_Parameters_DnsPolicyConfig.reg
- HKLM_SYSTEM_CurrentControlSet_Services_GlobalSecureAccessDriver.reg
- HKLM_SYSTEM_CurrentControlSet_Services_GlobalSecureAccessEngineService.reg
- HKLM_SYSTEM_CurrentControlSet_Services_GlobalSecureAccessForwardingProfileService.reg
- HKLM_SYSTEM_CurrentControlSet_Services_GlobalSecureAccessTunnelingService.reg
- HKLM_SYSTEM_CurrentControlSet_Services_Tcpip_Parameters.reg
- HKLM_SYSTEM_CurrentControlSet_Services_WinSock2_Parameters_NameSpace_Catalog5_Catalog_Entries.reg
- hosts
- installedDrivers.txt
- installedPrograms.txt
- installedServices.txt
- kerberosInfo.txt
- LogsCollectorLog.log
- Microsoft-Windows-AAD-Analytic.evtx
- Microsoft-Windows-AAD-Operational.evtx
- Microsoft-Windows-Global Secure Access Client-Kernel.evtx
- Microsoft-Windows-Global Secure Access Client-Operational.evtx
- Microsoft-Windows-NetworkProfile-Operational.evtx
- Microsoft-Windows-UserDeviceRegistration-Admin.evtx
- Microsoft-Windows-UserDeviceRegistration-Debug.evtx
- NetworkConnectivity.txt
- NetworkDrivers.txt
- NetworkInterfaces.txt
- NetworkProtection.txt
- NetworkTrace.etl
- NetworkTrace.pcap
- NetworkTrace.txt
- powerCfgEnergyStates.txt
- powerCfgSleepStudy.txt
- RunningProcesses.log
- System_Microsoft-Windows-Kernel-Power.evtx
- systeminfo.txt
- systemWideProxy.txt
- userConfiguredProxy.txt
- userSessions.txt
- wfpfilters.xml
- wfpstate.xml

When you start the Diagnostics tool, you first get to the Overview tab. Here you find more details about your user, device, tenant and traffic profiles.

In the Health check tab, the client runs a basic check in which he checks all the basic settings to make GSA work.
Health Checks
- Can connect to the internet
- Tunneling service running
- Engine service running
- Forwarding Profile service running
- Driver running
- Client tray application running
- Policy service hostname resolved by DNS
- Policy server is reachable
- Forwarding profile registry exists
- Forwarding profile matches expected schema
- Client enabled by your organization
- Diagnostic URLs in forwarding profile
- Authentication certificate exists
- Authentication certificate valid
- Secure DNS disabled in OS
- Secure DNS disabled in Edge
- Secure DNS disabled in Chrome
- Secure DNS disabled in Firefox
- DNS responsive
- Magic IP received
- Cached token
- IPV4 preferred
- Proxy not configured
- No Hyper-V external virtual switch detected
- Global Secure Access processes healthy (last 24h)
- Entra Authentication edge hostname resolved
- M365 edge hostname resolved by DNS
- Entra Authentication Edge is reachable
- M365 Edge is reachable
- Tunneling succeeded Entra Authentication
- Tunneling succeeded M365
- QUIC disabled in Edge
- QUIC disabled in Chrome
- QUIC disabled in Firefox

In the Forwarding profile tab you find infos about the applied forwading profile id and the time it was applied. You can also check all currently applied rules per forwarding Profile.
INFO
The Entra forwarding profile is an actual 4th forwarding profile that is not listed in the activation overview in Entra. This is because it is a standard profile in the background that can not be changed and makes sure that all the authentication traffic still goes trough to entra. So to basically make sure you can not lock yourself out with traffic rules.

There is also a cool feature called the Policy tester, in which you can enter traffic information and test what would happen with it in regards to your rules.
 |  |
|---|
In the Hostname aquisition tab you can collect and analyze the devices DNS traffic.

In the Traffic tab you can collect and analyze the devices network traffic.

The Advanced log collection tab functions as previously described: click Start recording, reproduce whatever you want to check (such as a network issue), click Stop recording and the tool automatically gathers all relevant logs alongside the captured traffic information.

💡 Conclusion
What I really like about Entra Internet Access is that it feels like a real Zero Trust product, because it does not rely on explicit trust through IPs or network locations, but is using your identity as the perimeter. Also, when you boil it down, it is really not hard to implement.
Activate the traffic profile ➡️ create a web content filtering profile ➡️ link it to a security profile ➡️ connect it to a conditional access
And that is really it to get started. Everything else is an addition to make it better, get more info, cover more scenarios and so on and so on. It is practical, identity-aware and flexible enough to protect internet access without the user really being aware of it at all.
It is not perfect, but the overall experience is great for admins and users. And also, it is actually not that expensive per user, compared to other solutions.
If you are already in the M365 ecosystem, this is an absolute natural way to move security forward, make the whole environment more remote-friendly without needing to integrate new portals or a different management layer. I genuinely think Microsoft has a great product with Global Secure Access in general and their integration with Entra. It gives web filtering and also VPNs (Entra Private Access) a whole new dimension by making them so identity- and context-aware, working seamlessly with the other controls you already use.
Resources
- Microsoft Learn - Understand Internet Access
- Microsoft Learn - Global Secure Access documentation
- Microsoft Learn - Configure customer premises equipment for Global Secure Access
- Microsoft Learn - Configure Transport Layer Security inspection policies
- Microsoft Learn - Configure TLS inspection with a Microsoft-managed certificate (preview)
- Microsoft Learn - Web filtering in Global Secure Access (V2)
- Microsoft Learn - Transport Layer Security inspection FAQs)