Quick Wins to improve your security posture with Intune
Improving your organisation's security posture can seem daunting, but with Microsoft Intune, you can make significant improvements with a few strategic configurations. Here are some quick wins to get you started.
INFO
You can refine the following policies to meet the specific needs of your organisation.
The policies shown are a baseline that can be achieved with minimal disruption to your organisation.
1. Set Up Compliance Policy
Creating and enforcing compliance policies is a fundamental step in securing your devices. Compliance policies define the rules and settings that a device must comply with to be considered secure. Here's how to set up a policy that checks that your devices meet these minimum requirements:
- Windows 10 22H2
- A Firewall enabled
- An Antivirus enabled
- An Antispyware enabled
- Open the Microsoft Intune admin center.
- Navigate to 'Devices' -> 'Manage devices' -> 'Compliance' -> 'Create policy'.
- Select your platform, click 'Create' and enter a Name for your policy.
- In the 'Compliance settings' tab, select the 'Device Properties' and 'System Security' settings shown in the screenshots below.
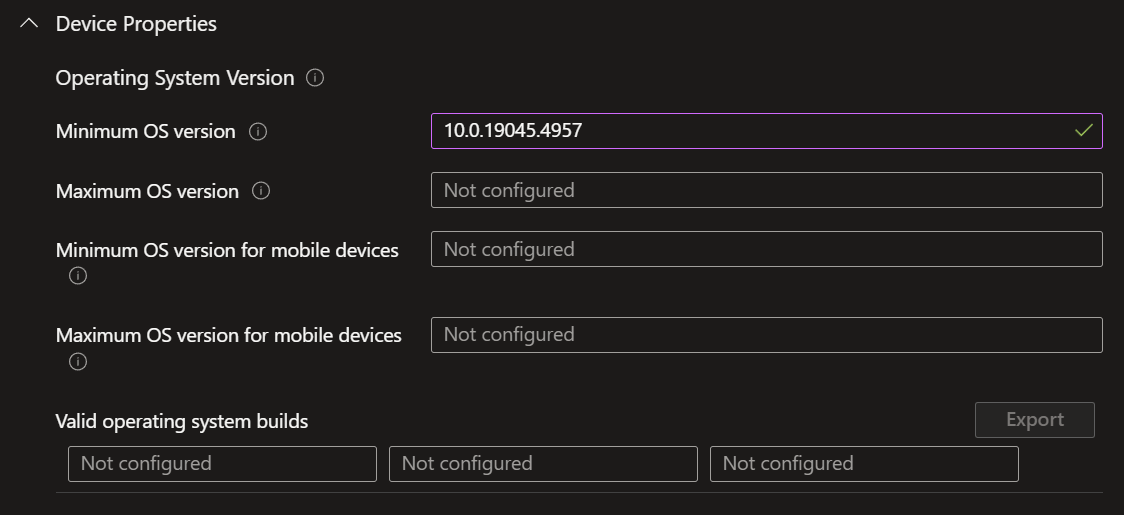
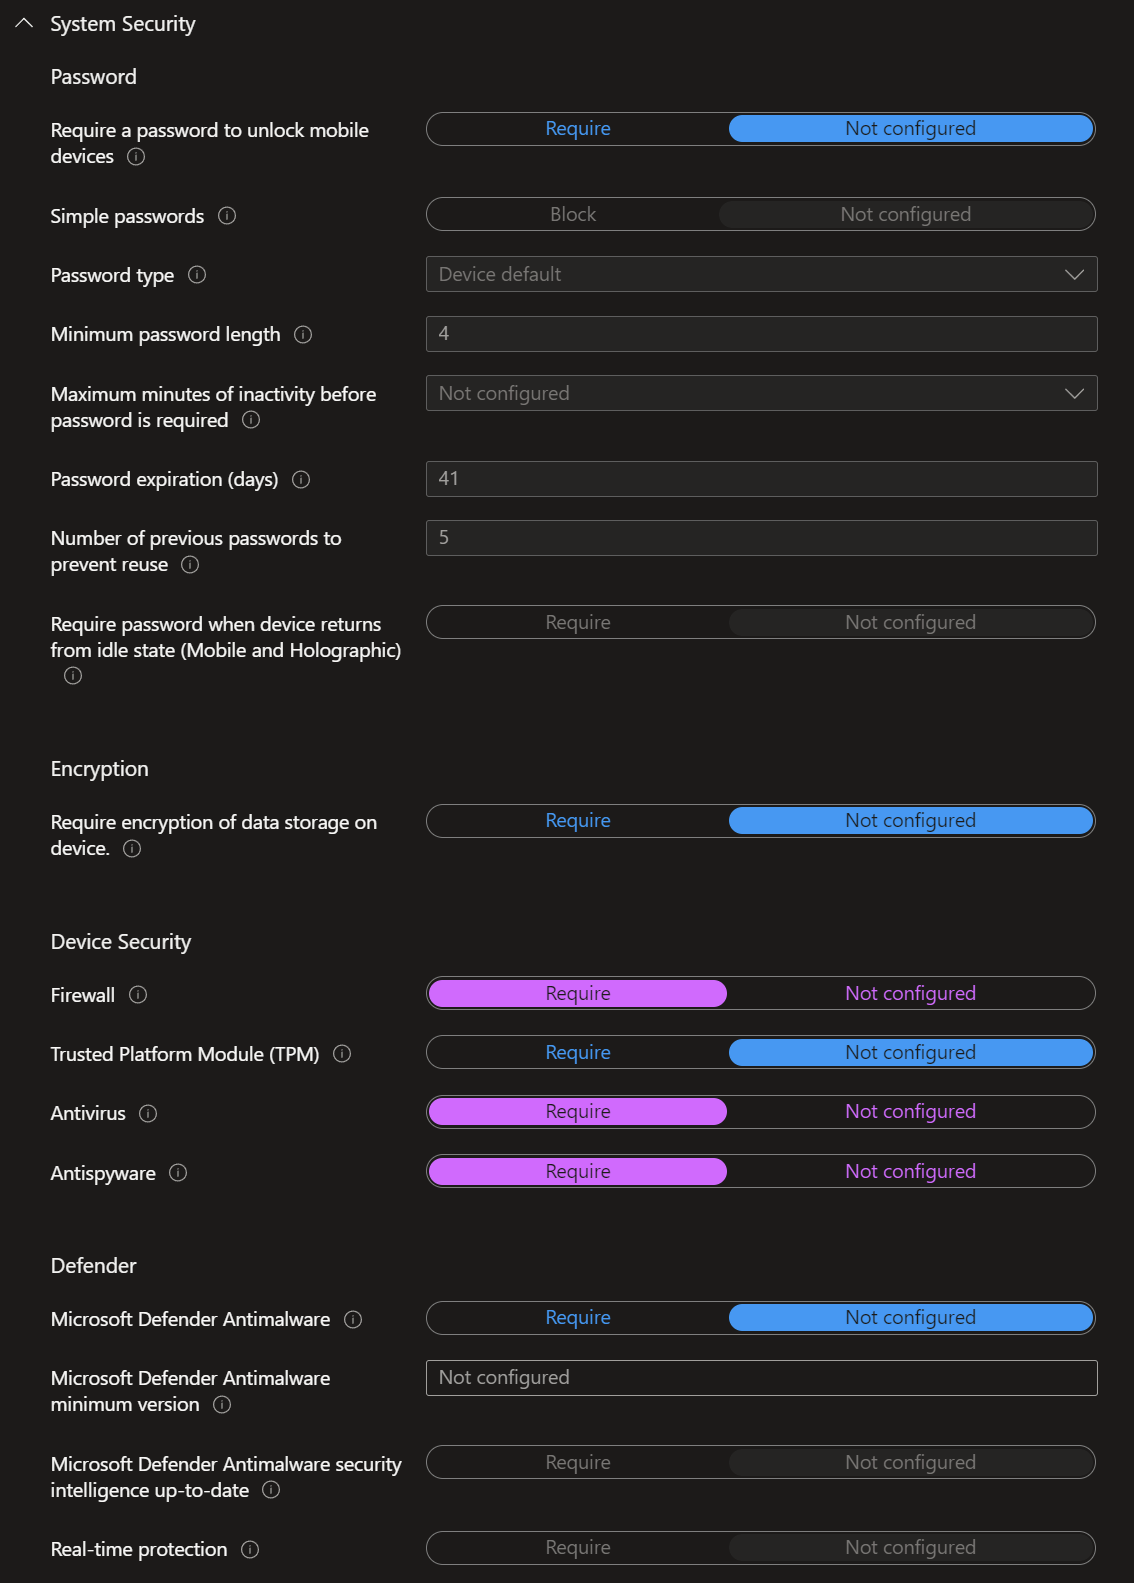
- When this is done, leave the 'Actions for non-compliance' tab as it is.
- Next, assign the policy to all devices and create the policy.

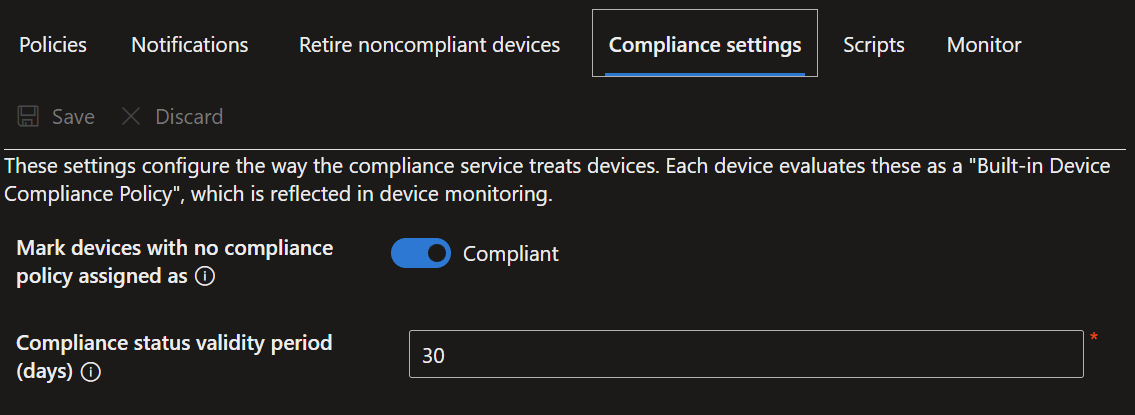
- Then select the 'Compliance settings' tab and check the 'Require devices with no compliance policy assigned as' box.
2. Conditional Access Policies
Conditional access policies help you control access to your organisation's resources based on conditions you define. By implementing conditional access policies, you can block non-compliant devices and enforce more secure authentication methods. To set this up, we use the new templates provided by Microsoft to achieve a baseline level of security:
WARNING
The following policies, when switched to ON, have a potentially huge impact on the access your users have to your resources.
To take the first step and minimize the risk to your environment, start with the 'Require compliant or hybrid Azure AD joined device or multifactor authentication for all users' policy. This will ensure that, at a minimum, your compliance policy (created above) is enforced, the device is hybrid joined, or MFA is used.
In practice, this means that your users can only log in to your cloud applications (e.g. Teams, Outlook, etc.) when they are using one of the following:
- at least Windows 10 22H2
- have a Firewall enabled
- have an AntiVirus solution enabled
- and an Antispyware enabled
to be compliant
- or they nead a Hybrid joined device
- or use Multifactor authentication.
TIP
It is highly recommended that you start by using all of the conditional access policies listed under Secure foundation.
But don't do too much at once, and start with the policy outlined in the box above.
- Open the Microsoft Intune admin center.
- Navigate to 'Devices' -> 'Manage devices' -> 'Conditional access' -> 'Create new policy from templates'.

- In the following wizard you will see the conditional access templates offered by Microsoft.
- Select the one you want to implement and click 'Review + create'.
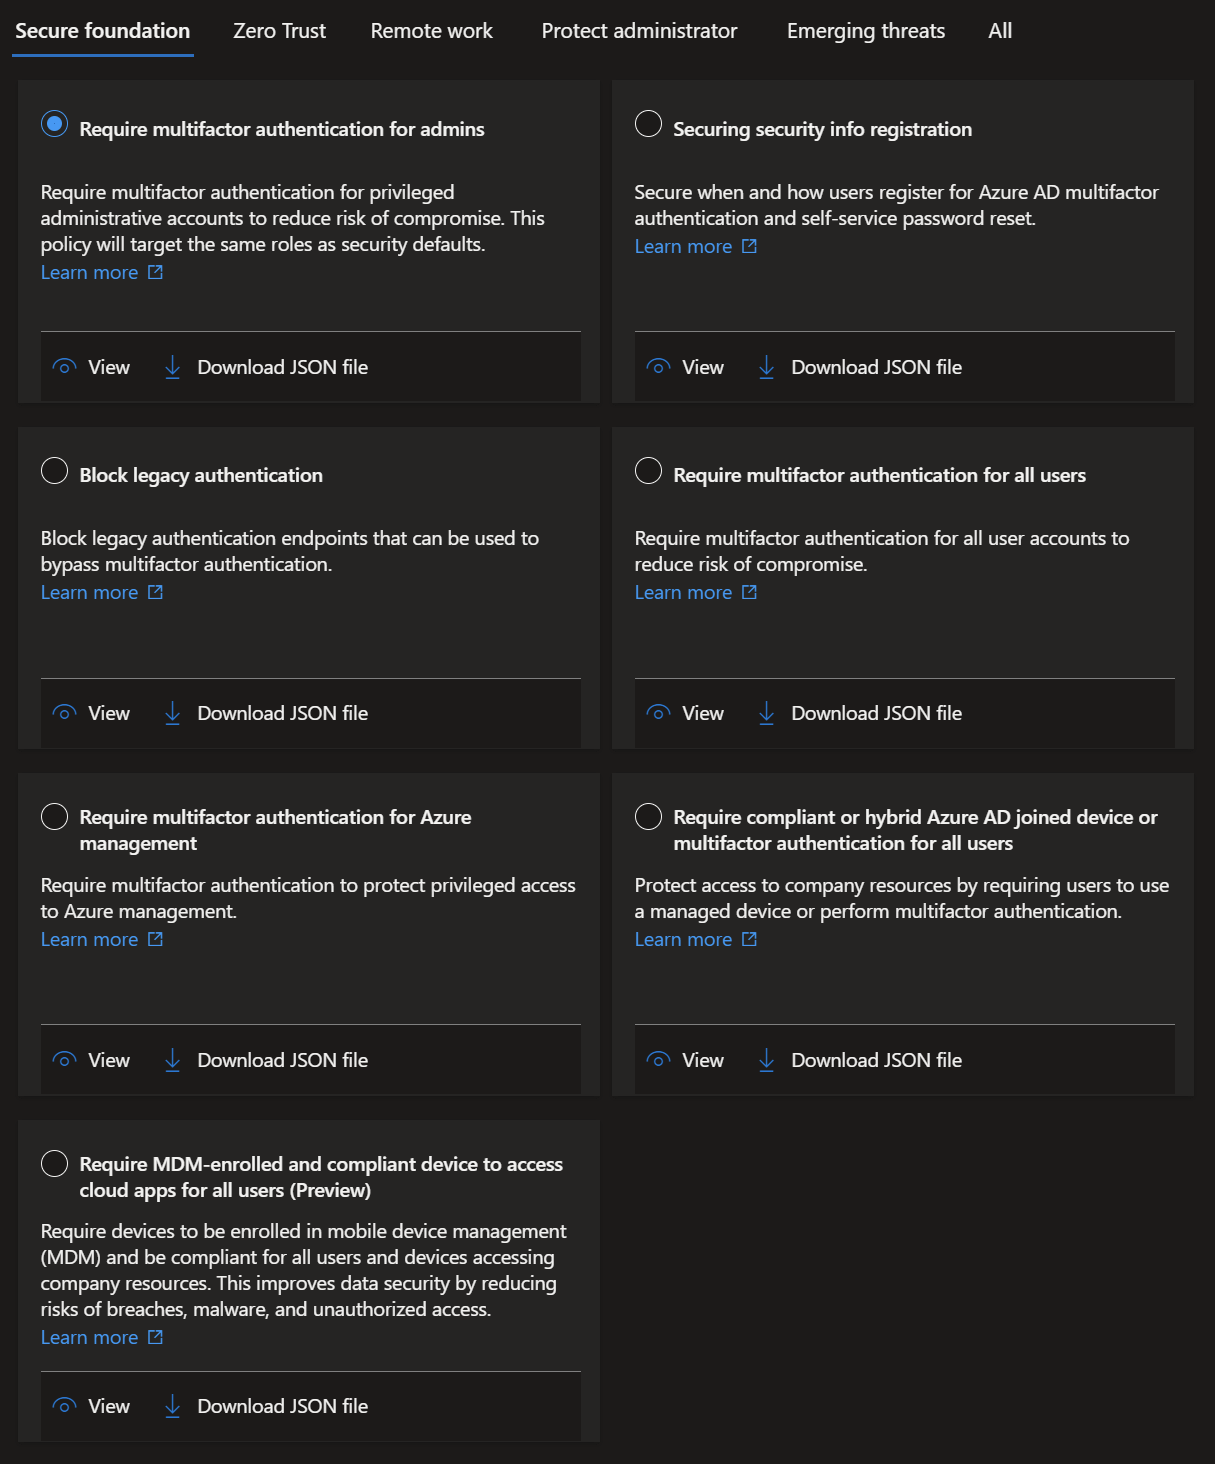
- In the next screen, leave the 'Report only' setting as it is and click 'Create'.
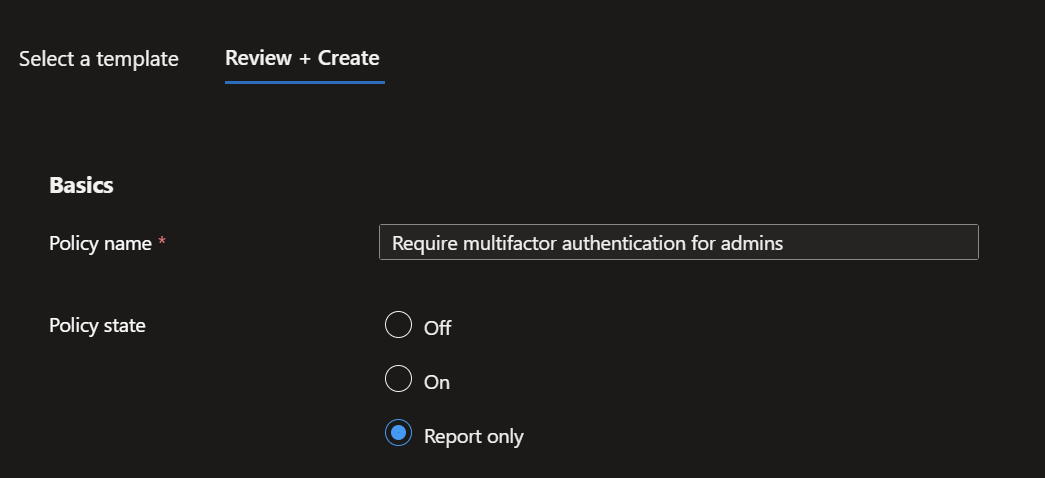
Start with 'Report only', check the sign in logs in the following days and if everything looks good, set it to 'ON'.
3. Use Security Baselines
Security baselines are preconfigured sets of security settings that are recommended by Microsoft. If you want to learn more about these policy sets, click on the following link to go to my article about them Microsoft Intune Security baselines.
For our third quick win, we're focusing on the 'Security Baseline for Windows 10 and later'.
- Again open the Microsoft Intune admin center.
- This time navigate to 'Endpoint security' -> 'Overview' -> 'Security baselines' -> 'Security Baseline for Windows 10 and later'.

- If you now click 'Create profile' -> 'Create', you can enter a name for the policy and click 'Next'.
- Next you will see the settings tab where Microsoft has pre-configured a plethora of security settings. Next up is the Settings tab, where Microsoft has preconfigured a wide range of security settings. These settings can be used as they are, but should be tested first with a small group of users in your environment. You can do this by going to the 'Assignment' tab and selecting a group that you have created. You can then simply 'Review + Create' the policy.
WARNING
⚠️Possible diruptive Settings to keep an eye on are:
- 'Administrative Templates' -> 'MS Security Guide' -> 'Configure SMB v1 client driver' and 'Configure SMB v1 server'
This could be a problem if you are still using SMB v1 for any reason at all. But if you are, I strongly recommend that you think about replacing or updating whatever it is that needs SMB v1. - 'Administrative Templates' -> 'Printers' -> 'Limits print driver installation to Administrators'
If you have enabled the installation of printer drivers for normal users via the registry, then this setting will prevent users from being able to install printer drivers in the future. Again, I strongly recommend that you do not allow this now, due to the associated security flaw (CVE-2021-34481). - 'Administrative Templates' -> 'System -> Device Installation -> Device Installation Restrictions' -> 'Prevent installation of devices using drivers that match these device setup classes'
This is only a problem if you are using an 'IEEE 1394 device that supports the SBP2 protocol device class'. - 'Administrative Templates' -> 'System' -> 'Power Management' -> 'Sleep Settings'
Enforcing the need for a password on wakeup could disrupt possible group PC scenarios (although you should definitely enable this setting). - 'Windows Components' -> 'BitLocker Drive Encryption' -> 'Removable Data Drives'
This setting denies write access to all removable drives (USB sticks) that are not encrypted by BitLocker. - 'Windows Components' -> 'Windows Remote Management (WinRM)' -> 'WinRM Client' / 'WinRM Service'
These settings disable basic authentication. - 'Browser'
If you rely on the use of password managers in your browser, this will disable that feature (at least for Microsoft Edge). - 'Defender'
If you have not previously used security software, these settings could interfere with the use of unsigned drivers or software. - 'Device Lock'
These settings may force your users to change their passwords to meet the new requirements. - 'Firewall'
If you have applications running on your devices that rely on specific open ports that you have not configured, instead working with the firewall disabled, these settings will enable the three firewall profiles and could disrupt the use of these applications. - 'Local Policies Security Options'
These settings could interfere with the ability of standard users to perform elevated tasks, and could disrupt systems that are using legacy network protocols. - 'User Rights'
These settings control local user permissions for your devices, and if you are working with local users (which you should not be doing), you could mess up this access.
4. Enable Defender for Endpoint
Microsoft Defender for Endpoint provides advanced threat protection and endpoint detection and response capabilities.
For the fourth quick win, you can enable and deploy the configuration of Microsoft Defender for Endpoint through Intune.
IMPORTANT
If you want to use Intune to configure Defender for Endpoint policies, you need to enable these options. Otherwise, even the Defender settings from the Security Baseline for Windows 10 and later will not work.
Enable the configuration of Defender policies through Intune
- Open the Microsoft Intune admin center -> go to 'Endpoint security' -> 'Microsoft Defender for Endpoint'.
- Set the 'Allow Microsoft Defender for Endpoint to enforce Endpoint Security Configurations' to 'On', to set up the connection between Microsoft Defender for Endpoint and Intune.

- Now set the 'Connect Windows devices version 10.0.15063 and above to Microsoft Defender for Endpoint' to 'On', to let Intune control the settings for Windows devices.
INFO
On the same tab, you can enable control for a range of other operating systems.

Onboard Devices to Defender for Endpoint (Installation on the devices)
- In the Microsoft Intune admin center -> go to 'Endpoint security' -> 'Endpoint detection and response'.

- Select 'Create policy' -> Platform = 'Windows' -> Profile = 'Endpoint detection and response' -> 'Create'.
- Enter your policy name and description and click 'Next'.
- Now select the settings shown in the screenshot below and click 'Next'.
- In the Assignment tab, select 'All devices' to make sure every device is onboarded. Then click 'Next' and 'Save'.
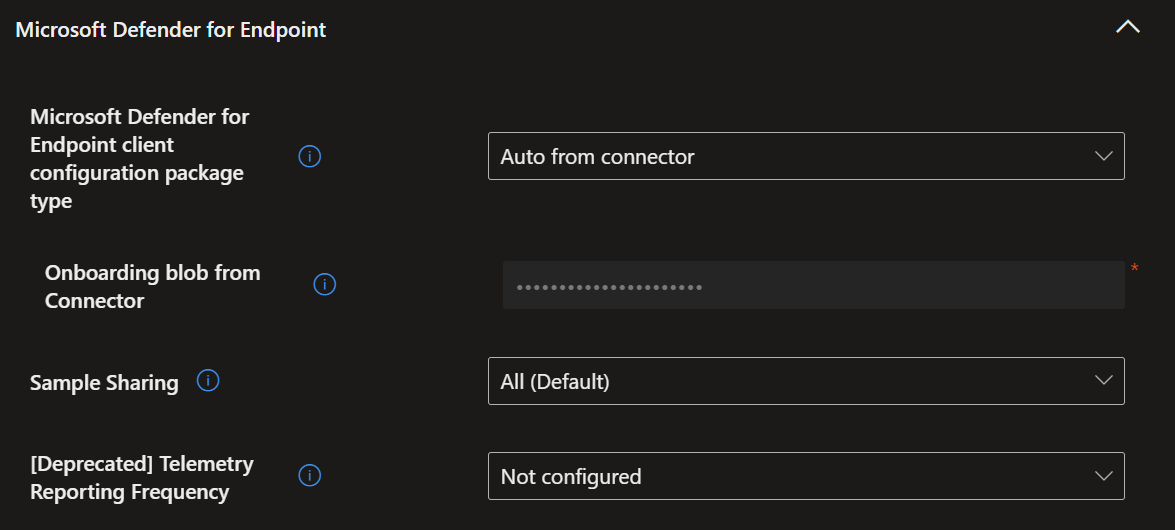
Configure Defender for Endpoint Policies
WARNING
In order to configure Defender for Endpoint policies, we need to change a few policies in the Baseline we created earlier, the 'Securirty Baseline for Windows 10 and later' profile.
This is because the Baseline also configures some Defender settings that may conflict with the more specific Defender policies we want to create from here.
For this you need to go back to where you created the Baseline and open it. Under the section 'Defender' you set all options to 'Not Configured' (example below). 
- In the Microsoft Intune admin center -> go to 'Endpoint security' -> 'Antivirus' and select 'Create policy'.
- After selecting 'Windows' as your platform, you can choose which policy to create. Start by selecting 'Defender update controls'.
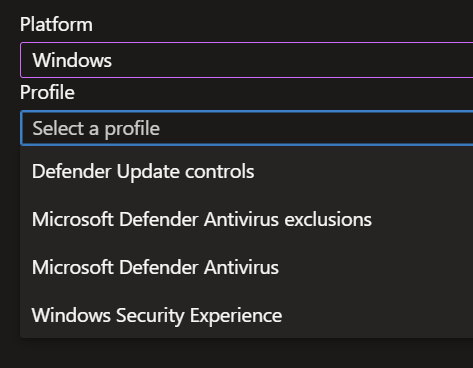
- Now name and describe your policy and select the settings shown in the screenshot below.
- Then click 'Next' till you arrive at the Assignment tab, select 'All devices', then click 'Next' and 'Save'.
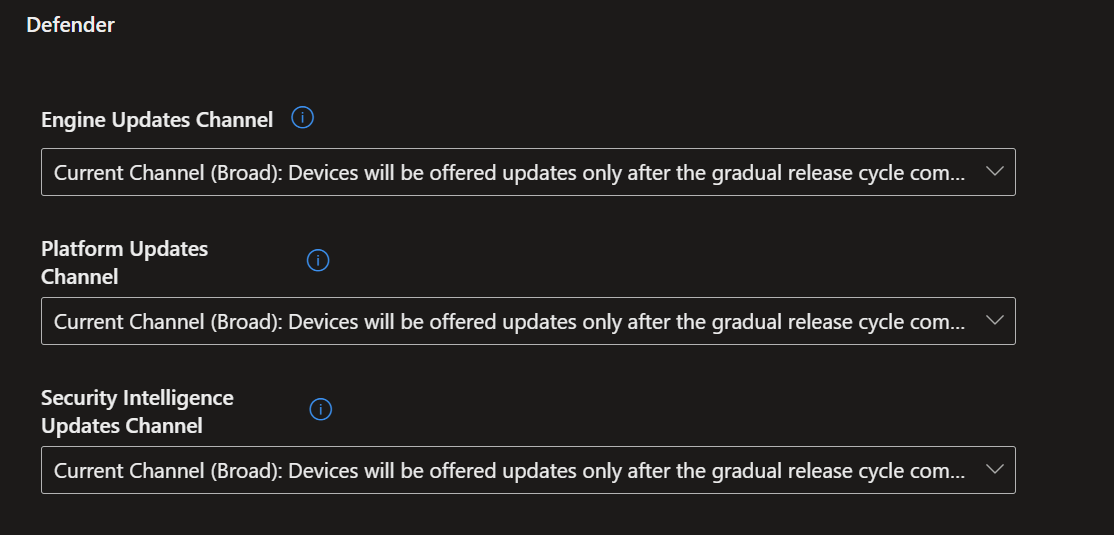
- We will now create a second policy by following the same steps as described above, but this time we will select 'Microsoft Defender AntiVirus'.
- Here I have chosen a wide range of security settings to give you the maximum security with the minimum disruption to your users. Again, simply select the settings shown in the screenshots below, then go to the 'Assignment' tab, select 'All devices', then click 'Next' and 'Save'.
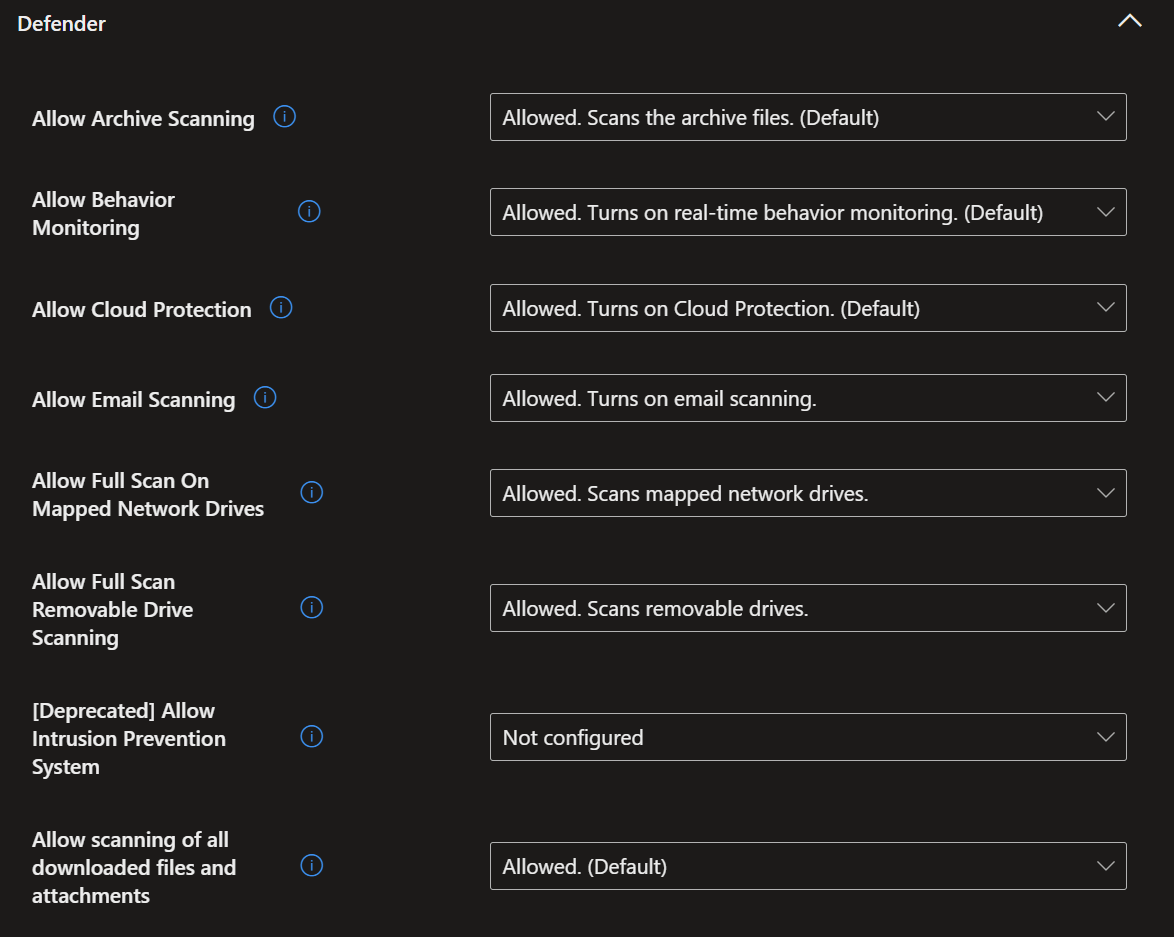
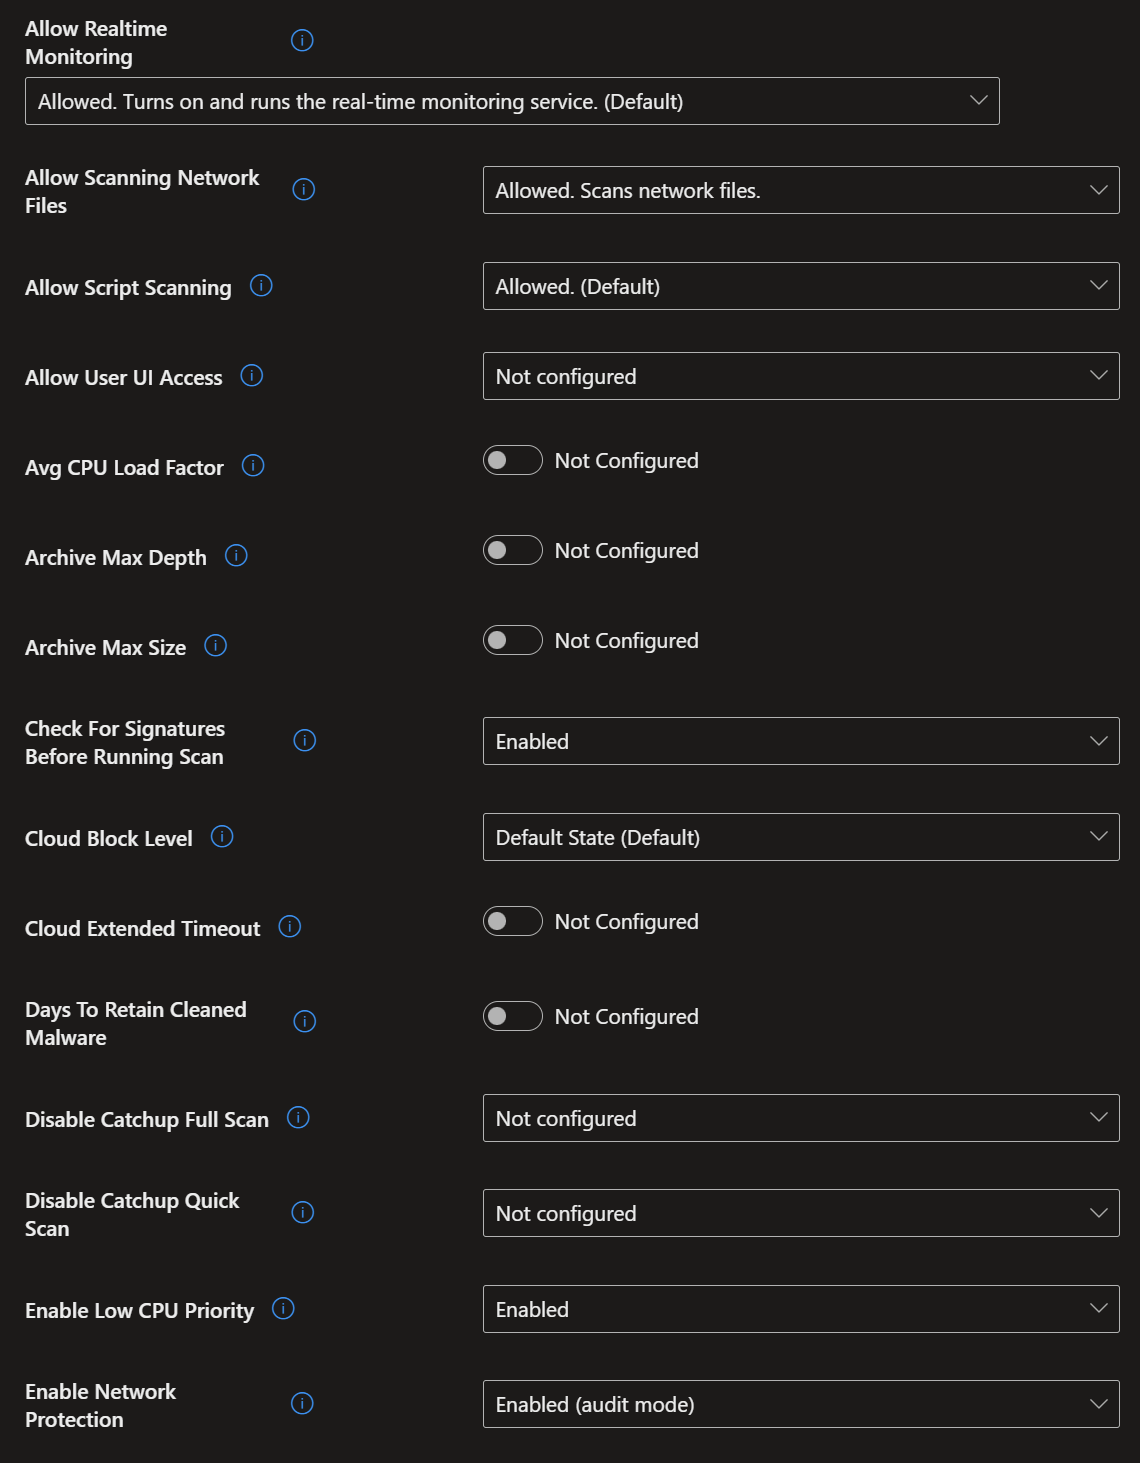
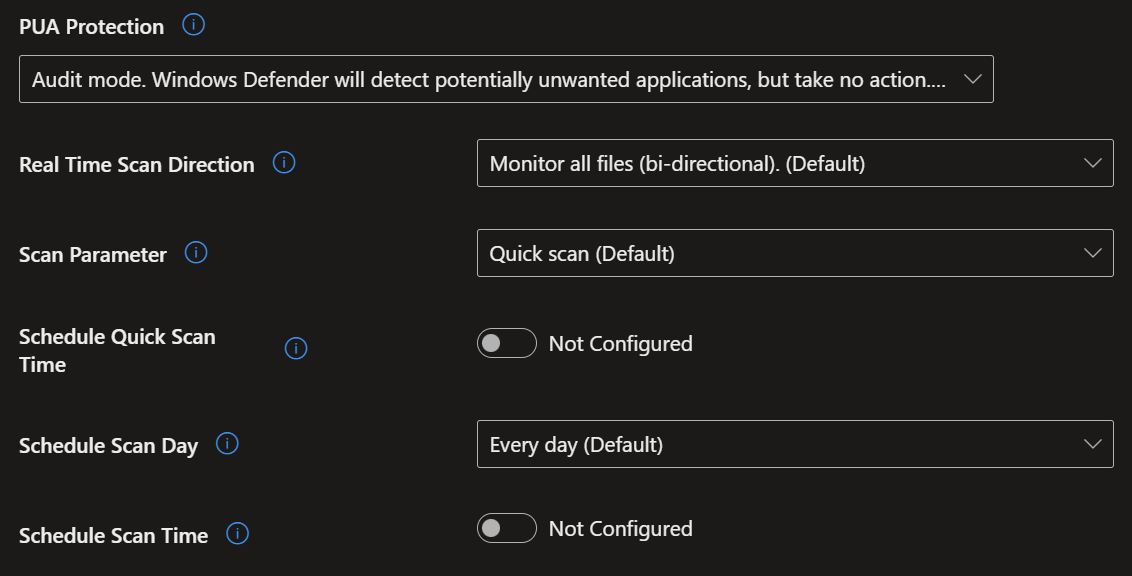

- To create the third and final policy, follow the same steps as above, but now select 'Windows Security Experience'.
- This setting is to enable 'Tamper Protection', but if you wish you can also customise the Defender UI that your users see.

Conclusion
NOTE
By implementing these quick wins in Intune, you can significantly improve your organisation's security posture and create a minimum threshold to secure your environment.
Each step builds a more secure environment, protecting your data and resources from potential threats.