
Apple Business
👋 Introduction
Apple Business (formally Apple Business Manager) is a web portal that helps organizations easily deploy and manage Apple devices, apps, accounts, and brand presence across Apple platforms. It unifies device enrollment, app purchasing, managed account provisioning, and brand management into a single, streamlined portal. You can leverage built-in device management directly in Apple Business or connect to your existing MDM solution like Microsoft Intune to centralize management across your entire organization.
Device & Account Management features
- Automated Device Enrollment directly from the carrier or reseller
- Apple Built-in Device Management with policy and app deployment
- Seamless migration of devices from other MDM solutions
- Central app and book purchasing via Volume Purchase Program (VPP)
- Federated managed Apple Accounts integrated with Entra ID
- Integration with Microsoft Intune and other MDM solutions
Brand Presence & Business Features
- Brand management and customization on Apple Maps, Apple Wallet, and Siri
- Location management with business details, hours, and photos
- Apple Ads for promoting business locations
- Branded Mail with company logos and branding
- Tap to Pay on iPhone for accepting payments
- Verify with Wallet for secure identity verification
INFO
Apple Business Manager was renamed and revamped in April 2026, and is now called Apple Business.
If you already got an Apple Business Account (Apple Business Manager, Apple Business Essentials, Apple Business Connect), logging in to your account will automatically migrate the organization to the new Apple Business.
👨💼 Create Apple Business Account
Admins can sign up for Apple Business and start using basic features in minutes without cost. You need to verify your organization to use the full feature set, like Automated Device Enrollment, App Store volume purchasing and managed Apple IDs.
TIP
Use a dedicated service account for Apple Business instead of a user email account. This email address becomes your Administrators managed Apple Account. This ensures that your future access remains independent of specific employees.
Create the Account
- Go to https://business.apple.com and select
Get Started.

- Enter your information and select
Next.

Next, create and confirm a password for your new account, enter your phone number, make sure you are not a bot and click
Continue.IMPORTANT
A one-time verification code is sent to your email address first, then a different code is sent to your phone number.

- Lastly follow the prompts to finish setting up your Apple Business account.

Verify your company
After you created your Apple Business organization, you got 10 days to verify it. If your organization isn’t verified in time, Apple will delete the organization and its data.
- Go to https://business.apple.com, sign in, click on the top right on your Organization's name and open the Settings Page.

The first tab you see, are the Organization Settings where you can
Verifyyour organization. You need to complete two different verification methods individually.Possible mehtods are:
- Business ID: A D-U-N-S (Data Universal Numbering System) Number or Employer Identification Number (EIN / Government ID types accepted).
- Domain Validation: Add a TXT record to your DNS server. See Add and verify a domain.
- Upload one of the following official documents:
- Business licence
- Sales tax permit
- Food, health or alcohol permit
- Lease or property agreement
- Utility bill
- Other
As soon as you have completed this, click
Sendto start the review process and wait until Apple get's back to you.

TIP
After your organization is approved, create one additional user with the Administrator role as a backup, so you can recover access if your standard admin account gets lost. You can create users in the People blade accesible from the Apple Business portal start screen.
📱 Apple Built-in Device Management
Using an MDM to manage your iOS/iPadOS or Mac devices makes perfect sense, so you can make sure your devices and by extension, your data is secure.
It simplifies the setup and management of devices. New devices can be deployed automatically with the correct apps and settings, reducing the need for manual work. You maintain control of your devices throughout their lifecycle.
Set up
- On the Apple Business main page, open the Devices page and select the Management tab.
- Select
Turn on built-in devices managementto start using the new Apple built-in device management.

Blueprints
As soon as the device mangement is ready, you can start creating:
- Blueprint (Set of Policies, Users and Apps)
- Configurations (Device Policies)
- Managed Apps
- macOS Packages
When first clicking on Blueprints you will get short explenation screen.

- After that, you can choose between three different kind of blueprints:
- Blueprint for user devices
- Blueprint for service devices
- Customn Blueprint

- No matter which one you pick, you can name your Blueprint and add your own custom Configruations or select pre-built ones.

- You can add Apps you previously deployed via the
Apps & Serviespage.

- And for user devices, you also need to choose the users / groups you want to assign the blueprint to.

- After that, you click
Create Blueprint.

Configurations
- In the Configurations page you will find the previously mentioned pre-built policies and get to create your own custom ones, with a press on the small
+on the top right.

- Here you can name your Configuration and select what you want to make a configuration for.

- Click the point you want to configure and click
Next.

- Lastly you can then make the settings for the specific configuraiton and click
Save.

Managed Apps
- In the Managed Apps page you will find all the Apps you provisioned on the Apps & Services page.
- For iOS/iPadOS and macOS Apps you find these four tabs:
- Overview
- Install Status
- Configuration
- Licenses
- In the Overview page you see all the information about the app.

- In the Install Status page you can find the devices the app is currently installed on.
- In the Configuration tab you can set, if you want the App to be installed automatically or let the User install it manually through the new Apple Business App.


- In the Licenses tab you see an overview of how the app got distributed (Blueprints for example) and how many licenses are assigned.

macOS Packages
If you have applications that aren’t available through the Mac App Store, you can still deploy them to Mac devices with Apple Business using the macOS Packages feature.
 |  |
|---|
You can learn more about macOS Packages, how to create and deploy them here.
🔗 Connect Apple Business with Intune
Connecting Apple Business to Intune, gets your devices on the same familiar control plane as your Windows devices and gets you much more options for your device management.
Connect Apple Business with Intune
- Open the Microsoft Intune admin center, go to Devices -> Enrollment and open the Apple tab.
- Now select Apple MDM Push Certificate and start the configuration.

- First you need to give Microsoft permission to exchange data with Apple.
- Next, click on
Download your CSRto download the Intune certificate signing request (.csr) file. - Now go to the Apple Push Certificates Portal and sign in with the same Apple ID you used for Apple Business.
- Select
Create a Certificateand accept the terms and conditions.

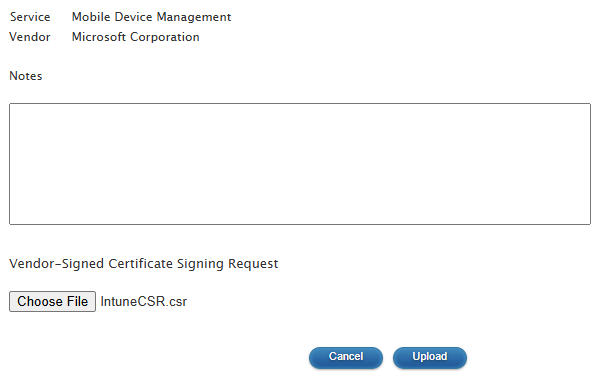
- Upload the Intune certificate signing request (.csr) file you downloaded earlier and select
Upload.
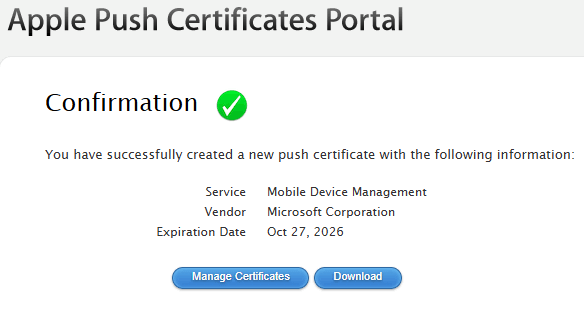
- After the upload is complete, you get a confirmation that the certificate was created successfully. Then download the Apple MDM push certificate (.pem) file.

- Now back in the Intune portal, enter the Apple ID you used to create the Apple MDM push certificate, upload the .pem file you just downloaded from Apple and click
Upload. - After that the status of the Apple MDM Push Certificate should show as
Active.

Configure automatic enrollment token
To now set up automatic enrollment for Apple devices, you need to create an enrollment profile in Intune and assign it to the devices in Apple Business.
- Open the Microsoft Intune admin center, go to Devices -> Enrollment and open the Apple tab.
- Now select Enrollment program tokens under the Bulk Enrollment Methods and click
Create.

- As before you need to give Microsoft permission to exchange data with Apple and then Download your public key (.pem) file.
- Then open the Apple Business portal and go to the Devices page.
- Under Management, select Add.

- Next select
Connect external device managementand clickContinue.
- Give your new MDM a name, check the box for the MDM to be able to release devices, upload the Certificate (.pem) file you downloaded from Intune and click
Next.

- On the next page you select
Download Service Tokenand clickDone.

Back in Intune you need to enter the AppleID and then upload the just downloaded service token.
Click
Next, add Scope Tags if needed andReview + create.Lastly you should go back to the Apple Business Portal and configure your default MDM.

Configure automatic enrollment profile
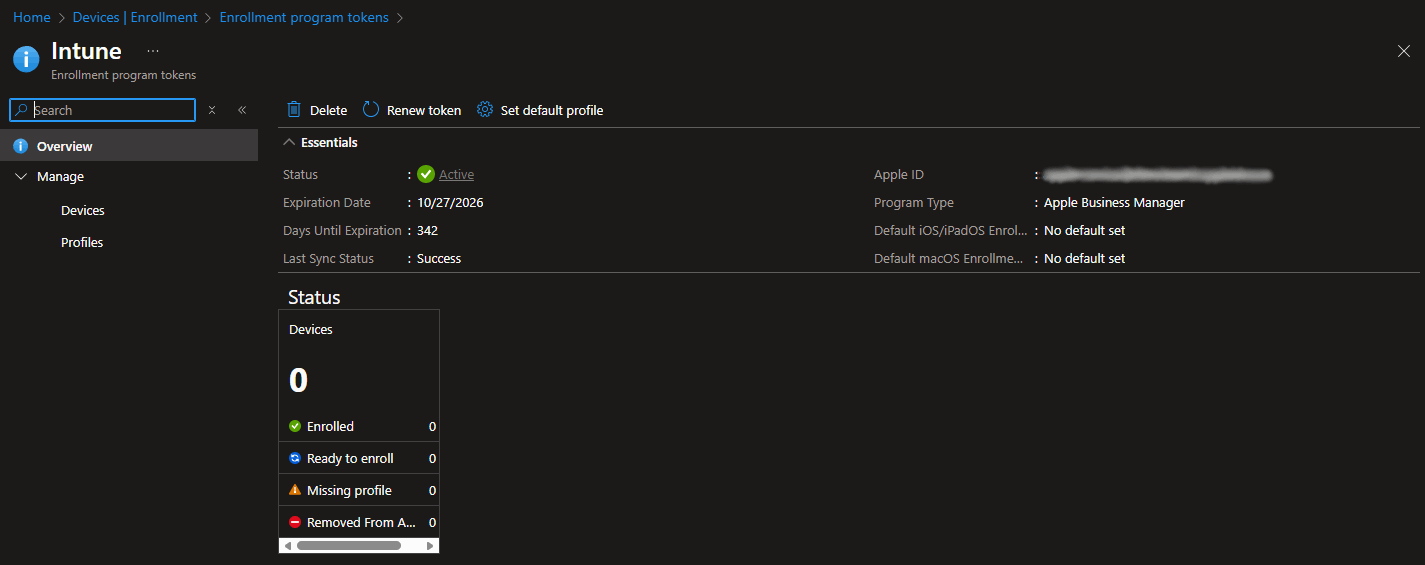
- Now that you have created the enrollment token, and the Status in the Intune Portal is Active, you can create an enrollment profile by clicking on the token in the list.

- Click on Profiles, then click
Create profileand select if you want to create an iOS/iPadOS or macOS profile.
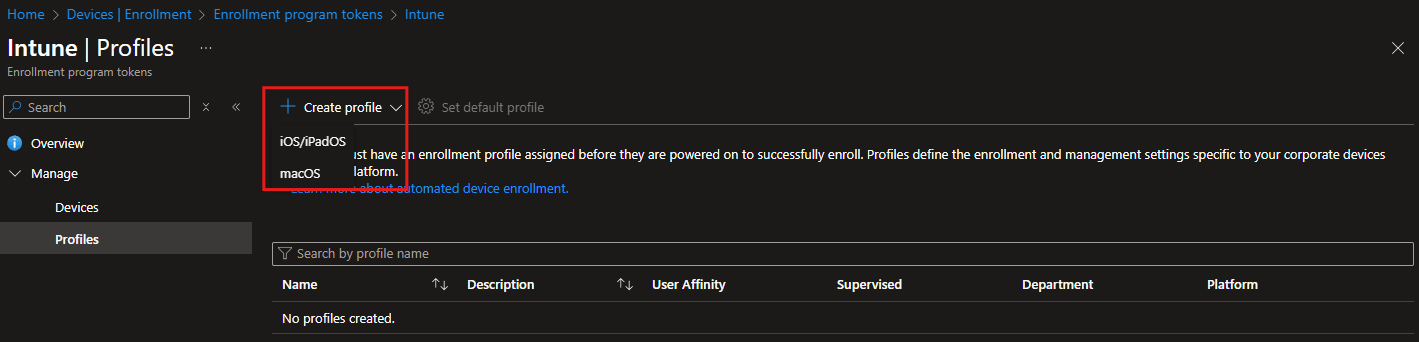
Now give your profile a name and description, then click
Next.In the Management Settings section, you can configure how your devices should enroll.
| iOS/iPadOS Profile | macOS Profile |
|---|---|
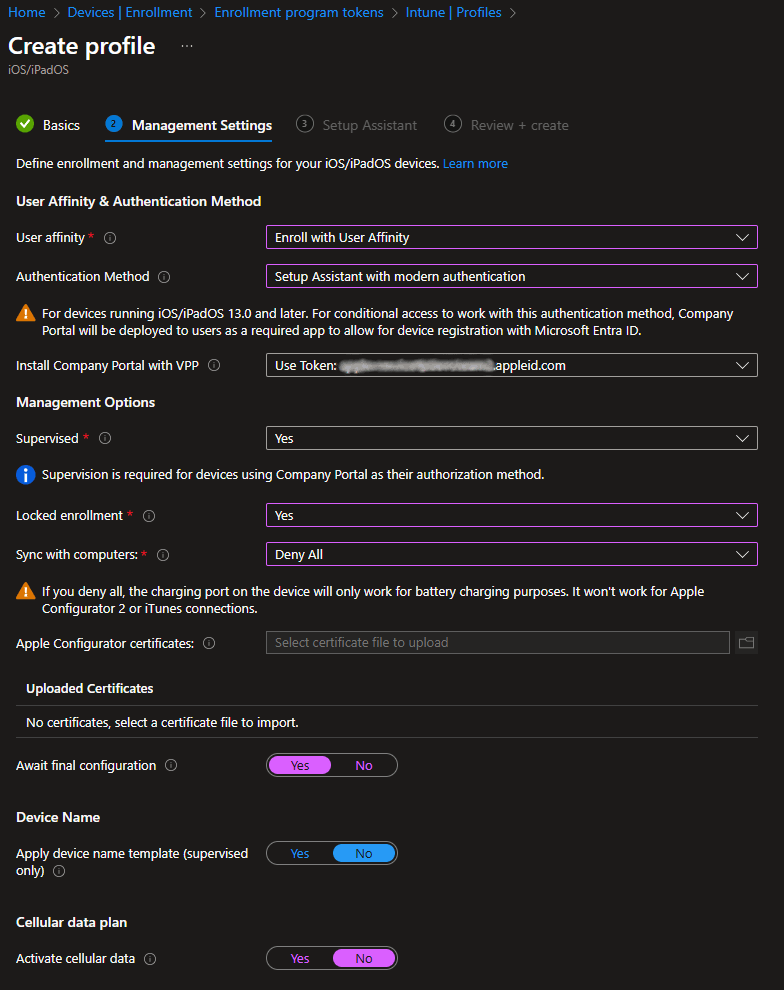 | 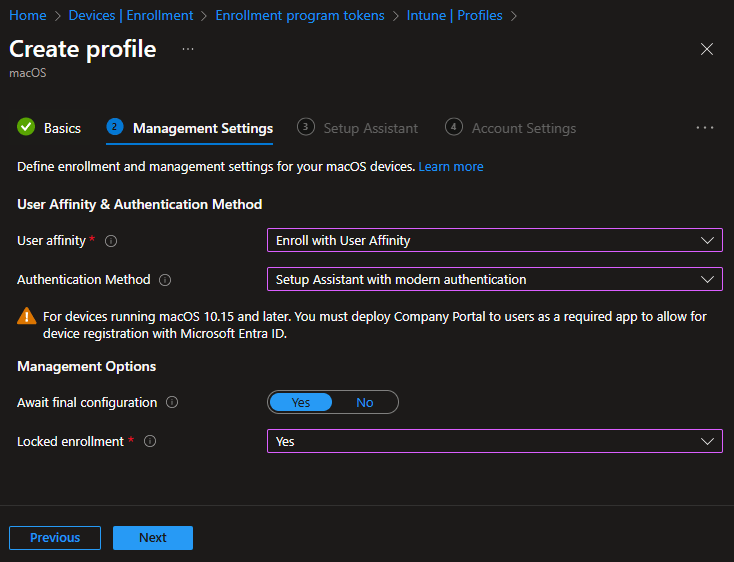 |
- User affinity: You can enroll with user affinity or without user affinity. iOS/iPadOS devices can additionally enroll in shared Entra mode.
- Authentication Method: You can choose between Setup Assistant (legacy) or Setup Assistant with modern authentication. iOS/iPadOS devices can additionally use the Company Portal.
- Locked enrollment: Prevents the user from removing the management profile through system preferences or terminal.
- Await final configuration: Pauses and locks Setup Assistant before the home screen so Intune can finish applying critical settings.
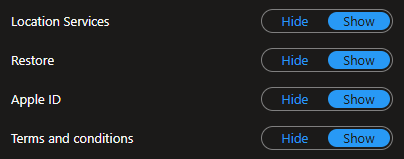
- In the Setup Assistant section, you can enter the Department and Phone Number you want to show up for the end user. You can also choose which Setup Assistant screens to show or hide during device enrollment.

Example:
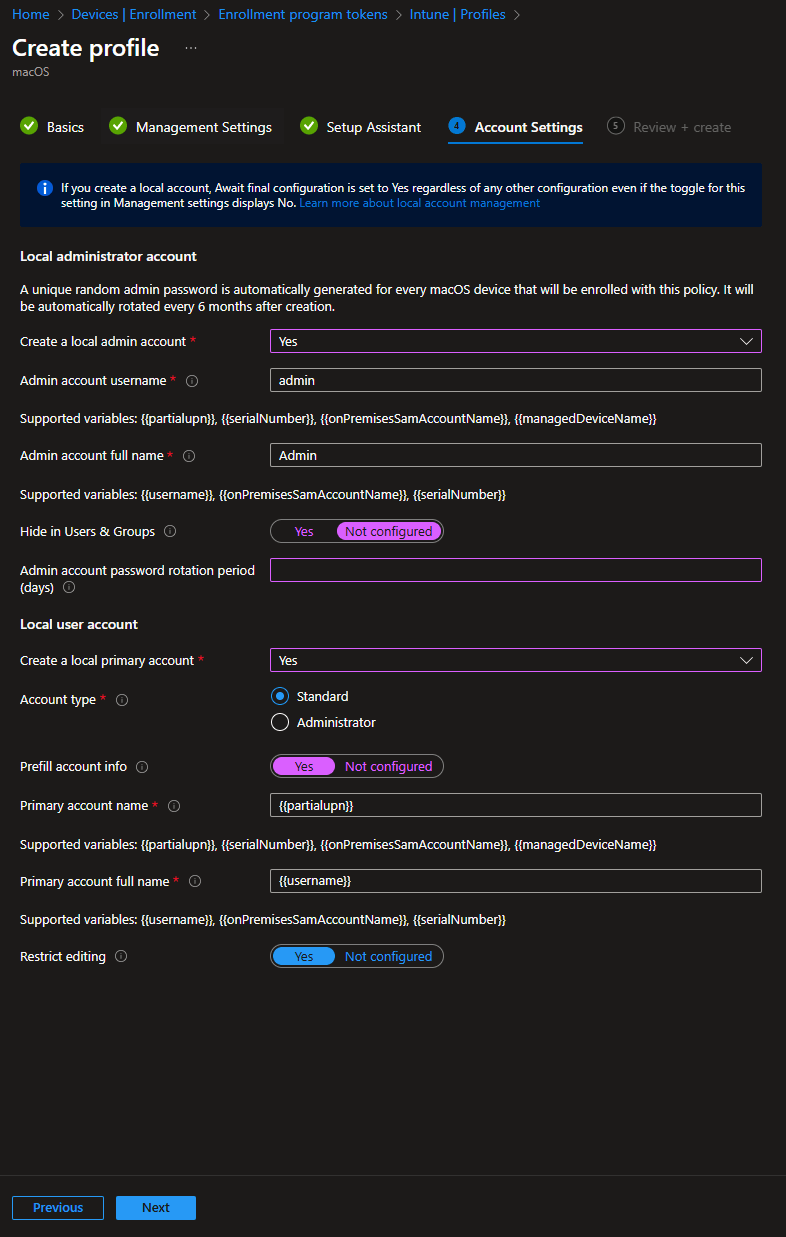
- In the macOS profile you can also configure additional Account Settings, for a potential local admin and user account on the device.
- Then click
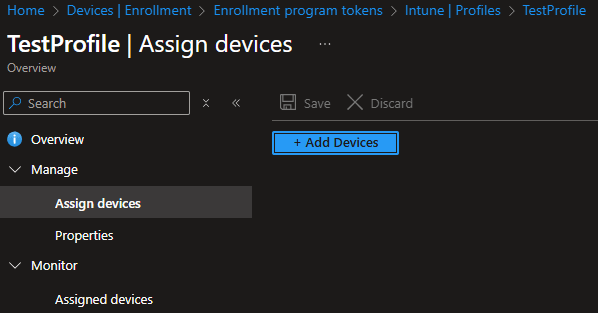
NextandReview + create. - In the Profile you can now, next to the automatically assigned devices, also manually assign devices that are already in Intune.
- If you now go back to the Profiles list directly under the Enrollment token, you can also set default profiles for iOS/iPadOS and macOS.

Configure enrollment Type & Notifications & Restrictions
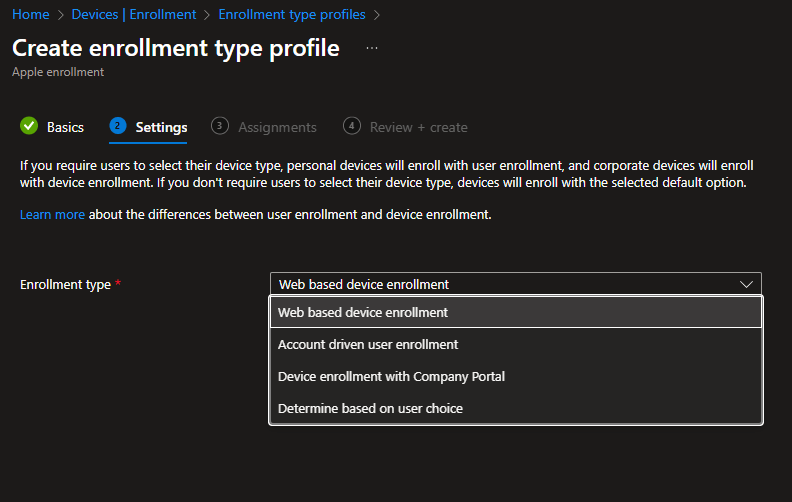
If you additionally want configure a default enrollment method for non automated enrollments you can create an enrollment type profile.
- Open the Microsoft Intune admin center, go to Devices -> Enrollment and open the Enrollment type profile.
- Here you can create a profile with the default enrollment method.
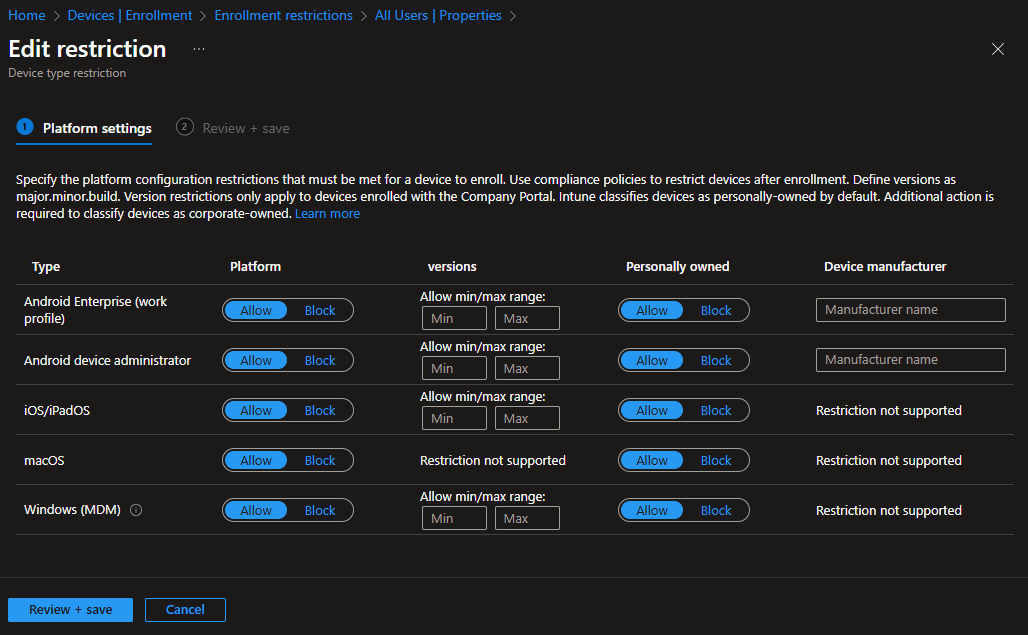
Or you can set restrictions to which devices can enroll in the first place.
- Open the Microsoft Intune admin center, go to Devices -> Enrollment and open the Enrollment restrictions or Enrollment Type Restriction.
- Here you can set per platform if it is allowed at all, if personally owned devices are allowed and which version they need to have.
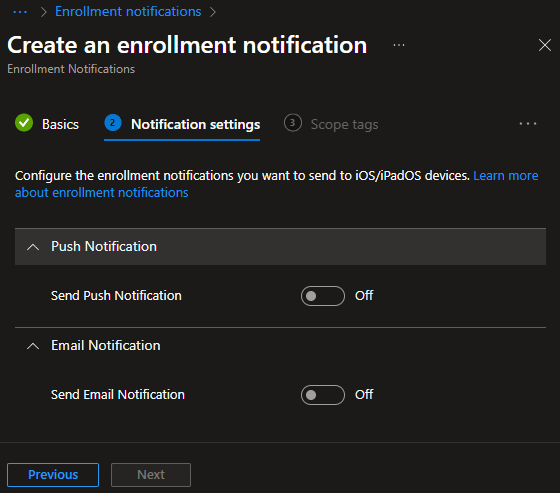
If you want to set additional notification about enrollments you can also do that.
- Open the Microsoft Intune admin center, go to Devices -> Enrollment and open the Enrollment notifications in the Apple tab.
- Here you can configure push and email notifications.
📱 Adding managed Apple devices
Adding your devices to the Apple Business makes sure the devices are bound to your company while also allowing you to automatically enroll them in your MDM solution during the setup process. For this Apple provides the Automated Device Enrollment (ADE), formerly known as Device Enrollment Program (DEP). Here your reseller or carrier can directly add the devices to your Apple Business organisation during the purchase process, so your devices are automatically enrolled in Intune when they are unboxed and powered on for the first time. Like this you can send the devices directly from the reseller to end users without having to manually do anymore configuration.
- To start adding devices to your Apple Business account, go to the Apple Business portal and open the Devices page.
- Here you first need to add your Apple Customer Number to be able to add devices that you purchased or the Reseller Number so your reseller adds new devices on your behalf automatically.


- As soon as you have added devices to your Apple Business Account, you can assign them to an MDM solution (if you didn't set a default one already), release them from your org for reselling or turn off an activation lock.

- After assigning devices to Intune, they should show up in the Intune portal under Devices -> iOS/iPadOS or macOS.
- If you added an enrollment profile in the previous step, they will also automatically get that profile assigned.

🍎 Managed Apple accounts
Using an Apple device you need an Apple ID. For personal devices, users usually create their own Apple ID, but for corporate devices this is not a good idea. If you allow this, you not only lose control over this part of your identitiy management and the security that this provides, but also create an unnecessary barrier for your users when they enroll their devices. You risk, your data getting out or saved to personal storage or mail accounts, creating potential data privacy compliance issues or simply who pays for needed apps and how this gets handelt by accounting. All unnecessary if you use Managed Apple IDs. This can easily be done by federating your Entra ID with Apple Business. With this your users just use there already existing credentials for there Apple devices.
- Open the Apple Business portal,go to the Settings page and select Domains.
- Here you find your automatically generated apple domain and you can start the federation process by clicking
Get Started.

- Next you select your Identity Provider of choice, in our case
Microsoft Entra IDand selectSign in with Microsoft.
 |  |  |
|---|
- After signing in you need to consent to a view permission for Apple Business and then your Entra ID will be connected (In the Graph request, it is still called "Apple Business Manager").
 |  |
|---|
- Now you see your newly federated domains in the 'Domains' list. Next to these you can click on
Manageto turn on federation for the specific domains.

- In the pop-up window, you can toggle on
Sign in with Microsoft Entra ID.

- Now that your domains are federated, you can set up the Apple Account Format you want to use for the Managed Apple IDs. For that you click
Set Formatunderneath your domain list, next to the Apple Account Format point.

- In a pop-up window you can select a domain and choose between three different formats for the Managed Apple IDs or create a custom one. Then save with
Done.

- To make your Managed Apple IDs work, you still need to activate the directory sync to Apple Business. You can do that directly under the Format options we just set up. This will add your Entra user accounts to the Apple Business People directory automatically and keep them in sync. Click under Directory Sync on the 3 dots to the right and select
Connect.


- And you find your users in the People tab. Your users can start using their Entra accounts now as Apple IDs.


- In the accounts portal, you also find the option to send enrollment instructions for a new Device directly to users, alongside existing Apple Business Manager options like:
- Reset Passcode
- Sign Out Device
- Deactivate Managed Apple Account
 |  |
|---|
🛒 App Store volume purchasing
With Apple Business you can also buy apps and books centrally in volume without the hassle of individual purchases or distributing credit card infos to your users. It’s called the Volume Purchase Program (VPP). It lets your organization retain ownership of purchased apps instead of tying them to individual accounts, making it easy to reassign licenses to other users.
To use the VPP with your MDM you must first connect it. For that you open the Apple Business portal, go to the Settings Page -> Payments & Billing. Here you can activate the Content Token and download the token file (.vpptoken). On this page you would also enter payment information / Store Credit for purchasing payed apps.
TIP
You don`t need to enter any payment information to aquire free apps.

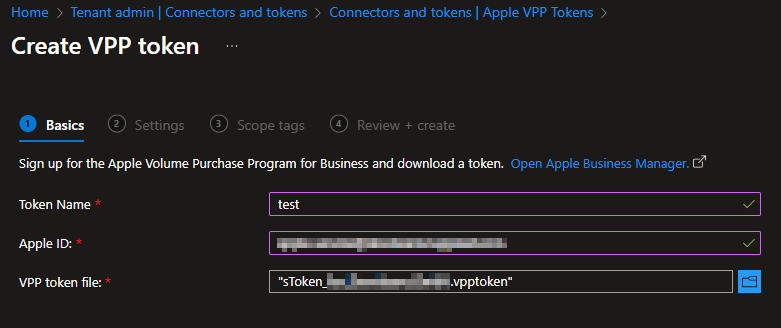
- Now open the Microsoft Intune admin center, go to Tenant administration -> Connectors and tokens -> Apple VPP Tokens and click
Create. - Enter a name for the token, the Apple ID you used to create the token and upload the .vpptoken file you downloaded from the Apple Business portal and click
Next.
- On the next page you choose your Contry/Region and your Type of VPP account (Depending if you use the Apple Business (Business) or Apple School Manager(Education)). In addition to that you can toggle if this token was used before by another MDM solution and Intune should take control (so you can continue using all the licenses seemlessly) and if you like, Automatic app updates. Then you also need to grant Microsoft the permission to exchange data with Apple, so it can send and receive data from Apple Device Management.

- When you proceed to the next pages you can add scope tags and hit
Review + create.
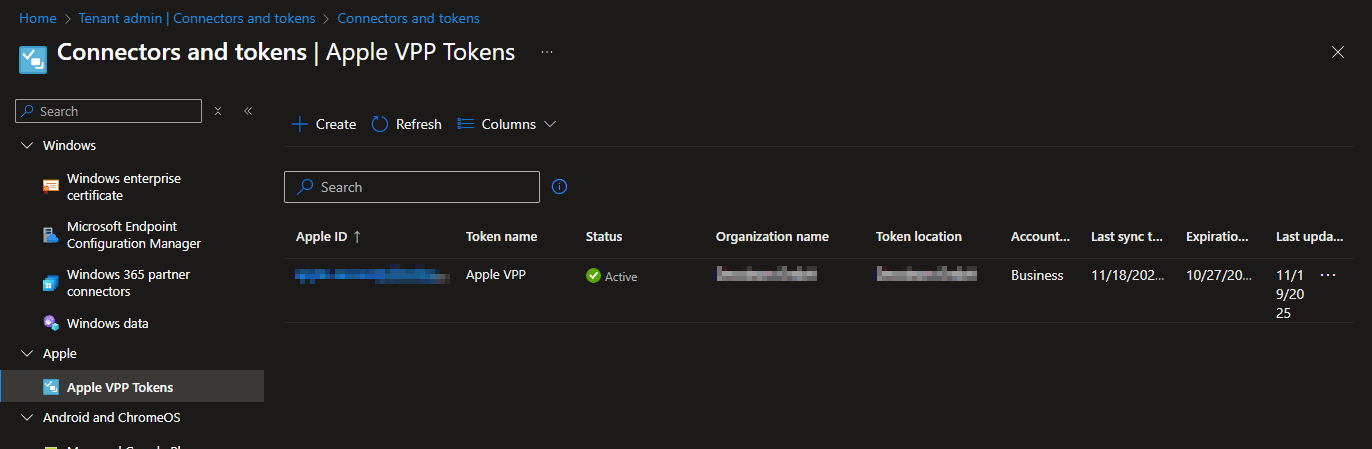
- When you now go back to the Apple Business portal, open the Settings Page and select Payments & Billing again, you can find all your purchases in the Purchase History tab.

- To find and buy new apps, open the Apps & Services page from the main screen and click
View Store. - Here you can view your current apps & books or add new ones. Just enter the name in the search bar, select the Organizational Unit, choose your quantity, and click
Get.

 |  |
|---|
- After every buy the admin gets a mail with a purchase confirmation.

- If you then go back to the Intune admin center the apps will automatically get synced to the Apps page with the Type iOS volume purchase program app (the platform at the start, changes with the type of app you purchased) and you can assign them to your devices or users.

⚙️ Device Management through Intune
With your Apple Account linked to Intune, Managed Apple IDs ready, devices enrolled and VPP connected, the setup is complete!
Moving forward, managing these devices is exactly the same as managing any other corporate Apple device you’ve previously added through Apple Configurator or the Company Portal.

- Go to your Intune admin center -> Devices and select Apple mobile as platform.
- Here you can see reports about your devices and set up:
- Enrollment profiles
- Configuration profiles
- Compliance policies
- Device clean-up rules

INFO
Microsoft is migrating all device configuration settings from Templates to the Settings Catalog, so it is recommended to use the Settings Catalog whenever possible.
Additionally, both Apple and Microsoft are actively promoting Declarative Device Management (DDM) for Apple settings. DDM works similarly to Desired State Configuration (DSC) and provides a more efficient and reliable way to apply and maintain device settings. Whenever supported, it is recommended to use DDM.
➡️ Migrate Apple devices from other MDM's to Intune
When Apple released iOS/iPadOS/macOS 26 in August, they also added an MDM migration functionality as a new feature to Apple Business. That solved one of the main headaches people had with switching MDM solutions in the past. Usually, you had to do a factory reset on the devices before they could be manually re-enrolled. This new migration feature, which is directly built in Apple Business, lets IT admins move devices from one MDM to another without big end-user downtime.
Prerequisites
- Administrator or Device Enrolment Manager permissions in Apple Business
- Intune Administrator or Global Administrator permissions in Microsoft Intune
- Devices with iOS, iPadOS or macOS 26 or later
- Devices need to be enrolled with Apple Business
IMPORTANT
To keep things working smoothly and make it easy for users, it's important that admins make sure Intune uses the same settings as the old MDM and use the Await final configuration setting. This way users don`t need to worry about new settings or a different experience and it makes the migration much smoother. Amending the settings to your liking should then be done gradually in a scond step, to not give the end user too many chances to compain about this whole IT "noncense" 😉 and there constant changes. 
MDM migration - Admin experience
- Document the settings in your old MDM solution.
- Add Intune as a MDM solution to Apple Business as explained above (Connect Apple Business with Intune, Configure automatic enrollment token).
INFO
You can also configure your MDM per device type if you need to use more then one MDM solution in your environment.

- Open the Intune admin center and set up the documented settings from your old solution in Intune and any additional configurations you need (enrollment profiles, compliance policies, configuration profiles, apps, etc.)
WARNING
Please test the migration process before rolling out to your production devices, to make sure your settings in Intune are actually the same as before and the user experience is not negatively impacted.
- Then you can go back to the Apple Business portal and switch the Device Management for your devices to Intune. For that open the Device you want to migrate, select the three dots on the top right and click
Assign Device Management.

- Now select the new MDM, click
Continue, set a migration deadline for the user, clickContinueagain and thenConfirmthe change.
VPP
If volume purchased apps were part of the old MDM deployment, you should not set a migration deadline greater than 30 days so to not run into problems with automatic license queries from app developers.

Notifications
After you set the migration deadline, users receive ongoing re‑enrolment alerts:
- daily until 24 hours before the deadline
- hourly, until the final hour
- during the final hour in 60, 30, 10 and 1 minute intervals.
 |  |
|---|
MDM migration - User experience
TIP
I higly recommend informing your users beforehand about the upcoming notification and clicks they have to do. Even so it is a pretty straight forward process for the user, taking the time beforehand to inform and, depending on your endusers IT affinity, maybe issuing a short one page guide, will save you a lot of helpdesk calls in the end.
- First the enduser gets a push notification on his device that he needs to re-enroll the device.
- When the user clicks the notification and then
Start Enrollmenton mac orStart Enrollmentdirectly on iOS the rest of the process is completly automatic.
| macOS | iOS/iPadOS |
|---|---|
  |  |
- At the end the user will get a notification that the enrollment is complete and thats it for him.

- The admin can now go back to the Intune portal and the device shows under devices, with no difference to any other device that Intune manages.

MDM migration - Volume purchased apps
- You first need to open your old MDM and remove the VPP token there. If you get the option to remove the apps from the devices you should decline that.
- Next you can download the same token from the Apple Business portal again and add it to Intune, as shown above in the App Store volume purchasing section.
IMPORTANT
To make the old token work, you need to toggle the option "Take control of token from another MDM" while adding the token to Intune.
⚙️ Additional Apple Settings
In addition to the previous settings, Apple Business Manager includes several other settings that allow you to further customize and fine-tune your organization's deployment.
Roles & Permissions
- Open the Apple Business portal, go to the Settings Page and select Roles & Permissions.
- Here you can create and assign pre-built and custom roles for the use and administration of Apple Business.
- Managed Apple ID's are automatically assigned to the Staff role.
- The Apple ID you used to create the Apple Business instance, is automatically assigned to the Organization Administrator role.
TIP
As previously mentioned, you should assign the Organization Administrator role to one additional user as a backup, so you can recover access if your initial admin account gets lost.

Beta features
- Open the Apple Business portal, go to the Settings Page and select Beta Features.
- Here you can enroll your organization in beta features that Apple is currently testing. This way you can get early access to new features and test them out before they get generally available.
IMPORTANT
Do not use this for a productive environment. The risk of bugs, issues and security flaws is simply to high.

Organizational Units
- Open the Apple Business portal, go to the Settings Page and select Organizational Units.
- Here you can create Organizational Units to group and organize your Apple Accounts and apps.

- Just click
Add, enter a name, description for the new OU and clickDoneto create it.

Access Management
Under Access Management you can manage which services users can access with there Managed Apple IDs.
- Open the Apple Business portal, navigate to the Settings page and under Access Management, select either Sign in with Apple or Apple Services.
- Sign in with Apple
- Here you can configure the apps, where users are permitted to use "Sign in with Apple" to login with their Managed Apple IDs.

- Apple Services
- Here you can configure the services that users can access with their Managed Apple IDs.

INFO
You can find a complete list of all possible services that support Managed Apple IDs here.
Integrations
- Open the Apple Business portal, navigate to the Settings page and under Integrations, select either API or Partner Access.
- API
- This allows you to give a third-party partners access to manage your brand in Apple Business using an Apple provided API.

- Partner Access
- This allows you to delegate management of your brands, brand features and locations to a third-party partner using the Apple Business portal (e.g. a marketing agency).

Location Reports
With location reports, downloadable reports help you gain a deeper understanding of how people find your brand’s locations and what they do after discovering them.
Location reports include:
- Searches
- Views
- Actions
These metrics are associated with your brand’s locations in Maps.
To find them open the Apple Business portal, go to the Settings Page and select Location Reports.

Legal Terms
On this page you will find the legal terms for use of Apple Business and the related services and features.

Activity Center
The Activity Center is the home of all logs that Apple Business provides from up to 30 days. Here you can follow all actions taken in Apple Business.

Log categories
- Email new sign-ins
- Create new sign-ins
- Update Managed Apple Accounts
- Edit Managed Apple Accounts
- Assign roles
- Delete accounts
- Deactivate accounts
- Reactivate accounts
- Assign devices
- Unassign devices
- Release devices
- Unassign and delete server
- Reassign and delete server
- Accounts federated
- Federation disabled
- Domain collision scan
- Disconnect from source
- SCIM Accounts Provisioned
- SCIM Accounts Deprovisioned
- Sync SCIM Accounts
- Create new verification codes
- Email new verification codes
- Create new Shared iPad passcodes
- Email new Shared iPad passcodes
🏢 Brands
One of the big new features of Apple Business is the possibility to create and manage your own brands on Apple platforms. You can manage how on or more of your Brands appear on Apple Maps, Apple Wallet and Siri, create custom ads and much more.
To add a brand the following information are required:
- Country or region
- Primary category (for example, a restaurant, gym or library)
- Website (it needs to use https://) (alternatively, a Facebook, Instagram or TikTok page)
Additionally you need to decide which kind of brand you want to create:
- Single brand: This is for small businesses or if there is no physical location.
- Multiple brands: This is if you have more then one brand or the same brand in multiple regions.
INFO
Apple verifies and approves the brands and logos you create before you can use them, to make sure they follow their guidelines.
Brand Profile
Adding a brand helps customers discover it across Maps, Apple Wallet, Siri, and more. We start with adding a Brand Profile, which is the basis for everything else.
Start in the Portal
- Open the Apple Business portal and navigate to Brands → Brand Profile.

- Select
Add a Brand, then choose one of the following:Single brandMultiple brands
- Click
Next.

Option A: Add a Single Brand
- Enter the Brand Name.
- Select your Country or Region.
- Choose the Primary Category.
- Add the Brand Website.
- Select whether the brand is owned or franchised, then click
Next.

- Optionally add a Brand Logo (Upload or select from existing photos).

- After that click
Send for Review.

Option B: Add Multiple Brands
- Search for your brand:
- Select them from the list if found.
- If not found, see option A on what Information to enter.
- Select whether each brand is owned or franchised, then click
Send for Review.

Edit Brand Information
- After adding a Brand Profile you can find it and it's Status on the Brand Profile page.

- If you open the Brand Profile you can also edit the information you entered before and configure additional details about your brand.

Asset Gallery
In Apple Business, you can use the Asset Gallery to store, locate, and reuse photos for your organization and its locations. This makes it easy to manage and maintain a consistent visual identity across all your brand's locations on Apple Maps.

Locations
When customers view your location in Apple Maps, they expect details specific to that place. You can:
- Customize place card content
- Upload photos
- Promote items, deals or updates with showcases
Each location is linked to a brand. Brand settings (like name, logo, and cover photo) apply across all locations.
INFO
You can set a unique cover photo for each individual location.
Add a Location (New or Existing)
- Open the Apple Business portal and navigate to Brands -> Locations from the main menu.
- Click
Add a Location.

- Enter the location name and choose an existing one or create a new one.
IMPORTANT
If the location is already managed, continue adding it and request a transfer afterward.
- Enter the address and adjust the map pin if needed. Then click
Next.

- Enter your information and click
Next.- Default language
- Display name
- Primary category
- Status (Open or Opening Soon)
- Phone number (required for new locations)
- Website

- Add your opening hours and click
Next.

- Apple has the Brand pre-selected if you chose an existing one at the start. If you didn't create a Brand Profile before, you can do it now, else click
Done.

- When you open the Location after the creation, you can edit the information, add cover photos, showcases, more photos or insights. This is also the place to manage your ads.

Ads
You can promote your locations by creating or purchasing ads that appear directly on Apple Maps.
There are two ways to set this up:
- From a specific location: Create ads directly within the location you want to promote.
- From the Ads page: Access the Ads section in the main menu. This page serves as a shortcut and will redirect you back to the locations menu, where you can manage your ads.

Branded Mail
Branded Mail allows business owners to customize their emails by adding their company’s logo and name, improving brand recognition.
Important
Customers can only see the branded part of your emails on iPhone and in iCloud Mail on the web.
- Open the Apple Business portal and navigate to Brands -> Branded Mail from the main menu.
- Click
Set up Branded Mail.

- Create a new brand or select an existing one.

- Add your domain or email address and click
Done.- If you already set up Federation with Entra ID, you can select the synced domains here.
- If you want to add a new domain, you need to copy the TXT record to your DNS to verify it.

Tap to Pay on iPhone
Tap to Pay on iPhone lets you accept contactless payments directly on your iPhone, no extra hardware needed. Take payments from cards, Apple Pay, Apple Watch, and other digital wallets using a supported App Store app.

INFO
As you can see, you need a merchand ID from your payment service provider to use this feature.
Verify with Wallet
Verify with Wallet on the Web lets users securely share ID info from Apple Wallet or other wallets for fast, seamless online verification, eliminating user unfriendlysteps like document scans or selfies.
Eligible Categories
The following Apple Business categories can use Verify with Wallet on the Web:
- Services
- Financial
- Government
- Rentals
- Car
- Scooter
- Purchases
- Alcohol (order ahead and delivery)
- Access (physical security)
- Air travel
- Gig economy
- Healthcare
- Hospitality
- Insurance
- Ticketing

INFO
As you can see, you need to be verified to own your brand and be in an eligible category to use this feature.
💡 Conclusion
Apple Business combined with Intune provides a comprehensive, modern platform for managing Apple devices and brands at enterprise scale. From device enrollment through brand presence across Apple Maps, Wallet, and Siri, this integrated approach gives organizations complete control over their Apple ecosystem.
Core Device Management Benefits
- Automated Device Enrollment: Devices from resellers or carriers are assigned and enrolled automatically, eliminating manual setup steps.
- Apple Built-in Device Management: Create blueprints with policies, apps, and user assignments directly in Apple Business for streamlined configuration.
- Managed Apple IDs: Federation with Entra ID lets users sign in with familiar corporate credentials while maintaining organizational control.
- Centralized App Licensing: VPP simplifies app distribution, licensing, and reassignment across iOS, iPadOS, and macOS.
- Seamless MDM Migration: Move devices from legacy MDM solutions without factory resets, maintaining user productivity and minimizing downtime.
Brand and Business Presence
- Brand Management: Control how your organization appears on Apple Maps, Apple Wallet, and Siri.
- Location Management: Customize business location details with photos, hours, and contact information.
- Apple Ads: Promote locations directly through Apple Maps advertising.
- Specialized Features: Tap to Pay on iPhone and Verify with Wallet extend your business capabilities on Apple devices.
Why Choose Intune
- Direct partnership with Apple ensures rapid support for latest features, often released simultaneously.
- Continuous feature expansion for Apple devices including security capabilities like LAPS.
- Single pane of glass for all endpoint management (Windows, iOS, iPadOS, macOS).
- M365 licensing often includes necessary Intune capabilities without additional cost.
- Integrated security and compliance with Microsoft Defender and Conditional Access.
Administrative Control and Flexibility
- Role-based access management with custom role creation.
- Organizational units for grouping accounts, devices, and apps.
- Access management controls for Sign in with Apple and Apple Services.
- Detailed activity logging and audit trails.
- Beta feature access for early adoption and testing.
Whether you're deploying your first managed Apple devices or migrating from another solution, Apple Business with Intune delivers the tooling, scalability and integration needed for modern endpoint management in a cloud environment.
References
- Apple Support - Apple Business User Guide
- Apple Support - Migrate managed devices to another device management service
- Microsoft Tech Community - Apple making device migration to Microsoft Intune easy with upcoming OS 26 release
- Microsoft Learn - Enrollment guide: Enroll Apple mobile devices in Microsoft Intune
- Microsoft Learn - Add iOS Store Apps to Microsoft Intune