
Windows 365 Configuration
👋 Introduction
Windows 365 is Microsoft’s cloud-based Desktop-as-a-Service (DaaS) offering. It provides fully managed virtual PCs hosted in the cloud, which users can access from any device with an internet connection.
To learn more about what a Cloud PC or Windows 365 is or how it compares to other DaaS solutions, look at this article.
In the following guide I will go trough the configuration, provisioning and user experience of Windows 365.
To use Windows 365 Business, you only need to buy the license and assign it to a user in the M365 Admin Center -> Billing -> Licenses. You can not manage it and therefore no configuration of the Cloud PC itself is needed.
Network Requirements
The following URLs and Ports are needed to provision Cloud PCs and complete the Health Checks:
- *.infra.windows365.microsoft.com
- *.cmdagent.trafficmanager.net
Registration Endpoints
- login.microsoftonline.com
- login.live.com
- enterpriseregistration.windows.net
- global.azure-devices-provisioning.net (Ports 443, 5671 outbound)
- Various hm-iot-in-prod & hm-iot-in-2/3/4-prod endpoints (Ports 443, 5671 outbound)
All endpoints use port 443 unless differnetly specified
Port 3389 is disabled by default on Windows 365 and is recommended to stay that way. Do not use this port to access the Cloud PC`s.
You can learn more about all current network requirement here.
📥 Provisioning
Windows 365 Enterprise, Flex, Reserve and Link are managed through the Intune admin center.
Update 01.06.2026
Windows 365 Frontline is now named Windows 365 Flex.
If you got no licenses in your tenant, you can not start with the configuration.

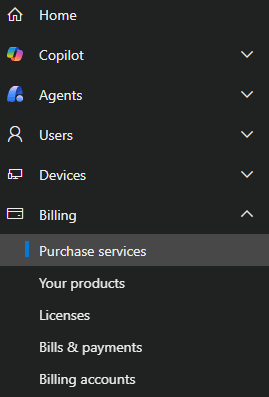
- To start provisioning Licenses you first need to buy some or start a trial. You can do that by going to the Microsoft 365 admin center and select Marketplace or if this is not shown in your side panel you open Billing and select Purchase services. There you can just search for the Windows 365 product you want and get it as a purchase or trial.
 |  |
|---|
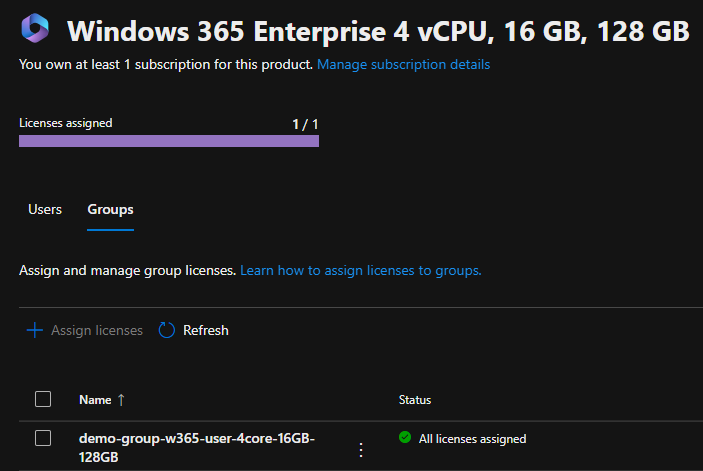
- Now that you got the license you can start with the provisioning. For that you open Billing and select Licenses.

- Click on the Windows 365 License in your list and select
+ Assign licenseeither in the Users or Groups tab and assign it to the identity you want to access the Cloud PC with.
⚙️ Configuration
Prerequisites:
- Access to the Intune admin portal
- Entra roles: Global Administrator, Intune Administrator or Windows 365 Administrator
To set up Windows 365, there are four configuration areas where you can define settings:
- Provisioning policies: Control how the Cloud PC is created and set up.
- Custom images: Create and use a custom Windows image from an Azure Image Gallery for new Cloud PCs.
- Azure network connection: Connect an Azure virtual network (VNet) for Cloud PC networking.
- Settings: Manage user-related settings for Cloud PCs.
In addition you should set up a device group to better assign your policies.
- First you open the Intune admin portal -> Devices -> Manage Windows 365 Cloud PCs -> Cloud PC Overview, where you can see the Overview of the current Windows 365 status and get started.

- If you select All Cloud PCs or All Cloud Apps, you will get a list of all the current Cloud PCs and Remote Apps and there status.


Provisioning policies
- To create a provisioning policy you select Provision Cloud PCs and click
Create policyon the Provisioning policies tab.

- On the first page you enter the policy name, description and select the Cloud PC experience and type you need.
- Experience
- Full Desktop
- Remote App
- Type
- Enterprise
- Flex
- Reserve (So new it is not on the screenshot.)
- Experience
- Next you select the Join type details.
- Join type
- Entra Join
- Hybrid Entra Join
- Network
- Microsoft hosted network
- Azure network connection
- Entra single sign-on
- Join type

Network connection
If you select Microsoft hosted network Microsoft will take care of the needed Network architecture. Additionally since December 2025 you can utilize a 3 tiered region level.
- Geography level (Level 1): Selects all regions in the whole Geography.
- Region group level (Level 2): Selects a specipic supgroup of that Geography, for data boundary requirements for example.
- Region level (Level 3): Selects a specific region.
The Cloud PCs will then get provisioned only in the selected regions and you can also select your own custom selection of regions out of a Geography. You can also set your Region selection to auto. That means Microsoft automatically spreads your devices through the Geography dependend on the best availability. So that also means, if there is an outage in a Region your Cloud PCs will get automatically set up in another region, without you needing to do anything and new regions will automatically get utilized.

If you select Azure network connection Cloud PCs will use a prior set up Vnet from your Azure supscription that you connected through the Azure network connection tab. With this you got the complete control over the network infrastructure and can connect Cloud PCs to your existing environment, without going through the internet. This is mandatory for Hybrid Entra joined Cloud PCs.
If you select Flex as License type you can additionally select if you want to utilize Dedicated or Shared mode.
INFO
Be aware that selecting Access only apps which run on a Cloud PC always means you run Windows 365 Flex in Shared mode.

- Then you click
Nextand select the Image type on the next page. You can select from a few Microsoft provided gallery images or use a Custom image you set up in the Custom image tab.

- Now click
Nextagain and you get to the Configuration tab. Here you can set the following:- The Language the Cloud PC will use.
- A possible custom device naming template.
- If you want to use Autopilot device preperation. (This makes it easy to get the device directly set up the way you need it. With scripts and apps, ready for the user to log in.)
- If you want to utilize Windows Autopatch to automate Windows updates on your Cloud PCs.

Experience Sync
If you create a profile for a Windows 365 Flex Cloud PC in shared mode, you can addtionally select the new Experience Sync option. This new Feature (November 2025) will act as a quasi FsLogix(What is FsLogix?) for your Cloud PCs. With this the Windows personalization, user settings, application settings and application data will be saved between sessions. This provides a better user experience, despite Flex shared mode resetting the Cloud PC after logoff.
You can activate it in the Configuration settings and set the amount of storage you want to give each user for that.

- After the configuration you click
Nextagain, enter your Scope tags, set the Assignment to the device group you created and thenReview + createit.
Update 08.06.2026
The built-in administrator account is no longer automatically created during Cloud PC provisioning for Windows 365 Enterprise, Windows 365 Flex (Dedicated and Shared), and Windows 365 Reserve. This change makes things easier for customers to improve security by getting rid of a well known privileged account that isn't used.
Custom images
- To add a custom image select Provision Cloud PCs and go to the Custom images tab.

When you then click
Add, you can select between aManaged imageand anAzure compute gallery image.Next a flyout window opens where you can select the following:
- An image name.
- The version of your image (So you can see which image is used here and used in which Cloud PC. This gives you a better understanding of your image lifecycle.)
- The subscription where your image gallery is located.
- The source image / Azure compute gallery image you want to use.
| Managed Image | Azure Compute Gallery Image |
|---|---|
 |  |
- After that you just add the image.

INFO
You can not add a new Azure Compute Gallery image if Trusted Launch is not selected.
Azure network connection
- To add a custom network connection you select Provision Cloud PCs and go to the Azure network connection tab.

When you click Create you can either add a connection for Microsoft Entra join or Hybrid Microsoft Entra join. For both you need to meet a few requirements.

Requirements for Entra joined Cloud PCs:
- Azure Virtual Network: Must be in the same region as the Windows 365 desktops.
- Network Bandwidth: Make sure the network has enough bandwidth for your needs.
- Subnet and IP Address Space: A subnet in the VNet with enough available IP addresses.
Additional requirements for Hybrid Entra joined Cloud PCs:
- DNS Resolution: The VNet must be able to resolve AD DNS records.
- Domain Controller Access: The VNet must have network connectivity to a domain controller.
- For an Entra join network you just enter a name and then select the VNet and Subnet from your existing subscriptions. For Entra hybrid join, you also need to add your domain info one tab later (The domain user needs to have the apropriate permissions to add devices).
 |   |
|---|
- After that you click
Next, enter scope tags if needed and then create the connection.

- This will now trigger a connection check that can take a few minutes to complete, to check if your connection is legit.

- After the fact you can click on the
Statusand look at the checks that where performed. In the case of a failure, you can also find the problem in here.

INFO
You can add up to 50 network connections to your Windows 365 environment.
Settings
- To create a settings policy you select Cloud PC Settings and click
Create.

Here you select between the following settings types:
- Cloud PC configurations
- Windows App settings
- Remote Connection Experience
- User settings
Cloud PC configuration
In the Cloud PC configurations you can turn on Copilot + PC AI features.
INFO
This feature will be set after the initial propvisioning of the cloud PC and needs at least a "8 vCPU / 32GB RAM / 256GB Storage" Machine.
It will take around 48 hours to activate and needs the Windows Insider Program at the moment. Learn more here.
- Just add the Name and Description in the first tab, click
Nextand then in the Configuration settings tab, you enable the AI-enable features setting. - After that click
Nextagain, enter Scope tags you need, create the assignment to a group of users and thenReview + createthe settings policy.

You will be able to verify if it worked in the Overview of your Cloud PC.

Windows App settings
In the Windows App settings you can set the behaviour of the Windows App or Windows web portal for your users.
- Enter a Name and Description first and then on the second tab you can set the following settings:
- Enable users to reset their Cloud PCs: Enabling this shows the option for users to reprovision their Cloud PC.
- Allow users to initiate a Restore: Enabling this shows the option for users to initiate restores of their Cloud PC.
- Enable users to provision new Cloud PC instances: Enabling this allows users to provision there own Windows 365 Reserve PC.

- After that click
Nextagain, enter Scope tags you need, create the assignment to a group of users and thenReview + createthe settings policy.
INFO
These settings will override the User settings, if they conflict.
Remote Connection Experience
In the Remote Connection Experience the admin configures the settings for the remote connection itself.
- Enter a Name and Description first and then on the second tab you can set the following settings:
- Input protection: Prevents local input (keyboard, pen, etc.) from reaching the remote session. Only in-session input is accepted, enhancing isolation and reducing interference risk.

- After that click
Nextagain, enter Scope tags you need, create the assignment to a group of users and thenReview + createthe settings policy.
INFO
The Remote Connection Experience settings apply at the moment the user connects to the Cloud PC.
User settings
In the User settings you set up the behavior of the users that sign-in to your Cloud PCs.
INFO
These settings take effect at the moment of sign-in to the cloud PC. They have no effect on already signed-in users.
In addition, these settings have no effect on Flex devies in shared mode.
- First enter the name of your settings policy and then, you can set the following settings:
- Enable local admin: Elevated user to local admin on the Cloud PC.
- Enable users to reset their Cloud PCs: Enables a reset option in the Windows App, that lets the user reset / wipe and reprovision the Cloud PC (delets all user data and apps).
- Allow user to initiate restore service: Allows the user to restore the Cloud PC to any available backup.
- Frequency of restore-point service: Sets the time gap between restore points (4, 6, 12, 16 or 24 hours).
- Cross region disaster recovery configuration: Lets you protect Cloud PCs during regional outages (needs an additional license). You can select: None, Disaster Recovery Plus or Cross Region Disaster Recovery (Learn more here).
 |  |
|---|
- After that click
Next, create the assignment to a group of users and thenReview + createthe user settings.
Windows 365 Boot
Windows 365 Boot allows users to bypass the need to sign in to their physical device, enabling them to sign in directly to their Windows 365 Cloud PC after boot.
Authentication Methods
| Authentication | Dedicated mode supported | Shared mode supported |
|---|---|---|
| Username/password | ✅ | ✅ |
| Windows Hello for Business | ✅ | ❌ |
| FIDO key | ✅ | ✅ |
| Convenience pin | ❌ | ❌ |
- You can start the guided setup directly from the Overview page in the Intune admin portal -> Devices -> Device onboarding -> Windows 365, where you find it at the bottom under Windows 365 Guides -> Windows 365 Boot.

- The first page explains what Windows 365 Boot is and what will be configured in this profile. You just click
Nextto continue.

- After that you come to the Basics tab, where you can set the following options:
- Device name template
- Name
- Description
- Shared PC mode / Dedicated PC mode
And you get the Information about the ressources this guided setup will create for you. Now click Next to continue.

- In the Endpoint updates tab you set up the update behavior of the physical device, you use to access the Cloud PC. After that click
Nextto continue.

- In the Settings tab you can set up the following options:
- VPN profile
- Wi-Fi profile
- OS language
- Security baseline (This is for the physical device, not the Cloud PC)
- Connection Timeout
- Personalization (Shared PC mode only)
- Company name
- Company logo URL
- Lock screen Image URL
WARNING
If you select a VPN or Wi-Fi profile here, that is already assigned to all users or all devices, the guided setup will replace that assignment with the assignment from the guided setup.
| Dedicated mode | Shared PC mode |
|---|---|
 |  |
- If you then click
Nextyou will come to the Assignments tab, where you can first choose a deivce group to assign the profile to and then decide if users (also which users) should still be able to access the local device or only the cloud PC. To learn more about restricting access to the local device look here.

- When you now click
Nextagain you come to the Review + create tab, where you will be informed again which ressources the guided setup will create.

- Windows 365 App
- Windows 365 Boot Enrollment Status Page Profile
- Windows 365 Boot Autopilot Profile
- Windows 365 Boot Device Configuration Policy
- Windows 365 Boot Windows Update Policy
Other Settings
There are a few other things you can set up or need to know regarding the configuration of Windows 365.
RBAC
First regarding automatic configurations.
If you connect Images or Network connections to your Windows 365 environment, the system will automatically set up the apropriate RBAC role asignments in your Azure ressources to give Windows 365 the permission it needs. But these Role assignment will not be removed automatically, if you delete the Image or Network connection again.

Configuration Settings
Secondly there are a lot of configurations you can set up to customize the Cloud PC experience even more. You can use the same controls you used for RDP connections in the past.
The following example demonstrates how to enable USB redirection. This allows the use of USB devices such as FIDO security keys.
- To create a configuration you go to the Intune admin portal -> Devices -> Configuration, where you click create
+ Create->+ New Policyto create a new configuration. - Select
Windows 10 and Lateras Platform andSettings catalogas Profile type and then clickCreate. - Enter a Name and Description for your profile and then click
Nextto continue. - If you now click on
+ Add settingsyou can search for the Do not allow supported Plug and Play device redirection setting, activate it and set it toDisabled.
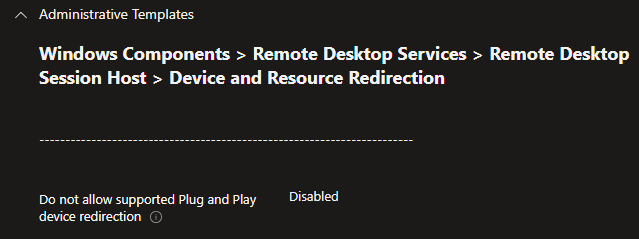
- Click
Nextagain, enter Scope tags if needed, clickNextagain, set the Assignments to the Windows 365 device group you created at the start and thenReview + createthe settings profile.
Next we need to create the setting to allow redirection on the local device, that connects to the Cloud PC. You can create that manually in your local Group Policy Editor to test or also through Intune.
- To create the setting through Intune follow the same steps as before and search for the setting Allow RDP redirection of other supported RemoteFX USB devices from this computer and set it to
Enabled. To create the setting manually open the Group Policy Editor (just search for group policy in Windows) on your local device and navigate to Computer Configuration -> Administrative Templates -> Windows Components -> Remote Desktop Services -> Remote Desktop Connection Client -> RemoteFX USB Device Redirection and set the setting there.

Once both settings have taken effect and you have connected to your Windows 365 machine, an additional symbol will appear in the connection bar, allowing you to activate or deactivate individual USB devices.

🗄️ Windows 365 Reserve
Windows 365 Reserve lets organizations give employees up to 10 days of Cloud PC access per year with an annual license. Cloud PCs are set up only when needed, what is cheaper and simpler then keeping physical loaner devices around and ship them through the lands.
There are a few important things to understand about Windows 365 Reserve licensing, as these will impact whether it is a good fit for your needs.
First, Windows 365 Reserve licenses must be purchased through Microsoft Sales and can not be gotten directly through the Microsoft Admin Center. The licenses apply at the tenant level and are not assigned in the Microsoft 365 admin center. Instead, they are applied when you create provisioning policies in Intune and assign those policies to a user group.
To cover users with Windows 365 Reserve, each user must already have the required base licenses, either standalone or as part of a bundle:
- Windows 11 Enterprise or Windows 10 Enterprise
- Microsoft Intune
- Microsoft Entra ID P1
The cost for Windows 365 Reserve is 20 $ per user per year (November 2025).
A few important additional points:
- Microsoft recommends purchasing one Windows 365 Reserve license for every user you want to cover
- Reserve licenses cannot be shared or pooled across users
- After a Windows 365 Reserve license is assigned through a provisioning policy, the user’s Cloud PC can be provisioned only after a seven-day waiting period.
So what that all means in practice is the following:
- You contact you Microsoft sales rep and buy the needed amount of Windows 365 Reserve licenses.
- These will then be provisioned to your tenant and visible in the Microsoft 365 admin center.
- Now you create a user group with the users that you want to cover (should be the amount of licenses you bought).
- Then you create a provisoning policy for Windows 365 in Intune and select Reserve as License type.
- In the Assignment tab of the provisioning policy you select the user group you created.
- When you then click on the provisioning policy, you will see all the users in the Cloud PC users tab.
- You now wait 7 days.
- After you can go back to the provisioning policy, click on the user and then click
Provision. - Now the Reserve Cloud PC will be ready in now time for the user.

- If you want to learn more about Windows 365 Reserve click here.
- If you want learn more about the licensing click here.
My Opinion
In theory, Windows 365 Reserve is a great product, but the convoluted licensing process and the hoops you have to jump through to provision it make it basically unusable for most companies. The hoops are clearly only there to prevent you from sharing licences across users or giving them to short-term personnel, such as contractors.
But this is exactly the main use case, in my opinion! I want a pool of reserve licences so that I always have a cloud PC on hand in case a physical device breaks. However, licensing basically my whole company or creating a two-class system of haves and have-nots is not realistic. I would still need physical loaner devices, so the whole point of Windows 365 Reserve would be lost.
So, I think Microsoft will test the waters again here, and hopefully reshape the licensing model in the end to give this great idea a chance to succeed.
⭐ User Experience
To access your Cloud PC there are multiple options. Following you find an Access Matrix where you find which access method is available for which license type and then a Feature Matrix where you find which features are available on which client.
Access Matrix
| Access | Business | Enterprise | Flex | Reserve |
|---|---|---|---|---|
| Windows App | ✅ | ✅ | ✅ | ✅ |
| Web Client | ✅ | ✅ | ✅ | ✅ |
| RDP Client (MSTSC) | ✅ | ✅ | ❌ | ❌ |
| LG Web OS | ✅ | ✅ | ❌ | ❌ |
| Windows 365 Boot | ❌ | ✅ | ✅ | ✅ |
| Windows 365 Link | ✅ | ✅ | ✅ | ✅ |
Support for the RDP Client will end March 27, 2026.
Client features
| Feature | Windows RDP Client (MSTSC) | Windows App | macOS | iOS / iPadOS | Android / Chrome OS | Web browser |
|---|---|---|---|---|---|---|
| Keyboard | ✅ | ✅ | ✅ | ✅ | ✅ | ✅ |
| Mouse / trackpad | ✅ | ✅ | ✅ | ❌ | ❌ | ✅ |
| Touch | ✅ | ✅ | ❌ | ✅ | ✅ | ✅ |
| Pen | ✅ | ✅ | ❌ | ✅ | ✅ | ✅ |
| Serial port | ✅ | ✅ | ❌ | ❌ | ❌ | ❌ |
| USB | ✅ | ✅ | ❌ | ❌ | ❌ | ❌ |
| Cameras | ✅ | ✅ | ✅ | ✅ | ✅ | ✅ (preview) |
| Clipboard – bidirectional | ✅ | ✅ | ✅ | Text, images | Text | Text |
| Clipboard – unidirectional¹ | ✅ | ✅ | ✅ | Text, images | Text | Text |
| Local drive / storage | ✅ | ✅ | ✅ | ✅ | ✅ | ✅² |
| Location | ✅³ | ✅³ | ❌ | ✅ | ❌ | ✅ |
| Microphones | ✅ | ✅ | ✅ | ✅ | ✅ | ✅ |
| Printers | ✅ | ✅ | ✅⁴ | ❌ | ❌ | ✅⁵ |
| Scanners⁶ | ✅ | ✅ | ❌ | ❌ | ❌ | ❌ |
| Smart Cards | ✅ | ✅ | ✅ | ❌ | ❌ | ❌ |
| Speakers | ✅ | ✅ | ✅ | ✅ | ✅ | ✅ |
- macOS support is native in the Remote Desktop client. All other platforms require remote session configuration.
- Limited to uploading and downloading files through a web browser.
- From a local device running Windows 11 only.
- The Remote Desktop client on macOS supports the Publisher Imagesetter printer driver by default (CUPS only).
- PDF printing only.
- High-level redirection of TWAIN scanners is not supported.
- The best option for accessing your Cloud PC on Windows is to use the Windows App and if you're not using Windows, you can also access it via the Browser at https://windows.cloud.microsoft/.
- Here you will find your assigned and provisioned Cloud PCs after sing in.
- Clicking the three dots on the right of your Cloud PC card allows you to perform various actions, such as restarting or restoring the Cloud PC, or accessing the settings.

- For accessing, you just click
Connect.
INFO
The first sign-in can run a little longer then normal.
📑 Reporting
To get a handle on the status of your Windows 365 devices, there are lots of options to look at.
IMPORTANT
This reporting is only available for Windows 365 Enterprise, Windows 365 Flex or Windows 365 Reserve licenses. Windows 365 Business is not managed through Intune and therefore has not these specific reporting options.
Windows 365 tab
- Firstly, to get an Overview about your current W365 devices and W365 cloud apps, you can look at the Overview, All Cloud PCs and All Cloud Apps pages in the Intune admin portal -> Devices -> Device onboarding -> Windows 365.
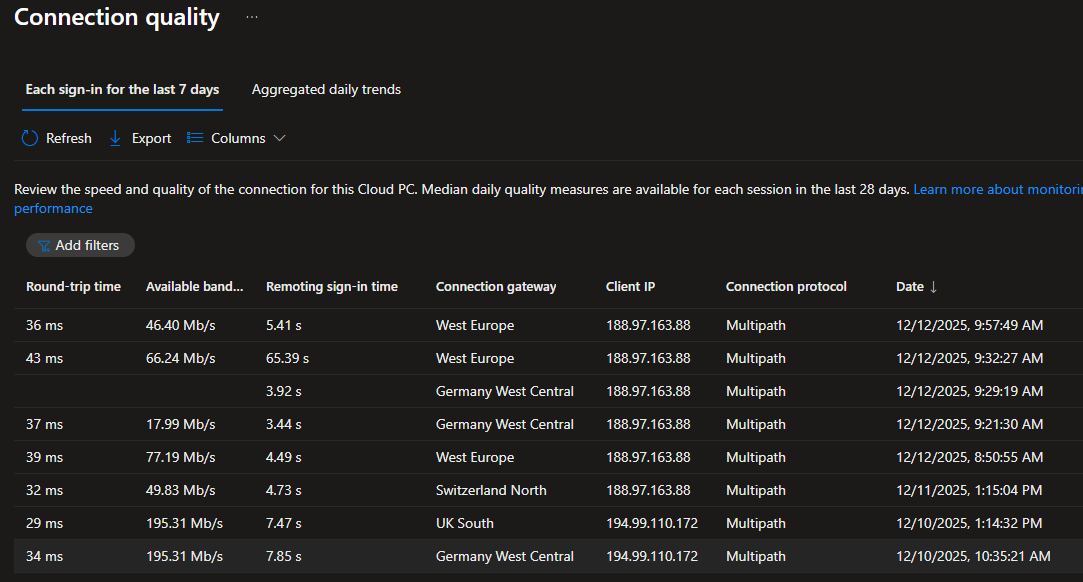
- On the same Overview page you find the Connection Quality Report. This report gives a great overview regarding connection speeds, bandwidth, gateway locations and more.

- On the Overview page you also find the Resource Performance report, which is a shortcut to the Endpoint analytics Resource Performance report. This report gives you a comparision view, how your devices are doing in the ressource department. To see only the Cloud PCs you can set up a Device scope.

Device Overview
- You can find the most basic overview directly in the Intune admin portal under the Device Overview.

- Or you can find a report on Cloud PC device actions (Restarts, Wipes and so on) under the Monitor section.

Reports section
Cloud PC overview
- In depth Windows 365 reports can be found in the Intune admin portal -> Reports under the Cloud PC overview. As well as the report on Connection quality, you will find many other useful reports, such as an overview of the status of your new Windows 365 Reserve licences or an overview of your AI-enabled (Copilot + PC) Cloud PCs.

- The first report I want to highlight is the Cloud PC utilization report, which gives you a great overview on how high the utilization of your Cloud PCs actually is. This will give you a better idea of whether you have the right number of Cloud PCs and whether you have enough of them.

- The second report to highlight is the Cloud PC recommendations report, which gives you even more information about your Cloud PC sizing and also provides recommendations on how to optimize the usage.

Cloud PC monitoring
In the Reports section you get a new tab called Cloud PC monitoring, where you can find a lot of usefull metrics about Cloud PC health and usage.

- On the Connection health tab you find connection counts and trends.

- On the User and devices tab you can select a user / device and see there connection history and counts.

- On the Configuration Monitoring tab you find connections based on the clients that connected.

Individual device section
- Next you can get a lot of Windows 365 specific information directly from the individual device page in Intune. Like that it is in fact a Cloud PC, which size it has and if it is AI-enabled.

- Next to that you find 2 special tabs in a Windows 365 device page. The first is the Performance tab, where you can find detailed reports about the connectivity status, the connection quality and the connections your users made.

- The first of these performance reports is listed under Connectivity status, but if you open the report you will find a Connectivity history with timestamps and statuses of connection activities.

- The second performance report is listed under Connection quality. Here you find really detailed information about all the connections that where made in regards to there latency, speed and more.
 | 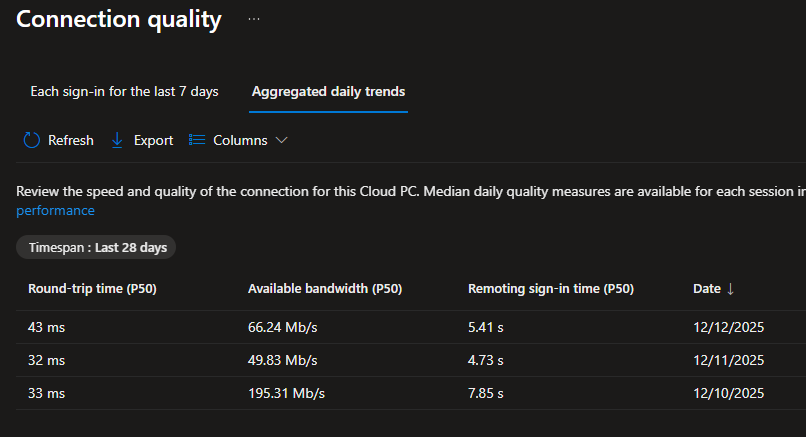 |
|---|
- The third and last performance report is listed under Time connected and this is what it shows (even so the report is named Session Performance).

- Now at last, the second special tab is the Restore points tab, where you can find all the restore points that are available for this Cloud PC, with the possebility to restore.

🕵️ Digital forensics
Digital forensics is the systematic process of identifying, preserving, analyzing, and presenting digital evidence to investigate incidents such as cybercrime, fraud or data breaches.
As part of managing your devices, you may sometimes need to submit a device for digital forensics. Windows 365 makes this possible by allowing you to place a Cloud PC under review.
When a Cloud PC is placed under review, Windows 365 securely saves a snapshot of the Cloud PC to your Storage account. Once the snapshot is transferred, it fully belongs to you and is not managed by Microsoft anymore.
- To do that, you just go to the Intune admin portal -> Devices -> Windows and open the Cloud PC you want to place under review.
- Now you click on
...at the top right and then onPlace Cloud PC under review.

- That will open a flyout on the right side, where you can select a Storage account from your Subscription.

💡 Conclusion
Windows 365 offers a flexible and modern approach to desktop-as-a-service, whether you're looking to support a small team or an entire enterprise. It is not a catch-all solution, but ideal for supporting specific scenarios like temporary staff, contractors or remote workers without risking data leaving your environment or compromising security. In addition it provides great resilience without the need to manage your own worldwide infrastructure.
The key to a successful Windows 365 deployment is starting with a clear understanding of your requirements. Consider which type best fits your use case, Business for simplicity, Enterprise for full control, Flex for frontline staff or Reserve to guarantee access.
Remember that Windows 365 is continuously evolving with new features like Experience Sync or AI-enabled capabilities. Stay informed about updates and regularly review your deployment through the available reports to ensure you're getting the most value from your investment.
References
- Windows 365 Experience Sync
- RDP USB Redirection
- Enhance Microsoft Hosted Network Cloud PC Resiliency with Multi-Region Selection
- User Experience Sync for Windows 365 Frontline in shared mode
- What is Windows 365 Boot?
- Compare Windows App features across platforms and devices
- Introducing the new Windows 365 monitoring and reporting platform
- Remote connection experience